Amazon’s custom-built Graviton processor allows users to create ARM instances in the AWS public cloud, and Rancher K3s is an excellent way to run Kubernetes in these instances. By allowing a lightweight implementation of Kubernetes optimized for ARM with a single binary, K3s simplifies the cluster initialization process down to executing a simple command.
In an earlier article, I discussed how ARM architecture is becoming a rival to x86 in cloud computing, and steps that can be taken to leverage this situation and be prepared for this new era. Following the same narrative, in this article I’ll look at an example of the Calico eBPF data plane running on AWS, using Terraform to bootstrap our install to AWS, and Rancher K3s to deploy the cluster.
A few changes to Calico are needed for ARM compatibility, including updating parts, enabling eBPF, and compiling operators for the ARM64 environment:.
- Tigera Operator – Tigera Operator is the recommended way to install Calico.
- go-build – go-build is a container environment packed with all the utilities that Calico requires in its compilation process.
- Calico-node – Calico-node is the pod that hosts Felix (i.e. it is the brain that carries control plane decisions fto your cluster).
Let’s discuss how to run an ARM-powered Kubernetes cluster equipped with Calico for security and eBPF as the data plane.
What is eBPF?
eBPF is a virtual machine embedded within the Linux kernel. It allows small programs to be loaded into the kernel, and attached to hooks, which are triggered when some event occurs. This allows the behavior of the kernel to be customized. While the eBPF virtual machine is the same for each type of hook, the capabilities of the hooks vary considerably. Since loading programs into the kernel would otherwise be a security risk, the kernel runs all programs through a very strict static verifier; the verifier sandboxes the program, ensuring it can only access allowed parts of memory and ensuring that it terminates quickly.
Calico’s eBPF data plane makes use of BPF functionality to allow source IP preservation, Direct Server Return (DSR) and even better performance. A full explanation of eBPF and its capabilities is out of the scope of this article, but if you are interested in learning more you can check out this post, which talks about eBPF capabilities and why you should use it.
Performance
Calico eBPF data plane is an alternative to Calico’s standard Linux data plane (based on iptables) that pushes the performance limits further. Calico leverages BPF programs to process packets rapidly and efficiently without ever leaving the packet processing context of the Linux kernel. The efficiency achieved by this method is close to natively compiled code in the kernel.
Benchmarks can help determine if a technology can live up to its promises. Although numbers might differ in various environments, the end result should be similar in most cases.
Both data planes are capable of pushing data close to the maximum available bandwidth of the wire. In this case, after 10 seconds, we can see the maximum bandwidth was reached.

The chart below shows the total CPU utilization consumed by the benchmarks, measured in vCPUs. This is the sum of both client and server CPU utilization.
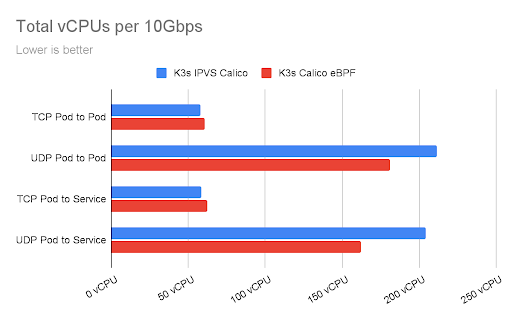
These statistics were collected using two A1.xlarge instances, this K8s benchmark suite, and multiple instances of iperf with parallel connections to each other. Note that AWS has a limit on single flows of traffic between EC2 instances that limits this type of traffic to 5Gbps.
Demo
This section provides you with the steps necessary to deploy a Rancher K3s ARM-based cluster equipped with Calico’s eBPF data plane on AWS public cloud infrastructures.
Before we begin
This demo section uses A1 instances from Amazon. In addition to an Amazon account, make sure the following applications are installed on your system:
Cluster preparation
Use the following command to download the Terraform template cluster:
git clone https://github.com/frozenprocess/demo-cluster.git
Browse to the calico-k3s-aws folder within demo-cluster:
cd calico-k3s-aws
Inside the calico-k3s-aws folder, you will find an example variable file called terraform.tfvars-example. Removing the example suffix from this file provides an easy way to modify some of the attributes of the cluster that will be deployed using Terraform.
For this example, since our document focuses on setting up an ARM environment, you need to modify the following values accordingly:
availability_zone_names = ["us-west-2a","us-west-2c"]
image_id = "ami-06d1fcb7a93046a55"
instance_type = "m6g.large"
us-west-2a and us-west-2c availability zones.Terraform uses “providers” in order to connect to a variety of environments. Use the following command to download the “providers” related to this demo:
terraform init
Now that our Terraform project is ready, use apply to populate the resources. Two vanilla Ubuntu EC2 VMs, one VPC, one IGW, two subnets, and one default route will be created after running the following command.
terraform apply
There should be an output similar to the following after a successful deployment:
instance_1_private_ip = "172.16.2.183"
instance_1_public_ip = "34.219.2.61"
instance_2_private_ip = "172.16.1.81"
instance_2_public_ip = "54.187.109.181"
K3s server installation
K3s server is the process that plays the role of control plane. This installation process creates important files that are crucial in controlling and maintaining the cluster.
Use instance_1_public_ip value and the calico-demo.pem file to connect to instance one.
ssh [email protected] -i calico-demo.pem
K3s’s single binary approach provides a nearly magical experience for installing a cluster. Simply run the following command and the cluster will be ready in a matter of seconds!
curl -sfL https://get.k3s.io | INSTALL_K3S_VERSION=v1.21.3+k3s1 K3S_KUBECONFIG_MODE="644" INSTALL_K3S_EXEC="--flannel-backend=none --tls-san=k3s.local --cluster-cidr=192.168.0.0/16 --disable-network-policy --disable=traefik" sh -
Despite its tiny size, K3s is packed with a lot of features. In this demo, we are going to disable Flannel, Traefik, and K3s default network policy to simplify the process. If you would like to know more about these features, please check out this link.
Let’s check the state of our cluster using kubectl:
kubectl get pods -A
You should see a result similar to the below. Notice that all of the pods are in pending state. This is because there is no CNI installed in our cluster.
NAMESPACE NAME READY STATUS RESTARTS AGE
kube-system local-path-provisioner-5ff76fc89d-pm2f5 0/1 Pending 0 23s
kube-system metrics-server-86cbb8457f-6mmbd 0/1 Pending 0 23s
kube-system coredns-7448499f4d-g6d9c 0/1 Pending 0 23s
Installing Calico
Tigera Operator is a great way to install Calico. Operators are a great way to interact with custom resources in a controlled manner.
tigera-operator manifest and add -arm64 to the end of the image: quay.io/tigera/operator:master line. In the below command, I’ve used sed to automatically do the procedure. However, if you are using Windows or having trouble with the following command, consider doing this step manually using a text editor and then applying your modified manifest using kubetl create -f <<myfile.yaml>>.Use the following command to install Tigera Operator on the cluster:
curl https://docs.projectcalico.org/master/manifests/tigera-operator.yaml | sed 's#:master#:master-arm64#' | kubectl create -f -
It is possible to verify operator installation using the following command:
kubectl get pods -n tigera-operator
There should be an output similar to the following:
NAME READY STATUS RESTARTS AGE
tigera-operator-86c4fc874f-86x8r 1/1 Running 0 56s
Calico is packed with a lot of features and tunable to its basic components. After installing the operator, it will constantly check for a configuration in the default namespace that contains the kind: Installation header to configure Calico in the cluster.
Use the following command to begin the installation:
kubectl create -f - <<EOF
apiVersion: operator.www.tigera.io/v1
kind: Installation
metadata:
name: default
spec:
calicoNetwork:
bgp: "Disabled"
ipPools:
- blockSize: 26
cidr: 192.168.0.0/16
encapsulation: VXLAN
natOutgoing: Enabled
nodeSelector: all()
EOF
Use the following command to verify Calico deployment has finished:
kubectl rollout status ds/calico-node -n calico-system
There should be an output similar to the following:
daemon set "calico-node" successfully rolled out
At this point, we have a working node in our K3s cluster, equipped with Calico using the standard Linux data plane.
K3s agent installation
Adding K3s worker nodes is as easy as installing the server. Simply copy the token:
sudo cat /var/lib/rancher/k3s/server/node-token
There should be an output similar to the following:
K10d650693ae9d1c33239dee97b00c5a5f669c9921525f9b02f83c68cd7decae829::server:695a8f016aeb78245bb527f81fe42cd6
Use the instance_2_public_ip value and calico-demo.pem that was created earlier by our Terraform project, and SSH into the second instance:
ssh [email protected] -i calico-demo.pem
Use the following command to install the agent and join the worker node to the cluster.
curl -sfL https://get.k3s.io | INSTALL_K3S_VERSION=v1.21.3+k3s1 K3S_URL=https://172.16.2.183:6443 K3S_TOKEN=K10d650693ae9d1c33239dee97b00c5a5f669c9921525f9b02f83c68cd7decae829::server:695a8f016aeb78245bb527f81fe42cd6 sh -
Back at the server, execute the following command to verify the newly installed worker:
kubectl get nodes
There should be an output similar to the following:
NAME STATUS ROLES AGE VERSION
ip-172-16-2-183 Ready control-plane,master 7m39s v1.21.1+k3s1
ip-172-16-1-81 Ready <none> 16s v1.21.1+k3s1
Enable eBPF
By default, Calico is set to use the iptables data plane, which provides a service named kubernetes in the default namespace and proxies it to the API server using kube-proxy pods.
Since Calico can take over the kube-proxy responsibilities in eBPF mode, we can safely remove these pods. However, we have to allow Calico to directly talk to the api-server in order to prevent any interruption.
Use the following command to determine the api-server information:
kubectl get endpoints kubernetes -o wide
NAME ENDPOINTS AGE
kubernetes 172.16.1.211:6443 4m18s
By using a configmap, we can tell Calico how to directly contact the cluster API server.
Use the following command to create the required configmap:
cat << EOF > kubernetes-services-endpoint.yaml
kind: ConfigMap
apiVersion: v1
metadata:
name: kubernetes-services-endpoint
namespace: tigera-operator
data:
KUBERNETES_SERVICE_HOST: "172.16.2.183"
KUBERNETES_SERVICE_PORT: "6443"
EOF
Use kubectl apply to apply the file and create the ConfigMap:
Kubectl apply -f kubernetes-services-endpoint.yaml
It might take 60 seconds for the configmap to be picked up by the cluster. After that, use the following command to restart the operator in order to pick up the changes:
kubectl delete pod -n tigera-operator -l k8s-app=tigera-operator
K3s embeds the kube-proxy process, which makes it hard to disable. Since both kube-proxy and eBPF are trying to interact with cluster data flow, we must change the Felix configuration parameter BPFKubeProxyIptablesCleanupEnabled to false. If both kube-proxy and BPFKubeProxyIptablesCleanupEnabled are enabled, kube-proxy will write its iptables rules and Felix will try to clean them up, resulting in iptables flapping between the two.
Export the cluster credentials file that was created by the server installation process:
export KUBECONFIG=/etc/rancher/k3s/k3s.yaml
Use the following command to disable iptables cleanup:
calicoctl patch felixconfiguration default --patch='{"spec": {"bpfKubeProxyIptablesCleanupEnabled": false}}'
Execute the following command to change the cluster data plane with eBPF:
kubectl patch installation.operator.www.tigera.io default --type merge -p '{"spec":{"calicoNetwork":{"linuxDataplane":"BPF", "hostPorts":null}}}'
Let’s verify our cluster’s health and node architecture by executing the following command:
kubectl get nodes -L kubernetes.io/arch
NAME STATUS ROLES AGE VERSION ARCH
ip-172-16-2-244 Ready <none> 65s v1.21.3+k3s1 arm64
ip-172-16-1-224 Ready control-plane,master 2m21s v1.21.3+k3s1 arm64
That’s it! You now have a multi-node K3s cluster secured with Calico that uses the eBPF data plane.
Clean up
In the demo folder, issue the following command to remove all of the resources created for this demo:
terraform destroy -auto-approve
Conclusion
K3s’s minimalistic approach makes it invaluable for resource-constrained environments, and its single binary approach allows for faster deployment across any infrastructure. Users can push this resource efficiency even further by using the Calico eBPF data plane, while also benefiting from Calico’s other features such as its feature-rich network policy language, BGP routing, and more.
In this article, I explored how to install a multi-node K3s cluster equipped with Calico, and how to swap the standard Linux data plane with eBPF. I’ve only scratched the surface of Calico’s eBPF capabilities here. For more information, take a look at our eBPF documentation.
Did you know you can become a certified Calico operator? Learn Kubernetes and container networking and security fundamentals using Calico in this free, self-paced certification course.
Join our mailing list
Get updates on blog posts, workshops, certification programs, new releases, and more!