






When enterprises transition to a microservices model, they often need to migrate their legacy applications to the new infrastructure. One popular framework used for these traditional applications is .Net. Due to migration, enterprises require the ability to run Windows containers in their Kubernetes infrastructure.
Calico supports Windows HNS as one of its data plane options and can implement policies on Kubernetes Windows nodes for quite some time. However, installing the necessary binaries for such implementation used to be a tedious task that required a lot of automation. Now, with the introduction of Windows HostProcess containers, which are equivalent to privileged DaemonSets in Linux, it is possible to run Calico in Windows hosts using a similar approach. If you want to learn more about HostProcess containers, please refer to the Microsoft documentation.
The objective of this blog post is to demonstrate how we can install Calico Enterprise in a Windows node using this method. Although there are multiple options to have a cluster with Windows nodes running, I will be using an AKS cluster using Azure CNI as the basis for our demonstration example.
Install and join Windows nodes to your existing cluster
After creating your cluster (in this case AKS), and assuming Calico has already been installed as described in the documentation, proceed to add the Windows node, so it can join that cluster:
az aks nodepool add
    --resource-group ${RG_NAME}
    --cluster-name ${CLUSTER_NAME}
    --os-type Windows
    --name ${NODE_POOL_NAME}
    --node-count 1
If you created the AKS cluster using Azure CNI, and you only use Calico for the security and observability piece, as soon as you add the node, it will join the cluster, and it will be marked as “Ready”:
% kubectl get nodes
NAME                                STATUS   ROLES   AGE     VERSION
aks-nodepool1-22713627-vmss000000   Ready    agent   5d21h   v1.25.6
aks-nodepool1-22713627-vmss000001   Ready    agent   5d21h   v1.25.6
aks-nodepool1-22713627-vmss000002   Ready    agent   5d21h   v1.25.6
aksnpwin000002                      Ready    agent   56s   v1.25.6
Once the Windows node has been added, you will see that all Tigera resources are available:
kubectl get tigerastatusHowever, there is an extra step we must take. Calico uses an installation script to create a kubeconfig file for the Calico Enterprise for Windows services.
Install Calico Enterprise in the Windows node:
1. You need to create a configmap with the details of the API service endpoint. For that, retrieve the Kubernetes API server and port with the command below:
kubectl get service kubernetes2. Then create a configmap with the values:
kubectl apply -f - << EOF
kind: ConfigMap
apiVersion: v1
metadata:
  name: kubernetes-services-endpoint
  namespace: tigera-operator
data:
  KUBERNETES_SERVICE_HOST: "${APISERVER_ADDR}"
  KUBERNETES_SERVICE_PORT: "${APISERVER_PORT}"
EOF
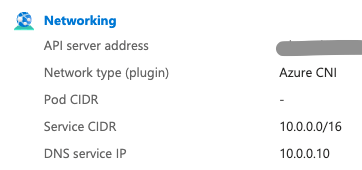
3. Finally, gather the service CIDR for your cluster. There are several ways to obtain this information, but one easy method would be checking the Networking details of your cluster in the Azure Portal (if using an AKS as in our example):
4. Enable Calico Enterprise for Windows on the Tigera operator installation resource:
kubectl patch installation default --type merge --patch='{"spec": {"serviceCIDRs": ["${SERVICE_CIDR}"], "calicoNetwork": {"windowsDataplane": "HNS"}}}'This will create a new pod in the calico-system namespace:
% kubectl get pod -n calico-system -l k8s-app=calico-node-windows
NAME                        READY   STATUS    RESTARTS   AGE
calico-node-windows-g8vr4   2/2     Running   0          12s
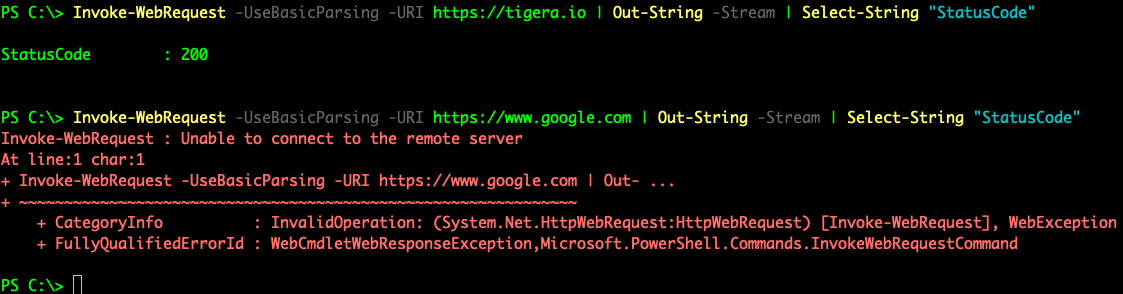
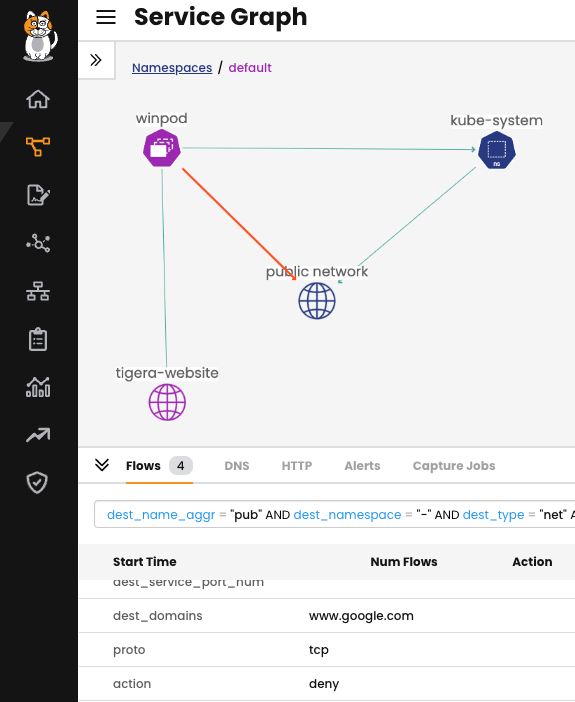
And that’s it! Now we can use standard Calico features as security policies to provide access controls to our windows pod. In the example below, a policy has been created to allow the pod to reach specific FQDNs:
The impact of this policy can be visualized in Service Graph:
Summary
We have demonstrated the simplicity of setting up Calico on an AKS cluster through the use of Azure CNI with HostProcess containers. By installing Calico, we can ensure the necessary security and observability that would otherwise be lacking. For other cluster types, and to know more about Calico, please visit the Calico Enterprise documentation and product page.
For more information or if you want to see the product in action, please request a free demo.


Join our mailing list
Get updates on blog posts, workshops, certification programs, new releases, and more!