









In the previous post in this series, we covered why Virtual Machine (VM) Live Migration in Kubernetes is difficult: a VM’s IP is its identity, and the “new” VM on the destination node has to come up with the same IP, this something that Kubernetes is not known for, and on top of that, traffic has to switch over only after network security policies are in place. Calico v3.32.0 delivers all the above and allows you to Live Migrate a VM without any network disruptions and this post is a short, do-it-yourself workshop to achieve it.
In about 5 minutes you’ll bring up a 3-node cluster, install Calico + KubeVirt, run a VM, and migrate it live.
Requirements
- A Linux or a Windows Machine preferably WSL2 (Mac Is not supported by KubeVirt)
- Docker or Podman with at least 8 GB RAM
- kubectl
- KIND (v0.31.0)
- virtctl (v1.8.2)
Note: In many Linux distros the default for most kernel parameters are too low, for a kind cluster running KubeVirt. Use the following command to temporarily increase these limits.
sudo sysctl -w fs.inotify.max_user_instances=2048
sudo sysctl -w fs.inotify.max_user_watches=1048576
If you face any challenges during the KubeVirt live migration, make sure to drop by our Slack to ask your questions.
Create a multi-node cluster
By default KIND is shipped with a simple default CNI, use the following command to disable the default CNI and create the demo cluster:
kind create cluster --config -<<EOF
kind: Cluster
apiVersion: kind.x-k8s.io/v1alpha4
name: calico-lab
nodes:
  - role: control-plane
  - role: worker
  - role: worker
networking:
  disableDefaultCNI: true
  podSubnet: 192.168.0.0/16
EOF
Install Calico
Live local VM migration is part of Calico v3.32.0 release and it’s important that you install or upgrade to this specific version. If you are already running Calico Unified Platform in your environment skip this part and go directly to the “Version and feature verifications” step there you can check your version of Calico.
Use the following command to install Tigera Operator:
kubectl create -f https://raw.githubusercontent.com/projectcalico/calico/v3.32.0/manifests/tigera-operator.yamlWait for the rollout to complete:
kubectl -n tigera-operator rollout status deploy/tigera-operator --timeout=2mNext, create the installation resource:
kubectl create -f - <<'EOF'
apiVersion: operator.tigera.io/v1
kind: Installation
metadata:
  name: default
spec:
  kubeletVolumePluginPath: None
  calicoNetwork:
    bgp: Enabled
    ipPools:
    - blockSize: 26
      cidr: 192.168.0.0/16
      encapsulation: IPIP
      natOutgoing: Enabled
      nodeSelector: all()
---
apiVersion: operator.tigera.io/v1
kind: APIServer
metadata:
  name: default
EOF
Wait for Calico installation to finish, you can verify that by running the following command:
kubectl wait --for=condition=Available tigerastatus/calico --timeout=2mInstall KubeVirt
To extend Kubernetes to manage stateful virtual machines just like ordinary containers, you first need to install KubeVirt, which acts as the crucial abstraction layer between your cluster and the underlying QEMU emulator.
Use the following command to install KubeVirt
kubectl create -f https://github.com/kubevirt/kubevirt/releases/download/v1.8.2/kubevirt-operator.yaml
kubectl create -f https://github.com/kubevirt/kubevirt/releases/download/v1.8.2/kubevirt-cr.yaml
Use the following command
kubectl -n kubevirt rollout status deploy/virt-operator --timeout=5mPreparing KubeVirt
To prepare the cluster for live migration, we must first configure KubeVirt to enable bridge networking on the pod network. This is the only networking mode that allows Calico to successfully persist a VM’s IP address across nodes. The permitBridgeInterfaceOnPodNetwork flag is a cluster-wide configuration in KubeVirt that determines whether a Virtual Machine (VM) can utilize the bridge interface type for its default pod network. While this is often set to true by default, cluster administrators sometimes disable it (set it to false) for security or architectural reasons.
kubectl -n kubevirt patch kubevirt kubevirt --type=merge -p '{
  "spec": {"configuration": {
    "developerConfiguration": {"useEmulation": true,"clusterProfiler": true},
    "network": {"defaultNetworkInterface": "bridge", "permitBridgeInterfaceOnPodNetwork": true}
  }}}'
After configuration is in place KubeVirt will spawn handler and API pods, this can take some time depending on your machine.
Use the following command to make sure KubeVirt deployment is complete:
kubectl -n kubevirt wait --for=condition=Available kubevirt/kubevirt --timeout=10mCreate a VM
Two things make this VM migratable: bridge: {} networking, and the allow-pod-bridge-network-live-migration annotation (KubeVirt blocks bridge-mode migration without it).
Use the following command to create a VM:
kubectl create -f https://raw.githubusercontent.com/frozenprocess/kubevirt-migration-observer/main/examples/vm.yamlLive VM Migration
Live VM migration is a marathon relay, there are multiple KubeVirt and Calico components that work together in order to make this migration happen and the beauty of this integration is that all the complexity is hidden behind a single command virtctl migrate. While Calico Unified Platform is heavily involved in the security and networking side of a VM migration process, KubeVirt handles the compute lifecycle, specifically racing the guest’s memory across the wire and cutting the CPU over to the new node.
To better understand this dance let’s use the KubeVirt observer app, this app will gather all the information regarding your cluster during the migration and organize it in a searchable way.
Use the following command to deploy the observer app inside the cluster:
kubectl create -f https://raw.githubusercontent.com/frozenprocess/kubevirt-migration-observer/main/examples/observer-job.yamlAfter observer is running
virtctl migrate demo-vm Gathering The Report
To make sure that the report is generated use the following command to take a peak at the observer status:
kubectl logs -l job-name=kubevirt-migration-observerThe expected result should be the following:
report written:
report written:
  markdown: /work/reports/demo-vm-20260604T232645Z.md
  json    : /work/reports/demo-vm-20260604T232645Z.json
  html    : /work/reports/demo-vm-20260604T232645Z.html
  audit   : /work/reports/demo-vm-20260604T232645Z-audit/audit.md
[observer] report written to /work/reports; holding 3600s for kubectl cp
Use the following command to copy the report to your workstation:
pod=$(kubectl -n default get pod -l app=kubevirt-migration-observer -o name)
kubectl -n default cp "${pod#pod/}:/work/reports" ./reports
Now head over to the reports folder on your local machine where you executed the command and examine the report.
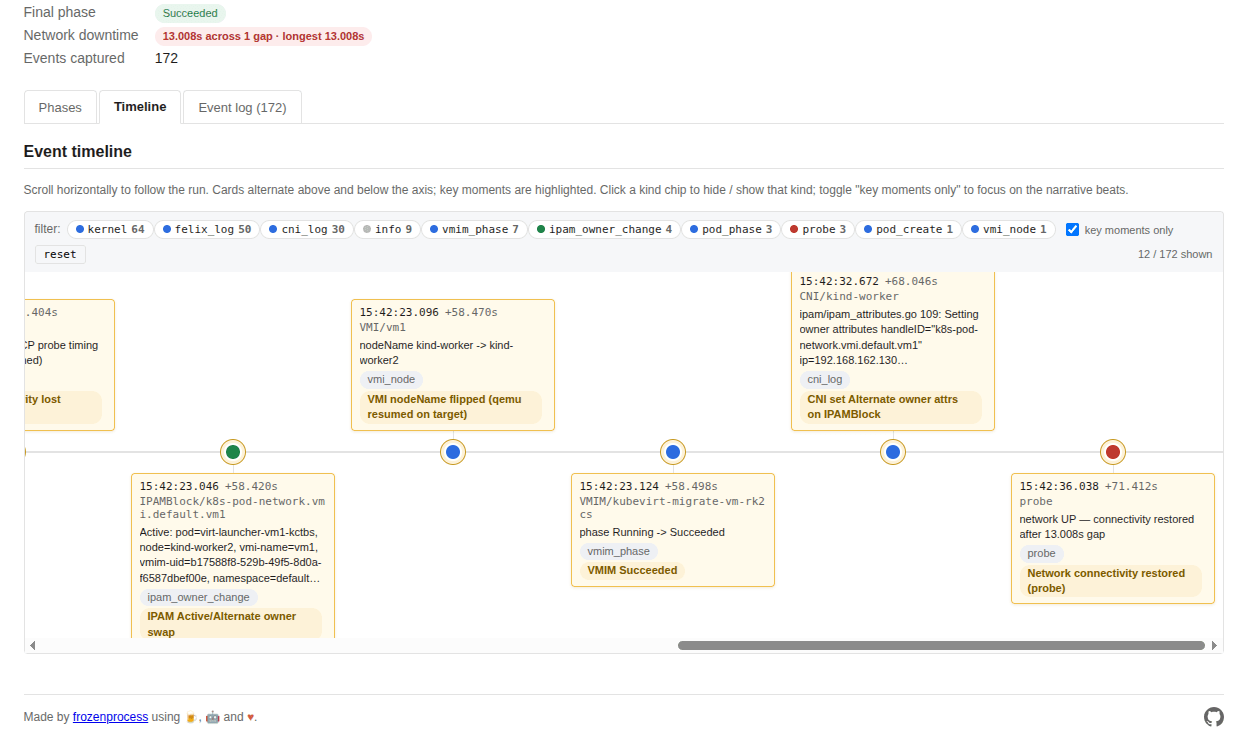
Note: observer app also has the ability to collect performance logs, and flamegraphs. If you are interested in running a full VM migration profile checkout the full tutorial here.
The following table compares two independent migration reports:
| data plane Configuration | Cutover VM Downtime (Via a TCP Probe) | Total Migration Time |
| BGP + IP-in-IP | 0s (None observed) | 1m 13.7s |
| VXLAN + BGP | 1s | 1m 44.5s |
Clean up
Run the following command to delete the demo environment:
kind delete clusters calico-labConclusion
Three resources do all the heavy lifting: the kubeVirtVMAddressPersistence setting on Calico’s IPAM config, the allow-pod-bridge-network-live-migration annotation on the VM, and bridge-mode networking so the VM uses the pod IP directly. Get those right and a stateful VM moves between machines with its TCP connections open and its identity intact. The observer just makes the proof visible.