SOC 2 is a compliance standard for service organizations, developed by the American Institute of CPAs (AICPA), which specifies how organizations should manage customer data. SOC 2 is based on five overarching Trust Services Criteria (TSC): security, availability, processing integrity, confidentiality, and privacy. Specifically, the security criteria are broken down into nine sections called common criteria (CC):
- CC1: Control Environment
- CC2: Communication and Information
- CC3: Risk Assessment
- CC4: Monitoring Activities
- CC5: Control Activities
- CC6: Logical and Physical Access Controls
- CC7: System Operations
- CC8: Change Management
- CC9: Risk Mitigation
How does SOC 2 compliance apply to containers and Kubernetes?
Running Kubernetes clusters often presents challenges for CC6 (logical and physical access), CC7 (systems operations), and CC8 (change management) when trying to comply with SOC 2 standards.
In this technical blog, we will dive into how Calico can help you achieve full compliance in achieving all the requirements of CC6. To understand how to achieve compliance with CC7 and CC8, you can review our SOC 2 white paper.
| Control # | Compliance requirements | Calico controls |
| CC 6.1, 6.6, 6.7, 6.8
|
Implement logical access security measures to authorized systems only, implement controls to prevent or detect and act upon introduction of malicious software |
|
Deploying the Google Online Boutique demo microservices application on a cluster
Our target microservices application is the Google Online Boutique (Hipstershop) demo that presents a mock online retail store made up of multiple microservices. The following diagram shows the make-up of the application and its microservices.

Create a namespace and deploy the application:
kubectl create namespace hipstershop
kubectl apply -n hipstershop -f https://raw.githubusercontent.com/GoogleCloudPlatform/microservices-demo/main/release/kubernetes-manifests.yaml
The Calico Cloud Dynamic Service Graph offers a comprehensive view of all of the resources in the cluster:
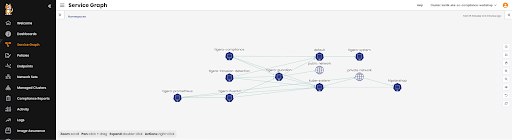
We can also drill down into the hipstershop namespace to get a look at the various services and pods making up this microservices application and check the live traffic flows between the various endpoints to plan our steps in securing it.

Achieve compliance with Calico Security Policy
Now that we’ve deployed our web store application, in order to comply with the SOC2 CC standard we have to secure it. This means applying Security Policies to restrict access as a much as possible. In this section we will walk through building up a robust security policy for our application.
Kubernetes and Calico Security Policies are made up of three main components that all need to be properly designed and implemented to achieve compliance.
Labels – Tag Kubernetes objects for filtering. Instead of IP addresses and IP ranges, network policies in Kubernetes depend on labels and selectors to determine which workloads can talk to each other. Workload identity is the same for Kubernetes and Calico Cloud network policies: as pods dynamically come and go, network policy is enforced based on the labels and selectors that you define.
Security Policy – The primary tool for securing a Kubernetes network. It lets you restrict network traffic in your cluster so only the traffic that you want to flow is allowed. Calico Cloud provides a more robust policy than Kubernetes, but you can use them together – seamlessly.
Policy Tiers – A hierarchical construct used to group policies and enforce higher precedence policies that cannot be circumvented by other teams.
- First let’s attach a SOC2 label to our application pods. Rather than apply the label one by one, label all pods in the hipstershop namespace with
soc2=truewith the following command:
kubectl label pods --all -n hipstershop soc2=true
Verify the labels are applied:
kubectl get pods -n hipstershop --show-labels
You should see the labels applied to all the pods:
NAME                                     READY   STATUS    RESTARTS   AGE   LABELS
adservice-8587b48c5f-hwhzq               1/1     Running   0          21m   app=adservice,soc2=true
cartservice-5c65c67f5d-mhr4s             1/1     Running   0          21m   app=cartservice,soc2=true
checkoutservice-54c9f7f49f-jzh56         1/1     Running   0          21m   app=checkoutservice,soc2=true
currencyservice-5877b8dbcc-st4km         1/1     Running   0          21m   app=currencyservice,soc2=true
emailservice-5c5448b7bc-h5kl9            1/1     Running   0          21m   app=emailservice,soc2=true
frontend-67f6fdc769-zl9qz                1/1     Running   0          21m   app=frontend,soc2=true
loadgenerator-555c7c5c44-8tr7t           1/1     Running   0          21m   app=loadgenerator,soc2=true
multitool                                1/1     Running   0          16m   run=multitool,soc2=true
paymentservice-7bc7f76c67-9smfk          1/1     Running   0          21m   app=paymentservice,soc2=true
productcatalogservice-67fff7c687-vprc8   1/1     Running   0          21m   app=productcatalogservice,soc2=true
recommendationservice-b49f757f-kmhr4     1/1     Running   0          21m   app=recommendationservice,soc2=true
redis-cart-58648d854-hw8rr               1/1     Running   0          21m   app=redis-cart,soc2=true
shippingservice-76b9bc7465-9nrts         1/1     Running   0          21m   app=shippingservice,soc2=true
- Let’s create the policy tiers to enforce higher precedence policies that cannot be circumvented by other teams.
As part of your microsegmentation strategy, tiers let you apply identity-based protection to workloads and hosts. All Calico Enterprise and Kubernetes network policies reside in tiers. We’ll be creating 3 tiers in the cluster and utilizing the default tier as well:
security – Global security tier with controls such as SOC 2 restrictions.
platform – Platform level controls such as DNS policy and tenant level isolation.
app-hipster – Application specific tier for microsegmentation inside the application.
To create the tiers apply the following manifest:
kubectl apply -f -<<EOF
apiVersion: projectcalico.org/v3
kind: Tier
metadata:
  name: app-hipstershop
spec:
  order: 400
---
apiVersion: projectcalico.org/v3
kind: Tier
metadata:
  name: platform
spec:
  order: 300
---
apiVersion: projectcalico.org/v3
kind: Tier
metadata:
  name: security
spec:
  order: 200
EOF
- After creating our tiers, we’ll apply some general policies to them before we start creating our main policies. These policies include allowing traffic to kube-dns from all pods, passing traffic that doesn’t explicitly match in the tier and finally a default deny policy.
kubectl apply -f -<<EOF
apiVersion: projectcalico.org/v3
kind: GlobalNetworkPolicy
metadata:
  name: platform.platform-default-pass
spec:
  tier: platform
  order: 100
  selector: ""
  namespaceSelector: ""
  serviceAccountSelector: ""
  ingress:
    - action: Pass
      source: {}
      destination: {}
  egress:
    - action: Pass
      source: {}
      destination: {}
  doNotTrack: false
  applyOnForward: false
  preDNAT: false
  types:
    - Ingress
    - Egress
---
apiVersion: projectcalico.org/v3
kind: GlobalNetworkPolicy
metadata:
  name: security.security-default-pass
spec:
  tier: security
  order: 150
  selector: ""
  namespaceSelector: ""
  serviceAccountSelector: ""
  ingress:
    - action: Pass
      source: {}
      destination: {}
  egress:
    - action: Pass
      source: {}
      destination: {}
  doNotTrack: false
  applyOnForward: false
  preDNAT: false
  types:
    - Ingress
    - Egress
---
apiVersion: projectcalico.org/v3
kind: GlobalNetworkPolicy
metadata:
  name: platform.allow-dns
spec:
  tier: platform
  order: -50
  selector: ""
  namespaceSelector: ""
  serviceAccountSelector: ""
  ingress:
    - action: Allow
      protocol: TCP
      source: {}
      destination:
        selector: k8s-app == "kube-dns"
        ports:
          - "53"
          - action: Allow
      protocol: UDP
      source: {}
      destination:
        selector: k8s-app == "kube-dns"
        ports:
          - "53"
  egress:
    - action: Allow
      protocol: TCP
      source: {}
      destination:
        selector: k8s-app == "kube-dns"
        ports:
          - "53"
    - action: Allow
      protocol: UDP
      source: {}
      destination:
        selector: k8s-app == "kube-dns"
        ports:
          - "53"
  doNotTrack: false
  applyOnForward: false
  preDNAT: false
  types:
    - Ingress
    - Egress
---
apiVersion: projectcalico.org/v3
kind: StagedGlobalNetworkPolicy
metadata:
  name: default.default-deny
spec:
  tier: default
  order: 1100
  selector: ''
  namespaceSelector: ''
  serviceAccountSelector: ''
  doNotTrack: false
  applyOnForward: false
  preDNAT: false
  types:
    - Ingress
    - Egress
EOF
- Now that we have our foundation in the Policy Tiers, we need to start applying policy to restrict traffic.
The first policy we will apply will only allow traffic to flow between pods with the label of soc2=true. Pods without the soc2=true label will also be able to freely communicate with each other.
We will also add a soc2-allowlist policy because we need a way to allow traffic to the frontend of the application as well as allowing DNS lookups from the SOC2 pods to the kube-dns system. We are also adding the metrics-server ingress port so that other pods can call it for getting node and pod metrics as needed.
kubectl apply -f -<<EOF
apiVersion: projectcalico.org/v3
kind: GlobalNetworkPolicy
metadata:
  name: security.soc2-allowlist
spec:
  tier: security
  order: 0
  selector: all()
  namespaceSelector: ''
  serviceAccountSelector: ''
  ingress:
    - action: Allow
      protocol: TCP
      source: {}
      destination:
        selector: app == "frontend"
        ports:
          - '8080'
    - action: Allow
      protocol: TCP
      source: {}
      destination:
        selector: k8s-app == "metrics-server"
        ports:
          - '4443'
  egress:
    - action: Allow
      protocol: UDP
      source: {}
      destination:
        selector: k8s-app == "kube-dns"
        ports:
          - '53'
    - action: Allow
      protocol: TCP
      source: {}
      destination:
        selector: k8s-app == "kube-dns"
        ports:
          - '53'
  doNotTrack: false
  applyOnForward: false
  preDNAT: false
  types:
    - Ingress
    - Egress
---
apiVersion: projectcalico.org/v3
kind: GlobalNetworkPolicy
metadata:
  name: security.soc2-restrict
spec:
  tier: security
  order: 75
  selector: soc2 == "true"
  namespaceSelector: ''
  serviceAccountSelector: ''
  ingress:
    - action: Allow
      source:
        selector: soc2 == "true"
      destination: {}
    - action: Deny
      source:
        selector: soc2 != "true"
      destination: {}
  egress:
    - action: Allow
      source: {}
      destination:
        selector: soc2 == "true"
    - action: Deny
      source: {}
      destination:
        selector: soc2 != "true"
  doNotTrack: false
  applyOnForward: false
  preDNAT: false
  types:
    - Ingress
    - Egress
EOF
Now we can verify this is working as expected.
SOC 2 policy testing
To test, we’ll use our MultiTool pods both inside of the hipstershop namespace and in the default namespace. Before we can complete the testing from the default namespace, we’ll have to apply a policy that allows egress traffic from the pods in the default namespace. This is because we’re applying an egress policy in an earlier step, so now, if we don’t allow it explicitly, the default deny will drop the traffic when it is enforced. To get around this we’ll apply this policy:
kubectl apply -f -<<EOF
apiVersion: projectcalico.org/v3
kind: NetworkPolicy
metadata:
  name: platform.default-egress
  namespace: default
spec:
  tier: platform
  order: 75
  selector: ''
  serviceAccountSelector: ''
  egress:
    - action: Allow
      source: {}
      destination: {}
  types:
    - Egress
EOF
For testing we will use two tools, curl and netcat.
Before we start testing, we’re going to get the addresses of all the Online Boutique services so we can use them in the testing to follow. To do this we’ll run the following command and keep the output handy:
kubectl get svc -n hipstershop -o wide
$ kubectl get svc -n hipstershop
NAME                    TYPE           CLUSTER-IP     EXTERNAL-IP     PORT(S)        AGE
adservice               ClusterIP      10.0.131.26              9555/TCP       4h37m
cartservice             ClusterIP      10.0.214.232             7070/TCP       4h37m
checkoutservice         ClusterIP      10.0.162.114             5050/TCP       4h37m
currencyservice         ClusterIP      10.0.227.232             7000/TCP       4h37m
emailservice            ClusterIP      10.0.72.153              5000/TCP       4h37m
frontend                ClusterIP      10.0.41.230              80/TCP         4h37m
frontend-external       LoadBalancer   10.0.209.155   51.143.16.163   80:30113/TCP   4h37m
paymentservice          ClusterIP      10.0.85.72               50051/TCP      4h37m
productcatalogservice   ClusterIP      10.0.60.54               3550/TCP       4h37m
recommendationservice   ClusterIP      10.0.20.46               8080/TCP       4h37m
redis-cart              ClusterIP      10.0.160.215             6379/TCP       4h37m
shippingservice         ClusterIP      10.0.77.30               50051/TCP      4h37m
First, from inside of the hipstershop namespace, we’ll exec into the multitool pod and connect to the frontend as well as try to connect to the cartservice' directly. To do this we will use NetCat and Curl.
From the above output, we know that our cartservice is has an address of 10.0.214.232.
Exec into the pod:
kubectl exec -n hipstershop multitool --stdin --tty -- /bin/bash
Test connectivity to cartservice directly:
kubectl exec -n hipstershop multitool --stdin --tty -- /bin/bash
Test connectivity to cartservice directly:
bash-5.1# nc -zvw 3 10.0.214.232 7070
10.0.214.232 (10.0.214.232:7070) open
And connectivity to the frontend service:
bash-5.1# curl -I 10.0.41.230
HTTP/1.1 200 OK
Set-Cookie: shop_session-id=1939f999-1237-4cc7-abdb-949423eae483; Max-Age=172800
Date: Wed, 15 Feb 2023 23:54:25 GMT
Content-Type: text/html; charset=utf-8
As expected, we can reach both services from our multitool pod with the soc2=true label.
Exit from the shell by typing exit.
Now lets try from a pod without the soc2=true label that is outside of the namespace. To do this, we’ll use our multitool pod in the default namespace:
kubectl exec multitool --stdin --tty -- /bin/bash
bash-5.1# nc -zvw 3 10.0.214.232 7070
nc: 10.0.214.232 (10.0.214.232:7070): Operation timed out
bash-5.1# curl -I 10.49.14.192
HTTP/1.1 200 OK
Set-Cookie: shop_session-id=772c5095-11f5-4bb0-9d42-0ef8dcda9707; Max-Age=172800
Date: Wed, 26 Jan 2022 20:21:54 GMT
Content-Type: text/html; charset=utf-8
As expected, we can connect to frontend because it has a policy allowing it but we can’t connect to the cartservice on 7070 because of our SOC 2 isolation policy.
Exit from the shell by typing exit.
Let’s add the soc2=true label to the pod:
kubectl label pod multitool soc2=true
And we can test again:
kubectl exec multitool --stdin --tty -- /bin/bash
bash-5.1# nc -zvw 3 10.0.214.232 7070
10.0.214.232 (10.0.214.232:7070) open
We can successfully connect from the MultiTool pod in the default namespace to a service in the hipstershop namespace as long as they both have the soc2=true label.
Conclusion
Complying with established security standards like SOC 2 can seem daunting at first, but Calico offers a robust policy engine way beyond regular Kubernetes policies to help fully secure the workloads by offering security tiers to not have teams interfere with each other’s policy and still maintain a hierarchy to comply with both internal security team requirements to comply with standards like SOC2 by allowing you to fully secure, isolate and have visibility into your containers in Kubernetes.
Related Guides:
- Kubernetes Security: 8 Best Practices to Secure Your Cluster
- Kubernetes Networking: The Complete Guide
- Microsegmentation Security: The Evolution of Cybersecurity in a Zero Trust World
Related Products: