







KubeVirt is an open-source project that extends Kubernetes, allowing users to run and manage virtual machines (VMs) alongside containers within a unified platform. Traditional virtualization and containerization have typically existed in separate worlds, requiring different management tools and APIs.
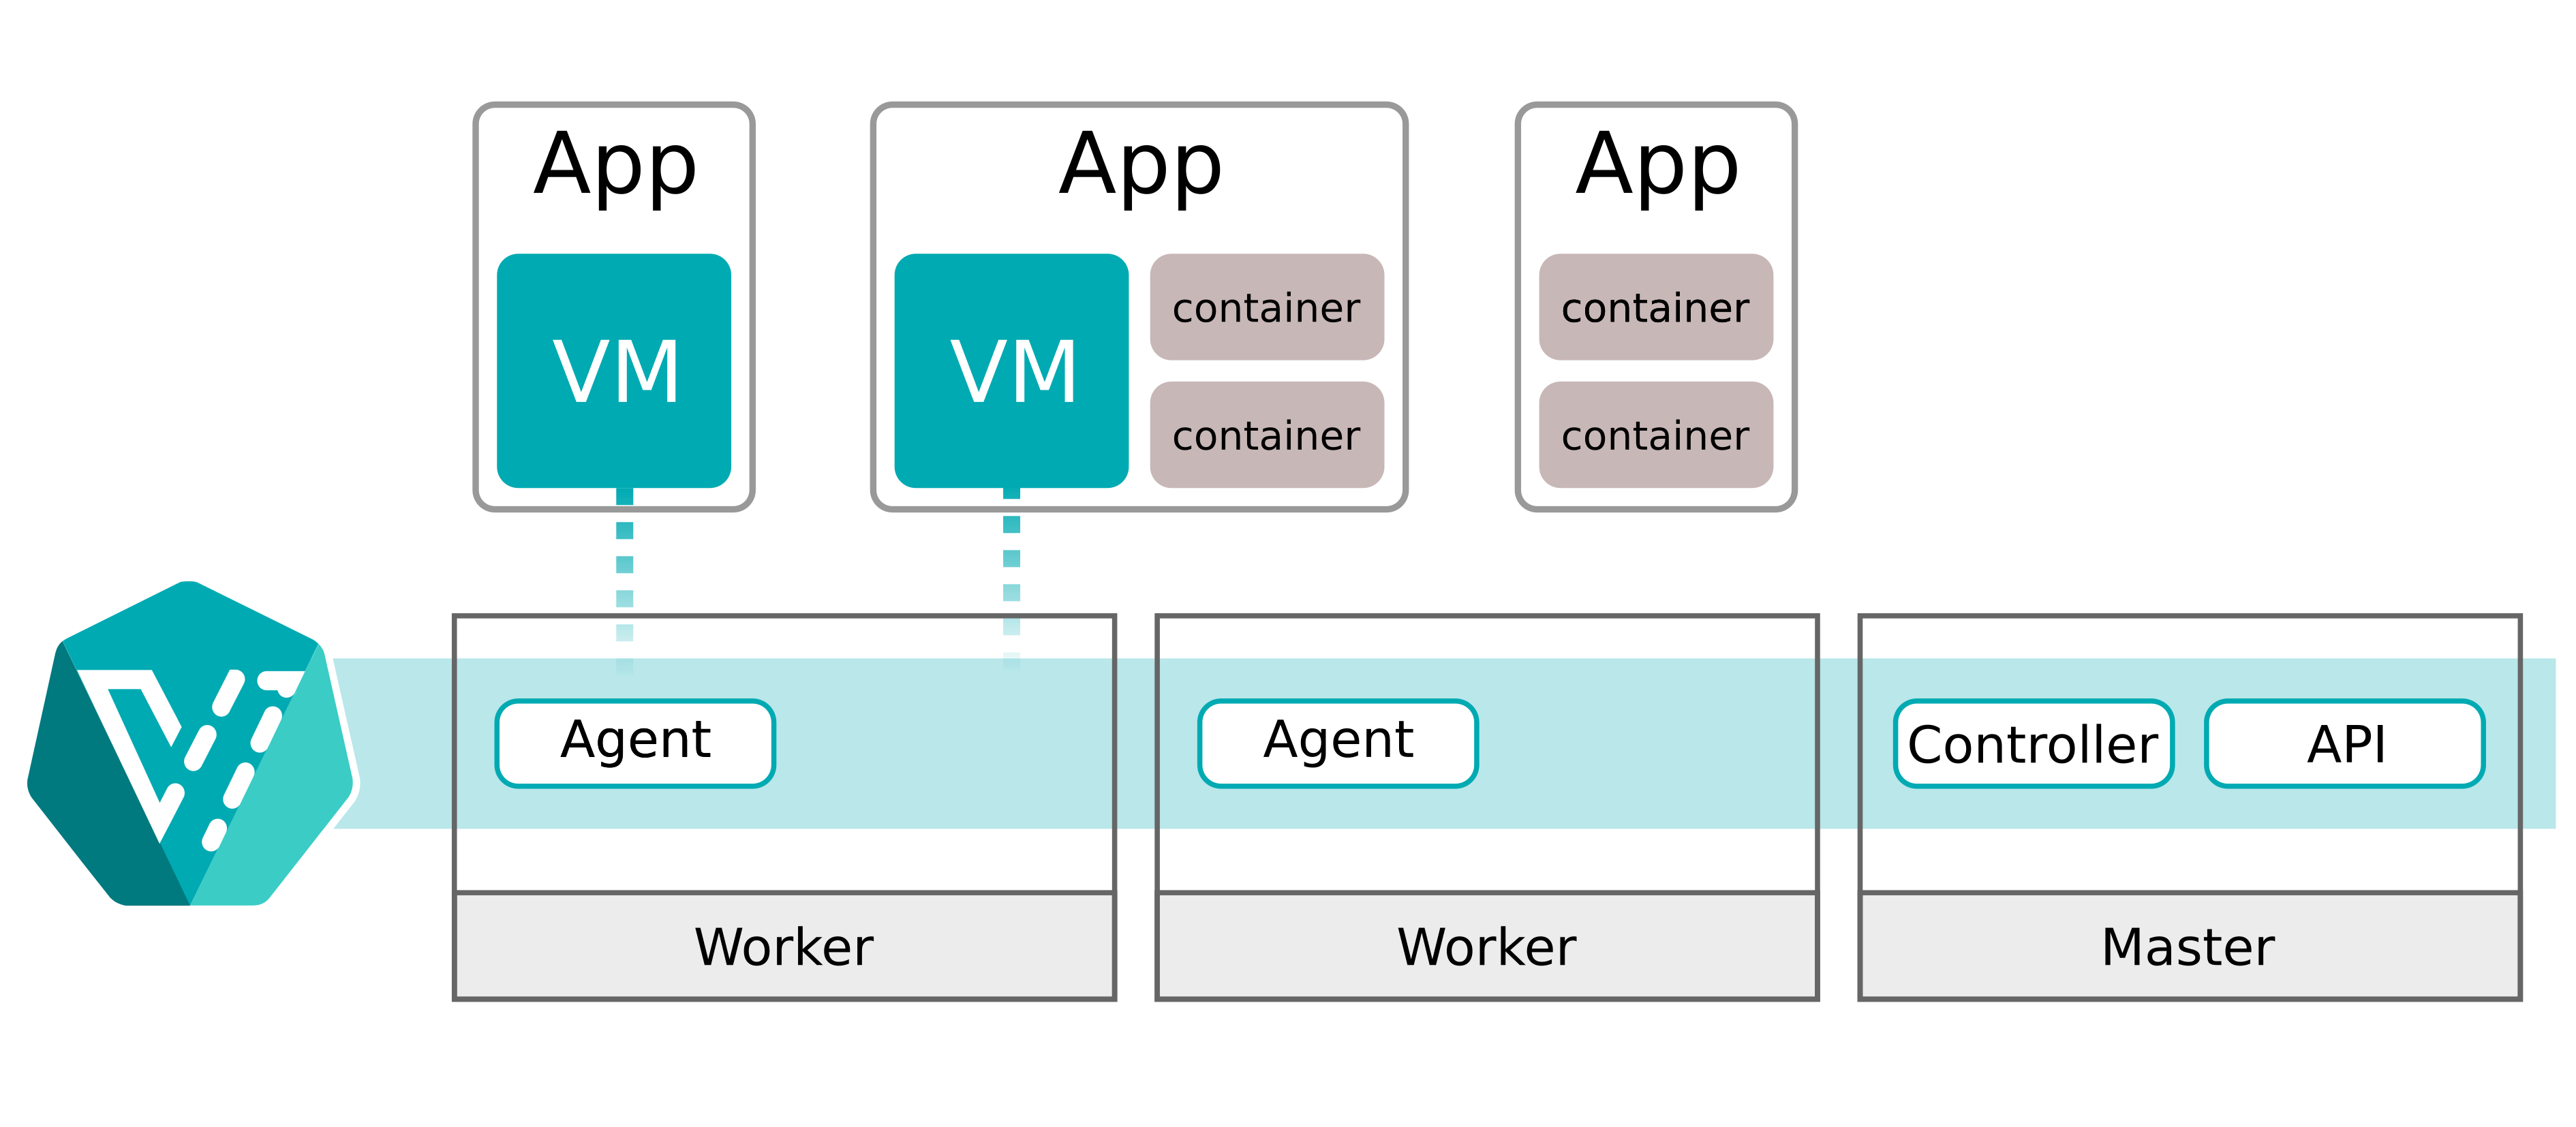
KubeVirt’s architecture builds on Kubernetes’ control and data plane models by introducing virtualization-specific components that operate entirely within the cluster. At the core, it extends the Kubernetes API with custom resource definitions (CRDs) to represent virtual machine workloads. A set of controllers (e.g., virt-controller) manages these resources at the control plane, while node-level agents (virt-handler) and launcher pods (virt-launcher) are responsible for VM execution.
In KubeVirt, each virtual machine is encapsulated within a pod, using standard Kubernetes mechanisms for scheduling, networking, and storage. This layered design enables KubeVirt to treat VMs as native Kubernetes workloads, ensuring tight integration with the platform’s declarative model, reconciliation loops, and operational patterns—without introducing external management planes or dependencies.
Source: KubeVirt
In this article:
- Understanding KubeVirt Architecture Components
- Additional Services and Integrations
- Best Practices for Deploying KubeVirt
Understanding KubeVirt Architecture Components
Custom Resource Definitions (CRDs)
KubeVirt extends the Kubernetes API by introducing new types through custom resource definitions (CRDs). These CRDs define how virtual machines and their components are represented inside the Kubernetes ecosystem. Just like Kubernetes pods or deployments, these new objects are submitted to the API server and handled by dedicated controllers.
Key KubeVirt CRDs include:
- VirtualMachineInstance (VMI): This is the core runtime object representing a single instance of a virtual machine. It defines the VM’s configuration, resources, disks, and boot instructions. VMIs are often ephemeral and not meant to be managed directly by end-users.
- VirtualMachine (VM): Acts as a higher-level controller over a VMI. It manages VM lifecycle operations such as start, stop, restart, and allows configuration changes that persist across restarts. This resource is similar to a StatefulSet with a single replica, focusing on providing stable identities and consistent configurations.
- VirtualMachineInstanceReplicaSet (VMIRS): Functions similarly to a Kubernetes ReplicaSet for pods. It ensures a specified number of identical VMIs are running, making it suitable for stateless or batch VM workloads.
These custom resources allow virtual machines to be managed just like containers. Once defined, they become first-class citizens in the Kubernetes API and are handled by the cluster’s reconciliation loop.
Control-Plane Components (Cluster-Wide Controllers)
To support the new CRDs, KubeVirt introduces additional controllers that operate at the cluster level. These controllers watch for changes in custom resources and perform the necessary actions to drive them toward their desired state.
The primary controller is the virt-controller. This controller is responsible for reconciling high-level resources like VirtualMachine and VirtualMachineInstance. When a new VM or VMI is created, the controller ensures it is scheduled, started, and kept in the desired state. It also handles restart policies and propagates spec changes when needed.
The controller runs inside the Kubernetes cluster, typically as a pod in a system namespace. It doesn’t operate outside of Kubernetes but integrates tightly with its control plane. This allows cluster administrators and users to interact only with the Kubernetes API, rather than managing virtualization infrastructure separately.
The control logic is built around the same reconciliation model as native Kubernetes controllers. When a VM resource is created, the controller reacts by generating a VMI. When the VM is stopped, it cleans up the corresponding instance. All actions are driven through declarative state definitions.
Node-Level / Worker Components
KubeVirt requires per-node components to manage the actual execution of virtual machines on cluster nodes. The main component at this level is the virt-handler. This is a daemon that runs on every node capable of running VMs. It watches for VMIs scheduled to its node and is responsible for launching and monitoring them using the virtualization runtime.
When a VMI is assigned to a node, virt-handler starts a virt-launcher pod, which wraps the VM. Inside that pod, libvirtd is used to manage the lifecycle of the VM using KVM or QEMU. This separation ensures that each VM runs in its own secure, isolated environment, aligned with Kubernetes scheduling and pod security models.
The virt-handler works closely with the node’s kubelet and other standard Kubernetes agents. However, it focuses only on VM-specific logic, such as bootstrapping the libvirt domain, configuring the VM’s networking and storage, and updating VMI status.
Importantly, these daemons are not installed outside of Kubernetes—they run inside pods, just like other workloads. This design ensures that all components remain consistent with Kubernetes operational models.
Application Layout and Workflow
The architecture of KubeVirt follows a service-oriented and choreography-based pattern, where multiple components cooperate to deliver VM functionality without centralized control.
A typical application layout in a KubeVirt-powered cluster looks like this:
KubeVirt Control Components:
virt-controller(cluster-wide lifecycle logic)virt-handler(node-level runtime)libvirtd(virtual machine monitor backend)
KubeVirt Managed Objects:
VirtualMachine→ high-level lifecycle controlVirtualMachineInstance→ the running virtual machineVirtualMachineInstanceReplicaSet→ manages a group of ephemeral VMIs
Execution Environment:
- Each VMI is wrapped in a
virt-launcherpod and scheduled like any other Kubernetes workload. - Standard Kubernetes components handle scheduling, networking (via CNI), and storage (via persistent volumes).
Workflow example:
- A user creates a
VirtualMachineresource, defining a VM spec and run strategy. virt-controllerdetects this and creates aVirtualMachineInstance.- Kubernetes schedules the VMI on a suitable node.
virt-handleron that node launches avirt-launcherpod.- Inside the pod, libvirt boots the VM using KVM.
- The VMI’s status is updated in the Kubernetes API and monitored continuously.
This model allows full reuse of Kubernetes primitives (e.g., scheduling, storage classes, service discovery), while adding a VM abstraction on top.
Tips from the Expert
In my experience, here are tips that can help you better operate Istio Ingress Gateways securely and reliably in production:
Use Gateway API instead of legacy resources for future-proofing:
The Kubernetes Gateway API is now supported in Istio and will eventually replace Istio’s custom Gateway and VirtualService resources. Adopting the Gateway API early ensures compatibility with evolving mesh and platform standards.
Implement rate limiting at the ingress layer with Envoy filters:
Native Istio Gateway resources don’t include rate limiting. Use Envoy’s rate_limit filter with an external rate limit service like ratelimit (from Envoyproxy) to enforce per-user or per-route limits, mitigating abuse and protecting backends.
Pin gateway deployments to specific nodes using node affinity:
Control gateway placement using Kubernetes nodeAffinity to ensure gateways run on edge-optimized nodes with high network throughput, DDoS protection, or specific firewall rules, improving security and performance under load.
Apply ingress gateway PodDisruptionBudgets and HPA:
Use PodDisruptionBudgets to maintain ingress availability during voluntary disruptions (e.g., node upgrades), and HorizontalPodAutoscaler to scale with traffic demand. This prevents ingress outages and improves mesh resiliency.
Rotate TLS secrets using Kubernetes Projected Volume with auto-refresh:
Instead of replacing secrets manually, mount them using projected volumes (e.g., from cert-manager or Vault Agent Injector) that refresh certificates automatically. Istio detects changes and reloads them without requiring gateway restarts.

Additional Services and Integrations
KubeVirt is commonly used alongside additional services. We’ll focus on two main varieties: networking integrations and security integrations.
Networking Integrations for VM-to-Pod Communication
KubeVirt integrates with Kubernetes networking plugins (CNI) to ensure virtual machines can communicate with pods and other services in the cluster. By default, each virtual machine receives a pod-like network interface, making it accessible within the cluster as if it were a container.
KubeVirt uses the bridge binding method to connect VMs to the pod network. This exposes the VM’s network interface directly within the Kubernetes network namespace, allowing seamless communication with services, ingresses, and other workloads. For more advanced networking use cases, KubeVirt supports multus CNI, which enables multiple interfaces per VM and connection to specialized networks (e.g., SR-IOV, VLANs, or isolated control planes).
To expose VMs externally, Kubernetes services can be defined targeting the VMI pod. Load balancers or node ports can be used to route traffic from outside the cluster to the virtual machine, just like with containerized services.
This design allows VMs to participate in service discovery, traffic routing, and network policy enforcement alongside containers, minimizing the operational difference between the two.
Security, Observability, and Policy Ecosystem Integrations
KubeVirt integrates with Kubernetes-native security and policy mechanisms to protect virtual machines and enforce compliance. VMs run in pods, so they benefit from Kubernetes constructs like pod security standards, role-based access control (RBAC), and network policies.
Security features include integration with SELinux, AppArmor, and seccomp profiles for isolating VM processes. VM disks can be encrypted using standard Kubernetes storage classes backed by CSI drivers that support encryption. TLS is used for communication between KubeVirt components, ensuring secure control plane operations.
For observability, KubeVirt exposes metrics via Prometheus-compatible endpoints. This includes VM lifecycle metrics, resource usage, and component health. Logs from virt-launcher and libvirt processes can be collected using standard Kubernetes logging solutions. KubeVirt also supports event recording and integrates with Kubernetes audit logging.
Policy management is handled through Kubernetes-native mechanisms. Admission controllers can enforce configuration rules, while tools like Gatekeeper (OPA) can apply custom policies to VM resources. This ensures VMs adhere to the same governance practices already used for containers.
Best Practices for Deploying KubeVirt
Here are some useful practices to keep in mind when using KubeVirt.
1. Evaluate Which VMs Should Run on KubeVirt vs Traditional Virtualization
Not all VM workloads are ideal candidates for KubeVirt. Legacy applications with specialized hardware dependencies, high I/O workloads, or licensing constraints may be better left on dedicated hypervisors. General-purpose Linux VMs, test environments, and bridging applications that need tight integration with containers are prime candidates for migration.
Conduct a thorough inventory and dependency mapping before migrating VMs, focusing on workloads that benefit from integration with containerized services or cloud-native automation. Applications with static resource needs, limited horizontal scalability, or unique performance tuning requirements may face challenges in Kubernetes environments. Prioritize modern, stateless, or loosely coupled workloads for initial migration.
2. Infrastructure Design: Placement, Scheduling, Node Labelling
Effective infrastructure design starts with Kubernetes-native placement and scheduling policies. Use node labels and taints to control where VM workloads are deployed, segregating critical VMs from less sensitive applications or container-only resources. This enables you to optimize resource allocation, comply with regulatory requirements, and ensure high availability.
KubeVirt supports affinity and anti-affinity rules, letting you balance workloads or enforce redundancy as needed. Resource isolation is critical for predictable VM performance. Define appropriate CPU, memory, and storage allocations for each node, and reserve dedicated hardware pools if necessary. Implement node selectors to route certain classes of VMs to pre-configured or security-hardened nodes.
3. Select a CNI Network Model and Plan for VM-Specific Networking
Choosing the right container network interface (CNI) plugin is essential for networking VMs in Kubernetes. Popular choices like Multus, Calico, or Flannel can be integrated with KubeVirt to provide flexible networking models suitable for VM workloads. Consider whether your VMs require features like multiple network interfaces, advanced routing, or direct attachment to existing VLANs, features that certain CNI plugins support out of the box.
Beyond plugin selection, evaluate network policies, DNS integration, and service exposure methods tailored for VM needs. Plan for VM-specific features such as static IP reservations or MAC address assignment, and test compatibility with containerized network policies. Ensure interoperability with existing on-premises networks or cloud environments, so VMs managed by KubeVirt can communicate securely and efficiently with external systems and services.
4. Deploy Using the Operator Model
KubeVirt provides its own Operator, which is the recommended installation and upgrade method. The Operator follows controller patterns to automate lifecycle management processes, such as deploying, updating, or scaling KubeVirt components cluster-wide. This reduces manual intervention, ensures best-practice defaults, and helps maintain compliance across versions and environments.
Using the Operator model brings built-in reconciliation and self-healing capabilities. Configuration drifts are automatically remediated, and the Operator can apply declarative changes consistently throughout the cluster. Operators also simplify upgrades, manage CRD lifecycle changes, and provide a central point of control for managing KubeVirt deployments at scale, reducing operational risk and complexity.
Managed Kubernetes distributions build on this pattern too; for example, OpenShift KubeVirt packages these operator-driven components so teams can run VMs alongside containers on the platform.
5. Follow Least Privilege and Secure Defaults
Security is paramount when running VMs on Kubernetes. Always deploy KubeVirt with the principle of least privilege, restricting service accounts and RBAC permissions to only what’s necessary. Use secure pod manifests, avoid privileged containers when possible, and configure KubeVirt to run with minimal host capabilities. Employ network policies and firewalls to isolate VMs both from containers and from one another, reducing the attack surface.
Review and apply KubeVirt’s built-in security features, such as SELinux integration, image signature verification, and encrypted storage for sensitive VM data. Regularly update the KubeVirt operator and all dependencies to ensure security patches are applied. Adopting Kubernetes security best practices alongside KubeVirt-specific guidelines minimizes risk.
6. Implement Unified Network Policy for VMs and Pods
To manage security effectively in a mixed environment of VMs and containers, define network policies that apply uniformly across both. KubeVirt integrates with Kubernetes network policy APIs, so you can apply the same enforcement rules to virtual machines as you would for pods.
Use Kubernetes-native network policies to segment traffic between namespaces, restrict ingress or egress at the VM level, and define service access boundaries. If your CNI plugin supports it (e.g., Calico), policies can target VM interfaces directly, treating them as pod endpoints. For more advanced needs, combine standard policies with Multus and custom CNI chains to enforce policies across multiple network interfaces per VM.
This approach ensures consistent enforcement across all workloads, reduces configuration drift, and simplifies auditing. Treating VMs and pods as equal participants in policy enforcement helps reduce security gaps and makes compliance frameworks easier to apply across the board.
7. Ensure Observability Across VM and Pod Traffic Paths
Observability tools must capture metrics, logs, and traces from both VMs and containers to provide end-to-end visibility. KubeVirt exposes VM metrics using Prometheus-compatible endpoints, which include resource usage (CPU, memory, I/O), VM lifecycle events, and libvirt process health.
To monitor traffic paths, use network observability tools like Cilium Hubble or eBPF-based telemetry solutions that support both container and VM interfaces. Fluent Bit or Vector agents can collect logs from virt-launcher pods, while OpenTelemetry can trace service interactions across hybrid workloads.
Ensure your observability stack supports correlation between pod and VM traffic, especially when VMs are part of service meshes or exposed through Kubernetes services. Use consistent labels and annotations across workloads to simplify dashboarding and alerting. This unified view helps diagnose performance issues, detect anomalies, and maintain service-level objectives across heterogeneous infrastructure.
How Calico Delivers Unified Networking & Security for Pods and VMs
In the vSphere world, VMs got their networking and security from one stack (NSX, vSwitches, hypervisor firewalls) and any containers running alongside them got it from somewhere else entirely. That split is the networking tax most platform teams are still paying. Calico collapses it: pods and VMs share the same data plane, the same policy model, and the same observability surface, so a workload’s type stops dictating how it’s networked, secured, or observed. Live migration between nodes becomes a consequence of that unification rather than a special case to engineer around. Understanding KubeVirt live migration is key to keeping virtual machine networking and policy intact as workloads move between nodes.
- Calico L2 Bridge Networks for VM network continuity. Calico creates a bridge on each cluster node and attaches a trunk interface, allowing the VM’s original VLAN, IP address, and MAC address to be carried directly into Kubernetes through a secondary interface (
net1) on thevirt-launcherpod. Multiple VLANs can share the same trunk-backed bridge, so the existing Layer 2 topology is preserved without per-VLAN infrastructure. - Declarative network configuration. Administrators define a Kubernetes
networkresource that tells Calico which VLAN to bridge and how to map it, and aNetworkAttachmentDefinitioninstructs KubeVirt to attach the secondary interface at boot. Migration tooling such as Forklift maps existing VM interfaces to these definitions and registers the VM’s IP with Calico before cutover. - IP, VLAN, and MAC continuity for VM workloads. Once Calico owns the VM’s network identity, it maintains routing state and binds that identity to the workload wherever it runs in the cluster. Firewall rules, DNS records, load balancer backends, and monitoring targets continue to resolve without change, and when KubeVirt live-migrates the VM between nodes, the upstream network sees no movement at all.
- eBPF-based observability across pods and VMs. Calico provides traffic flow data, communication patterns, and east-west visibility for both pod and VM interfaces using eBPF, without per-host agents, taps, or external monitoring tooling. Platform teams get one telemetry surface for both workload types, and that telemetry stays consistent as VMs move across nodes during live migration.
- Kubernetes-native network policy on VM interfaces. Calico network policy applies directly to VM interfaces using the same label and selector model used for containers, with selectors that can target specific VLANs or external networks. Existing hypervisor firewall rules can be migrated incrementally into version-controlled, auditable Calico policy, the same policy primitives your platform teams already use for pods.
Next Steps
- Read our practitioner’s guide: The Complete Guide to VM Networking for Kubernetes
- Lift-and-Shift VMs to Kubernetes with Calico L2 Bridge Networks – technical walkthrough of how Calico L2 Bridge Networks preserve VLANs and IPs during migration and across live migration between nodes.
- KubeVirt Networking: How to Preserve VM IP Addresses During Migration – interface-level detail on how Calico attaches the secondary net1 interface and tracks VM IPs through the virt-launcher pod.
- VM Migration to Kubernetes: What Breaks and How to Prevent It – comparison of L2 and L3 networking models for VM migration and the operational implications for live migration on day 2.
- Blog: KubeVirt Live Migration Done Right: What it Takes to Run VMs on Kubernetes