In part 1 of the GitOps blog series, we discussed the value of using GitOps for Calico policies, and how to roll out such a framework. In this second part of the series, we will expand the scope to include decentralized deployment and GitOps.
We see different personas among our customers deploying three types of controls:
- Cluster hardening policies are enforced and controlled by the platform admin
- Organizational security controls are enforced and controlled by the security admin
- Each application team may have their own unique requirements. This is controlled by the DevOps admin for the specific application.
This is different from the traditional firewall world, where the security admin is responsible for managing security policies, and the change management window could be several weeks in duration. Adopting that model in Kubernetes is simply counter to the very principles of enabling the developers. So how can we make policy creation and enforcement simple, yet adhere to organizational processes? The answer lies in simple tooling, GitOps and governance.
Policies have business logic that must be implemented in YAML. The business logic (allow access for service A to service B, open port 443 inbound on service B, permit access to slack webhook etc.) can easily be written by the development team. The challenge is getting the YAML correct, testing it, and making sure that something else is not broken because of the proposed changes.
As a solution, we propose the following:
- Establish a policy blueprint and communicate it. This should clearly articulate policy workflow and personas involved.
- Define your own human-readable template for policies. Then build the tooling to validate and convert that to the actual policies.
- Enforce the controls (policy governance) as part of the CI (continuous integration) process.
Your policy blueprint can be at either end of the spectrum. One end is being restrictive, where you lock down the policy updates via a central team. The other end is being permissive, where you have a fully decentralized platform and developers have the freedom to create their own policies. Either way, you are bound to answer questions like: “How do I ensure that the policies are, indeed, enforced?”, “How do I make sure that the policies are not violating my organization controls?”, etc.
How to Build a Decentralized Policy Pipeline
In the following sections, we provide an example of how to build a decentralized policy pipeline per the diagram, below.
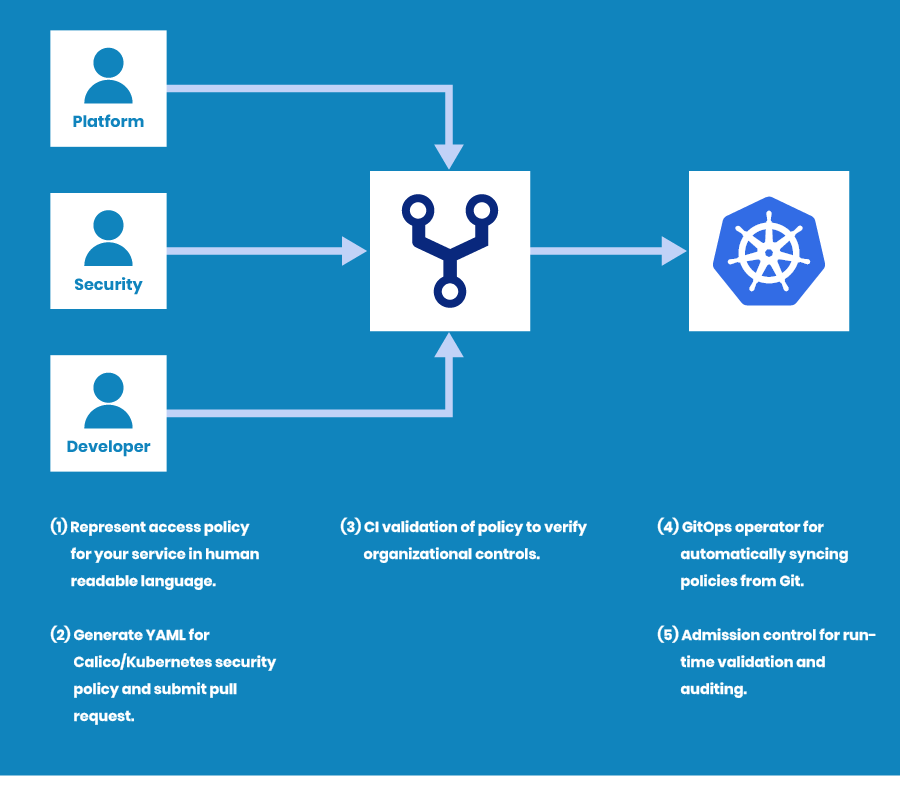
Figure 1: Decentralized policy pipeline example
We recommend following these steps:
First, you define a standard template for access policy representation and build tooling for security policy YAML generation from that template. Then instead of writing plain YAML, the application teams define their access policies in a simple, standard format as enforced in that template. This allows the app teams to focus on business logic and not worry about policy syntax or accuracy. Also in most cases, you have more than one cluster running and developers do not need to worry about which policy to apply on which cluster.
Then you introduce a set of validation checks in your CI pipeline. These validation checks represent how you have defined your policy governance. Some examples:
- NetworkPolicy for applications must have an order value of 500+
- Policy selector must be one of the label keys [zone, network, appname]
- Ingress policy cannot be “allow all”
- Metadata must contain your namespace
If the PR (pull request) for policy changes passes through the validation checks, it is automatically synced to the specific cluster by the GitOps operator. At this point, you can re-apply the policy governance checks using an admission controller. If you have a single user deploying Calico policies via GitOps and no other user is even allowed to create/update/delete network policies, then obviously you do not need any admission control checks. In contrast, if your users can update policies individually, then you need to have governance checks in place via an admission controller.
The steps in an end-to-end policy workflow should be automated as much as possible.
In our end-to-end example, we will do the following:
- Create a script to generate policy YAMLs from an opinionated template.
- Perform CI validation checks (policy governance) on git push trigger. We will use GitHub Actions as CI pipeline, and Conftest for policy checks. I chose Conftest as it uses OPA engine under the hood, and it allows us to write our governance checks once and use it for admission control as well. Policy checks are written in Rego language.
- Use ArgoCD as the GitOps operator.
The repo for all the code is here. The flow diagram for policy workflow is shown below.
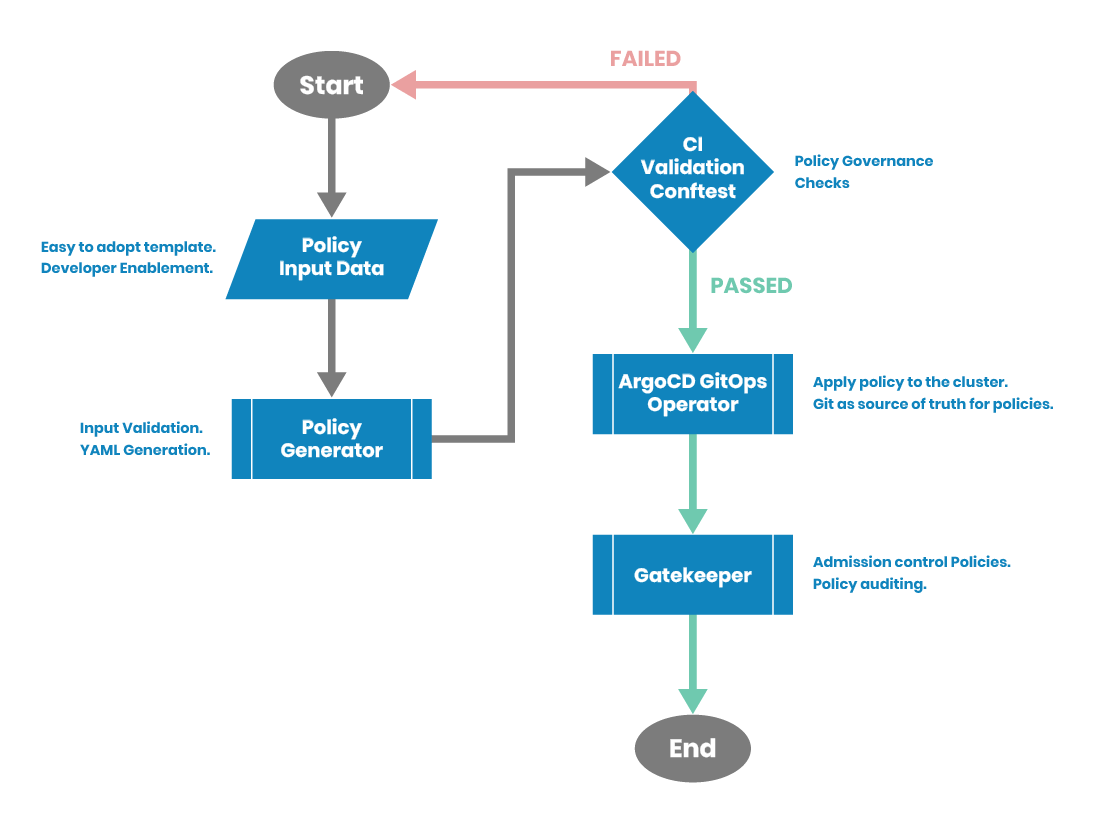
Figure 2: Policy workflow
Policy Generator
Now, let’s create a standard template for developers, so they don’t need to spend time researching how to create policies. This also makes the template the standard format, so all the policies are written exactly in the same way and are much easier to understand and troubleshoot. A simple template can be as follows:
PolicyName: test-app-polies
PolicyOrder: 700

ObjectType: NetworkPolicy
PolicyNamespace: test

AppliesToSelector: all()

Direction: ['Ingress','Egress']

EGRESS:
  - EgressAction: Allow
    EgressPort: [8080]
    EgressProtocol: TCP
    EgressDestinationSelector: ''
INGRESS:
  - IngressAction: Allow
    IngressPort: ''
    IngressProtocol: ''
    IngressSourceSelector: '''
While Calico policies support a rich set of enforcement, you can make it easier by following a standard template. For example, Calico policies support policy enforcement on three types of selectors: pods, namespaces, service accounts. You can pick the appropriate selector in your organization and enforce it via the template.
The policy generator script is a working example. It takes the policy definition in the example templates and generates corresponding Calico policy.
Conftest for Policy Checks
In our workflow example, the policies are submitted to a central repo by corresponding app admins. As each user submits a pull request containing policy YAMLs, this is the right step to apply the required checks. These checks are part of your policy governance and depend on the controls specific to your organization. Some check examples for Calico policies include:
- App policies must have an order value > 500
- App policies cannot contain allow-all ingress rules
- You cannot mix different types (dev, prod, staging) in your policy
- App policy name must be of format appid_<Org>_<site>_<appname>
In our workflow example, we use Conftest for policy checks in the CI pipeline. Conftest is a wrapper on top of OPA (open policy agent) and this makes it very easy to write policy checks. Needless to say, the same repo code for policy checks can be utilized for the admission controller (Gatekeeper/OPA).
We have two working examples of policy checks. To run the policy checks, we use GitHub Actions. This working example runs the policy checks on push to test branches of the repo.
Here is an example of a policy check failure.
WARN - ./policytests/calicopolicy.yaml - You should use networkset for allow-networks-egress. Globalnetworkset is meant to be used for cluster wide resources.

FAIL - ./policytests/calicopolicy.yaml - You are trying to apply a policy cluster-wide and not allowed to do so. Please use networkpolicy for default-deny-cluster
Here is an example showing that the policy checks passed. The result of the test run is reflected in the PR (pull request). After the PR is merged, the master has the latest version of the policies. This is the source of truth and needs to be applied to the cluster.
ArgoCD Operator
Please refer to the earlier blog post on GitOps series for details on using ArgoCD for policy deployment.
ArgoCD ensures that the policies in the GitHub are the source of truth, and prevents any direct modification to the policies. The end-to-end steps for getting ArgoCD working with Calico policies is documented here.
To replicate the end-to-end workflow described above in your cluster, make sure to have the latest version (3.10+) of Calico, as it supports policy for namespace selector.
- Work off a test branch. Use policygenerator.py to create your policy.yaml. Policy.yaml is stored under the policytests folder. There are two sample files (data.yaml, data1.yaml) for pass and fail test scenarios.
- Commit and push the policy.yaml. GitHub actions should trigger automatically and you will see the results under the actions tab.
- If the test passes, then you submit a PR.
- After the PR is approved and merged, ArgoCD takes the policy changes and applies them to the cluster.
Summary
We started by defining the scope (how to enable a decentralized policy workflow) and the challenges (policy writing complexity, governance checks) associated with using GitOps to enforce network security policies in Kubernetes. Then we created an end-to-end policy workflow as an example. This workflow enables app teams to build and maintain their own policies (decentralized), and ensures governance in the CI pipeline. ArgoCD ensures that Git remains as the source of truth for policies, while all the pull requests record each and every change to the policies.
We hope you found this information useful. In the third and final post in this series, we will dive into testing considerations for Calico policies.
————————————————-
Free Online Training
Access Live and On-Demand Kubernetes Tutorials
Calico Enterprise – Free Trial
Solve Common Kubernetes Roadblocks and Advance Your Enterprise Adoption
Join our mailing list
Get updates on blog posts, workshops, certification programs, new releases, and more!