Kubernetes adoption comes with a lot of challenges. One of them is consistently deploying applications to the platform. GitOps is a strategy which solves this problem and solves it at scale. In this blog, we will share how to leverage TravisCI and ArgoCD to design a highly scalable production-ready CI/CD workflow.
Deployment Workflow
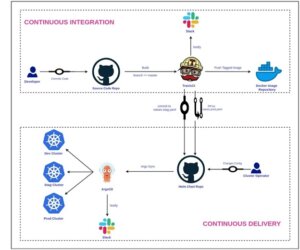
GitOps follows one simple principle “Git is the Source of Truth”. The entire pipeline can be divided into two broad categories. (1) Continuous Integration, where we enable our developers to develop new features, test the code and merge it into a master. (2) Continuous Delivery, where we release new versions of the code for our customers.
Repo Structure
The application and the Kubernetes manifests/helm chart both reside in a git repository. The application source code’s git repo consists of various branches. Following the same principle, we also keep the helm charts for our microservices in a git repo itself. For the sake of this blog we will assume that each source code repository will have at least three (3) branches.
- Dev Branch: This gets deployed to the Dev Kubernetes Environment
- Staging Branch: This gets deployed to the Staging Kubernetes Environment
- Master Branch: This get deployed to the Production Kubernetes Environment
The overall structure of the application’s github repo can be visualized as follows:
| $ tree -a myapp/ myapp/ ├── Dockerfile ├── Makefile ├── README.md ├── src └── .travis.yml |
src is the source code for the application
README.md is the readme for this application which lists usage, instructions and dependencies, etc.
Makefile is the master build file which will consume all other files/directories along with some environment variables to generate docker images and packaged helm charts.
Dockerfile is the dockerfile for the container running in the Kubernetes pod.
.travis.yml is the main CI configuration which will be consumed by travisCI to implement our workflow.
Similarly, the github repo for the helm charts may look something like this:
| $ tree -a charts/
charts/ |
This repository will contain the helm charts for all our applications. It should be noted that all our helm charts along with the values.yaml file also contain the following:
values.dev.yaml: These are the override values which will be used by the application in the development environment.
values.stag.yaml: These are the override values which will be used by the application in the staging environment.
values.prod.yaml: These are the override values which will be used by the application in the production environment.
In order to deploy to the staging environment manually, one would run:
| $ helm install -f charts/myapp/values.stag.yaml charts/myapp |
We will want our CD tool to follow a similar convention.
CI Workflow
It can be explained in the following points.
- As soon as the developer checks in code to Git, the CI pipeline is triggered:
- This check-in could be to a Dev Branch, Staging Branch or Master Branch
- We recommend running entire pipelines for a commit to the master branch (or when a tag gets pushed )
- In case of Pull Requests, only the Build and Test stages will run
- Once the pipeline is triggered:
This pull request only modifies the image tag which will be deployed to different environment. The following makefile encapsulates all of these.
| export TAG := $(shell git rev-parse –short HEAD) export APP := myapp .PHONY: docker-build docker-build: $(info Make: Building docker images: TAG=${TAG}) docker build -t myrepo/myapp:${TAG} -f Dockerfile ..PHONY: docker-scan docker-scan: $(info Make: Scanning docker images: TAG=${TAG}) make docker-build docker run –rm -v $HOME:/root/.cache/ -v /var/run/docker.sock:/var/run/docker.sock aquasec/trivy –exit-code 0 –severity MEDIUM,HIGH –ignore-unfixed myrepo/myapp:${TAG}.PHONY: docker-push docker-push: $(info Make: Building docker images: TAG=${TAG}) make docker-scan docker push myrepo/myapp:${TAG}.PHONY: stag-commit stag-commit: $(info Make: Commit to Staging helm chart TAG=${TAG}) git clone myorg/charts.git && cd charts && /snap/bin/yq write -i charts/${APP}/values.stag.yaml image.tag ${TAG} && git add charts/${APP}/values.stag.yaml && git commit -am “${APP} Stag Release ${TAG}” && \ git push -f -u master .PHONY: prod-pr prod-pr: $(info Make: Commit to Prod helm chart TAG=${TAG}) git clone myorg/charts.git && cd charts && /snap/bin/yq write -i charts/${APP}/values.prod.yaml image.tag ${TAG} && git add charts/${APP}/values.prod.yaml && git checkout -B ${APP}-${TAG}-release && git add . && git commit -am “${APP} Prod Release ${TAG}” && git push -f -u origin ${APP}-${TAG}-release |
An important concept here is to understand that we are using git sha (short) to tag the images with the commit-id. The same convention is followed throughout the process and we subsequently update the helm chart with the same naming convention in order to maintain consistency. Now all of these make targets will come together when you implement them in our CI configuration. Today we will take an example of TravisCI. The following .travis.yml consumes the Makefile at the source of our repo and runs our entire pipeline.
| sudo: required dist: xenial services: – docker addons: snaps: – name: yq classic: true env: global: # travis encrypt DOCKER_PASS=mydockerpass – secure: “BdfrOIoKvHUAYGORKuvlrRfB4cRdKIyr2RWlWrEl4OmNF9ypO+Ij7ZE=” # travis encrypt DOCKER_USER=mydockeruser – secure: “QSm6e3HC0SEyCl+lqil792zIe91xRA106/f3wm6rvEfbu/rxafkkbnj=” before_install: – echo $DOCKER_PASS | docker login -u $DOCKER_USER –password-stdin jobs: include: – stage: Build Docker Images name: “Build Docker images and run tests” script: # Building images – make docker-build- stage: Scan Docker Images name: “Scan Docker images” script: # Building images – make docker-scan – stage: Publish Docker Images name: “Push Docker images” if: branch = master script: # Pushing tagged images – make docker-push – stage: Update Helm Chart name: “Update Helm Chart” if: branch = master Script: # Deploy to Staging Cluster – make stag-commit # PR for Production Cluster – make prod-pr |
| #travis encrypt “<account>:<token>#channel” –add notifications.slack.rooms
notifications: slack: rooms: – secure: “sdfusdhfudfbgs3453durghssecurestringidsuag34522irueg=” on_success: always |
Important things to note:
- We are pushing docker images for the master branch only.
- In every other case, we build, test and scan the docker images. This ensures that when code gets merged to the master branch, at least all Unit tests are passing, it is free from vulnerabilities and it compiles properly.
- We can always have more complex scenarios where a build can be triggered when
- A tag which follows a certain naming convention gets pushed out
- A scheduled run of the pipeline takes place
- A particular branch is pushed to
Once, the image is built, pushed and the helm repo is updated. It is time to deploy our changes to a target Kubernetes environment. This is where the handoff from CI to CD takes place.
CD Workflow
ArgoCD is our tool of choice when it comes to continuous delivery. It is super-easy to install and configure. The most important question around a GitOps pipeline is “When to Deploy ?” So, let’s address that first. The deployment workflow for various environments is as follows:
Dev Environment: A commit/merge to the Dev branch of the application source code.
- Builds the dev branch pushes the docker image to the docker image repository
- Modifies values.dev.yaml for the application in the helm chart git repo, which triggers deployment to the Dev Kubernetes Cluster
- Modifies values.stag.yaml for the application and creates a PR for it. The deployment of this docker image to Staging is blocked unless the PR gets merged.
Staging Environment
Scenario I: When we merge the PR created by the Dev deploy, the docker image is rolled out to the Staging Environment.
Scenario II: A commit/merge/nightly build of the Staging branch of the application source code
- Builds the staging branch pushes the docker image to docker image repository
- Modifies values.stag.yaml for the application in the helm chart git repo which triggers deployment to the Staging Kubernetes Cluster
Production Environment: A commit/merge to the Master branch of the application source code.
- Builds the master branch pushes the docker image to the docker image repository
- Modifies values.stag.yaml for the application in the helm chart git repo which triggers deployment to the Staging Kubernetes Cluster
- Modifies values.prod.yaml for the application and creates a PR for it. The deployment of this docker image to Production is blocked unless the PR is merged.
- As soon as we merge the PR created above, the rollout for Production is initiated
This workflow ensures that the deployments to Production environment are always first deployed to Staging. It is very important to have this in place from a site reliability perspective. The ArgoCD configuration for the production deployment of an application may look something like this:
| apiVersion: argoproj.io/v1alpha1 kind: Application metadata: name: myapp-prod namespace: argocd finalizers: – resources-finalizer.argocd.argoproj.io annotations: recipients.argocd-notifications.argoproj.io: slack:#deploy-notifications labels: team: ops spec: project: myproject source: repoURL: [email protected]:myorg/charts.git targetRevision: HEAD path: charts/myapp helm: releaseName: myapp valueFiles: – values.prod.yaml destination: server: http://kubernetes.default.svc namespace: demo-app syncPolicy: automated: {} |
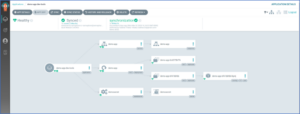
You can have a similar configuration for staging and dev deployments with different Kubernetes clusters as a destination. Once the application has successfully synced we should get a notification similar to the one shown, below.

And the resources can be visualized on the ArgoCD Dashboard.
Summary
I believe this helps us to get started with GitOps pipelines. Adopting a GitOps methodology has a ton of advantages, the most important being the transparency it brings between the application configuration deployed in a Kubernetes cluster and the one residing in the git. Feel free to reach out if you have any questions!
————————————————-
Free Online Training
Access Live and On-Demand Kubernetes Training
Calico Enterprise – Free Trial
Network Security, Monitoring, and Troubleshooting
for Microservices Running on Kubernetes
Join our mailing list
Get updates on blog posts, workshops, certification programs, new releases, and more!