Kubernetes documentation clearly defines what use cases you can achieve using Kubernetes network policies and what you can’t. You are probably familiar with the scope of network policies and how to use them to secure your workload from undesirable connections. Although it is possible to cover the basics with Kubernetes native network policies, there is a list of use cases that you cannot implement by just using these policies.
You can refer to the Kubernetes documentation to review the list of “What you can’t do with network policies (at least, not yet)”.
Here are some of the use cases that you cannot implement using only the native network policy API (transcribed from the Kubernetes documentation):
- Forcing internal cluster traffic to go through a common gateway.
- Anything TLS related.
- Node specific policies.
- Creation or management of “Policy requests” that are fulfilled by a third party.
- Default policies which are applied to all namespaces or pods.
- Advanced policy querying and reachability tooling.
- The ability to log network security events.
- The ability to explicitly deny policies.
- The ability to prevent loopback or incoming host traffic (Pods cannot currently block localhost access, nor do they have the ability to block access from their resident node).
In this multi-part blog series, we will address these user stories explaining why they are essential to protect your environment and how you can implement them using Calico.
Use Case #1: Forcing internal cluster traffic to go through a common gateway
New applications and workloads are constantly being added to Kubernetes clusters. Those applications must securely communicate with resources outside the cluster behind a firewall or other control points such as IDS/IPS, VPN Gateways, ACL on routers, etc. Firewalls require a consistent routable IP, but routable IPs are a limited resource that can be quickly depleted if applied to every service.
The Calico Egress Gateway ingeniously solves these problems. First, it defines a static egress IP for SNAT on traffic leaving the cluster and applies it to a specific namespace. Then it designates one pod in a namespace as the egress pod and assigns a routable IP which is used specifically for egress traffic leaving the cluster.
In this blog post, let’s explore in detail how the Calico Egress Gateway works and what problems it can solve.
Egress Gateway Technical Overview
The egress gateway serves as a pass-through point for outgoing application traffic that is set up to utilize it. As the traffic exits the cluster, it flows through the egress gateway, causing its original source IP address to be replaced by that of the egress gateway pod. Afterward, the traffic continues to be forwarded to its intended destination.
As an outbound application flow departs from the cluster, its IP packets will possess a source IP address, which usually corresponds to the pod IP of the pod responsible for generating the flow. Alternatively, it may be the node IP of the node on which that pod is hosted, provided the pod IP was derived from an IP pool with the natOutgoing attribute set to true. In the absence of any other CNI plugin configured to perform NAT on outbound traffic, the pod IP will be utilized
When an egress gateway is introduced, the same rules still apply for outbound application flows, with the exception that the egress gateway’s IP address becomes the source IP address instead of the original application pod’s IP address. Therefore, if the egress gateway’s pod IP was obtained from an IP pool with the natOutgoing attribute set to true, the flow will possess the egress gateway’s node IP, and if not, it will contain the egress gateway’s pod IP.
Enable egress gateway
In the default FelixConfiguration, the egressIPSupport parameter can assume two values enabling the egress gateway to operate differently:
EnablePerNamespace: When this value is applied, Calico will forward all the traffic from pods in a namespace to one egress gateway
kubectl patch felixconfiguration.p default --type='merge' -p \
'{"spec":{"egressIPSupport":"EnabledPerNamespace"}}'
EnabledPerNamespaceOrPerPod: For this value, you can choose between having the traffic from the entire namespace forwarded to an egress gateway or having the traffic of a specific pod (or pods) sent to an egress gateway.
kubectl patch felixconfiguration.p default --type='merge' -p \
'{"spec":{"egressIPSupport":"EnabledPerNamespaceOrPerPod"}}'
Additionally, egress gateways require the policy sync API to be enabled on Felix by modifying the field policySyncPathPrefix to /var/run/nodeagent:
kubectl patch felixconfiguration.p default --type='merge' -p \
'{"spec":{"policySyncPathPrefix":"/var/run/nodeagent"}}'
Provision an IP pool for egress gateway
Create the IP Pool with a small IP range and configure the egress gateway to use these IPs for outbound connections. This way, you can ensure that the source IPs utilized by your application are easily identifiable and traceable in your network infrastructure.
apiVersion: projectcalico.org/v3
kind: IPPool
metadata:
  name: egress-ippool-1
spec:
  cidr: 10.10.10.0/31
  blockSize: 31
  nodeSelector: "!all()"
Pull secret to egress gateway namespace
To pull Calico Cloud images, locate the required pull secret and transfer it to the namespace where you intend to establish your egress gateways. The pull secret is commonly referred to as “tigera-pull-secret” and resides in the calico-system namespace. To copy it to the default namespace, execute the following command:
kubectl get secret tigera-pull-secret --namespace=calico-system -o yaml |
  grep -v '^[[:space:]]*namespace:[[:space:]]*calico-system' |
  kubectl apply --namespace=default -f -
Deploy the egress gateway
You can deploy the egress gateway as a daemonset or as a deployment. Here is an example of a deployment yaml:
apiVersion: apps/v1
kind: Deployment
metadata:
  name: egress-gateway
  namespace: default
  labels:
    egress-code: red
spec:
  replicas: 1
  selector:
    matchLabels:
      egress-code: red
  template:
    metadata:
      annotations:
        cni.projectcalico.org/ipv4pools: "["10.10.10.0/31"]"
      labels:
        egress-code: red
    spec:
      imagePullSecrets:
      - name: tigera-pull-secret
      nodeSelector:
        kubernetes.io/os: linux
      initContainers:
      - name: egress-gateway-init
        command: ["/init-gateway.sh"]
        image: quay.io/tigera/egress-gateway:v3.15.1
        env:
        - name: EGRESS_POD_IP
          valueFrom:
            fieldRef:
              fieldPath: status.podIP
        securityContext:
          privileged: true
      containers:
      - name: egress-gateway
        command: ["/start-gateway.sh"]
        image: quay.io/tigera/egress-gateway:v3.15.1
        env:
        - name: ICMP_PROBE_IPS
          value: ""
        - name: ICMP_PROBE_INTERVAL
          value: "5s"
        - name: ICMP_PROBE_TIMEOUT
          value: "15s"
        - name: HTTP_PROBE_URLS
          value: ""
        - name: HTTP_PROBE_INTERVAL
          value: "10s"
        - name: HTTP_PROBE_TIMEOUT
          value: "30s"
        - name: HEALTH_PORT
          value: "8080"
        - name: EGRESS_POD_IP
          valueFrom:
            fieldRef:
              fieldPath: status.podIP
        securityContext:
          capabilities:
            add:
            - NET_ADMIN
        volumeMounts:
        - mountPath: /var/run
          name: policysync
        ports:
        - name: health
          containerPort: 8080
        readinessProbe:
          httpGet:
            path: /readiness
            port: 8080
          initialDelaySeconds: 3
          periodSeconds: 3
      terminationGracePeriodSeconds: 0
      volumes:
      - csi:
          driver: csi.www.tigera.io
        name: policysync
Configure a namespace or pod to use the egress gateway
In Calico Cloud, the Kubernetes Namespace and Pod resources can be configured to use specific egress gateways through annotations. These annotations act as selectors and are designed to identify the set of pods in the cluster that match the specified criteria. By leveraging these annotations, you can ensure that the appropriate egress gateway is used for each pod or namespace, regardless of their location in the cluster. So, to configure that all of the pods in a namespace should use the egress gateways that are labelled with egress-code: red, you would annotate that namespace like this:
kubectl annotate ns <namespace>
  egress.projectcalico.org/selector="egress-code == 'red'"
By default, the selector used in annotations only matches egress gateways within the same namespace. To select gateways in a different namespace, you must specify a namespaceSelector annotation as well. This can be done by running the following command:
kubectl annotate ns  \
  "cni.projectcalico.org/egress-gateway.selector=" \
  "cni.projectcalico.org/egress-gateway.namespaceSelector="
Replace with the name of the target namespace, and with the desired selector criteria. This will enable the namespace to use egress gateways that match the specified selector criteria in other namespaces.
The annotations used for egress gateways in Calico Cloud network policy have the same syntax and range of expressions as those used in selector fields. You can include the desired annotations when creating the pod to configure a specific Kubernetes Pod to use egress gateways. Here is an example of how to do this:
apiVersion: v1
kind: Pod
metadata:
  name: my-pod
  annotations:
    cni.projectcalico.org/egress-gateway.selector: "my-gateway"
    cni.projectcalico.org/egress-gateway.namespaceSelector: "namespace = 'my-namespace'"
spec:
  containers:
    - name: my-container
      image: nginx
In this example, the my-pod pod is configured to use egress gateways with a selector of “my-gateway” and a namespace selector of “namespace = ‘my-namespace'”. These annotations will override any egress gateway settings configured at the namespace level for this specific pod.
Voilà! You have your namespace’s (or pod’s) traffic going through a common gateway and leaving the cluster with a fixed IP that can be properly filtered by the firewall and granted the correct access permissions.
As an example:
In my deployment, you can verify the IP addresses of the nodes and the egress-gateways running as daemonset as follows:
$ kubectl get nodes \
  -o=custom-columns='NAME:.metadata.name,INTERNAL IPADDR:.status.addresses[?(@.type == "InternalIP")].address'
NAME                                            INTERNAL IPADDR
ip-192-168-0-41.ca-central-1.compute.internal   192.168.0.41
ip-192-168-0-9.ca-central-1.compute.internal    192.168.0.9

$ kubectl get pods  \
  -o=custom-columns='NAME:.metadata.name,IP ADDRESS:.status.podIP'
NAME                                  IP ADDRESS
egress-gateway-red-68b4956c5d-xff7p   192.168.0.81
egress-gateway-red-68b4956c5d-zv7j9   192.168.0.113
netshoot-default                      172.16.191.204
From the netshoot-default shell pod, you can try to connect to an external host at 192.168.0.28:
netshoot-default:~# nc -zv 192.168.0.28 7777
nc: connect to 192.168.0.28 port 7777 (tcp) failed: Connection refused
netshoot-default:~#
Looking into the external host, for the packet received, you will notice that the source IP address of the packet is the node IP address:
[ec2-user@ip-192-168-0-28 ~]$ sudo tcpdump -v -ni eth0 tcp port 7777
tcpdump: listening on eth0, link-type EN10MB (Ethernet), capture size 262144 bytes
16:13:49.561793 IP (tos 0x0, ttl 63, id 56337, offset 0, flags [DF], proto TCP (6), length 60)
    192.168.0.9.56424 > 192.168.0.28.cbt: Flags [S], cksum 0xf4fe (correct), seq 1977730801, win 62377, options [mss 8911,sackOK,TS val 3749357998 ecr 0,nop,wscale 7], length 0
16:13:49.561818 IP (tos 0x0, ttl 255, id 0, offset 0, flags [DF], proto TCP (6), length 40)
    192.168.0.28.cbt > 192.168.0.9.56424: Flags [R.], cksum 0xf6bc (correct), seq 0, ack 1977730802, win 0, length 0
16:17:56.138979 IP (tos 0x0, ttl 61, id 25620, offset 0, flags [DF], proto TCP (6), length 60
This is because the pod doesn’t have the required label for using the egress-gateway.

Let’s now label the pod, so the egress gateway will be used:
kubectl annotate pods netshoot-default \
  egress.projectcalico.org/selector="egress-code == 'red'"
By trying the connection again, a different source IP address will be used:
[ec2-user@ip-192-168-0-28 ~]$ sudo tcpdump -v -ni eth0 tcp port 7777
tcpdump: listening on eth0, link-type EN10MB (Ethernet), capture size 262144 bytes
16:17:56.138979 IP (tos 0x0, ttl 61, id 25620, offset 0, flags [DF], proto TCP (6), length 60)
    192.168.0.81.53684 > 192.168.0.28.cbt: Flags [S], cksum 0xd5c6 (correct), seq 635469154, win 62377, options [mss 8911,sackOK,TS val 3749604575 ecr 0,nop,wscale 7], length 0
16:17:56.139001 IP (tos 0x0, ttl 255, id 0, offset 0, flags [DF], proto TCP (6), length 40)
    192.168.0.28.cbt > 192.168.0.81.53684: Flags [R.], cksum 0x9ab9 (correct), seq 0, ack 635469155, win 0, length 0
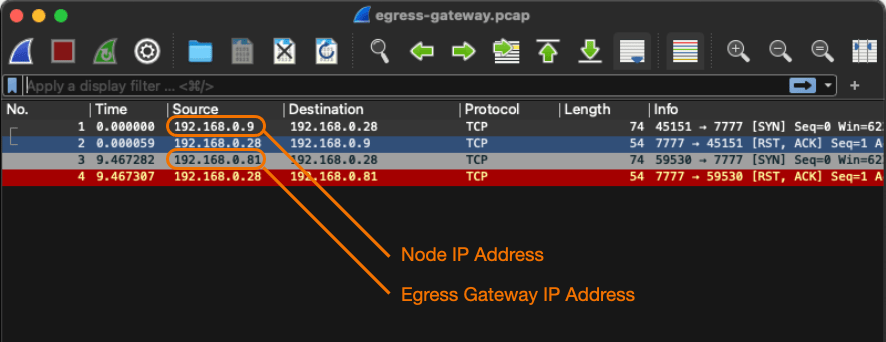
As you can see, this time, the source IP address corresponds to the egress gateway, and not to the node.
See both captured packets in the Wireshark.
Conclusion
Using the Calico Egress Gateway functionality, it is possible to integrate Kubernetes with firewalls, monitoring platforms, and other external systems, allowing them to identify Kubernetes workloads by assigning them a fixed IP address. In integrations with 3rd party APIs, it is possible to guarantee that your application will always use the same IP address for connecting.
In the next blog of this series, we will address the “Anything TLS related” limitation for the Kubernetes native network policies and show how you can use Calico to encrypt the network traffic between your workloads in a more intelligent way. Stay tuned!
Ready to try Calico Egress Gateway? Sign up for a free trial of Calico Cloud.
Join our mailing list
Get updates on blog posts, workshops, certification programs, new releases, and more!