The integration of cloud-native technologies like Kubernetes with public cloud platforms like Amazon EKS has ushered in a new era of scalable and efficient application deployments. However, this combination brings forth unique security challenges, especially concerning container images. Enter Calico Cloud’s Image Assurance – a comprehensive tool designed to bolster the security of your containerized applications on Amazon EKS.
Why Container Security Matters in Kubernetes Environments
The open architecture of Kubernetes, while providing unparalleled flexibility, presents unique security challenges. In a dynamic environment where pods are created and terminated frequently, the attack surface can continually change.
- Evolution of Threat Landscape: As applications evolve, their security postures can weaken. An image that’s deemed secure today can become a potential risk tomorrow.
- Third-party Integrations: Kubernetes deployments often integrate third-party images or libraries. Without proper scans, these can become the weakest link in the security chain.
- Emergency Deployments: The need for quick fixes might lead teams to bypass regular security protocols. These rapid deployments, while solving immediate issues, can introduce unforeseen vulnerabilities.
These vulnerabilities, especially when they are publicly known, are cataloged in the Common Vulnerabilities and Exposures (CVE) system. Calico Cloud’s Image Assurance leverages this system to provide detailed insights into potential security threats in your container images.
Calico Cloud Image Assurance: Bridging the Gap
Leveraging the comprehensive CVE system, Calico Cloud’s Image Assurance provides a thorough analysis of container images deployed on Amazon EKS. Here’s how it enhances security:
- Comprehensive Scanning: With Calico Cloud, you can scan every image deployed to your Kubernetes clusters. This includes everything from libraries like Python and Ruby gems to OS and non-OS packages.
- Assessment and Prioritization: Not all vulnerabilities carry the same risk. Image Assurance allows you to assess the impact of vulnerabilities, helping you prioritize your remediation efforts.
- Continuous Rescanning: Security is not a one-time activity. New vulnerabilities can emerge days or weeks after an initial scan. With continuous rescanning, you ensure that you’re always on top of the security game.
- Flexibility: You can create exceptions to ignore specific vulnerabilities if they don’t pose a threat to your environment. This helps reduce false positives and focuses on more critical issues.
- Proactive Alerts: Get notified about high-severity vulnerabilities in real-time, enabling you to delegate the task of remediation to the concerned teams immediately.
- Enforce Compliance: Block non-compliant workloads using policies, ensuring a robust cloud-native security posture.
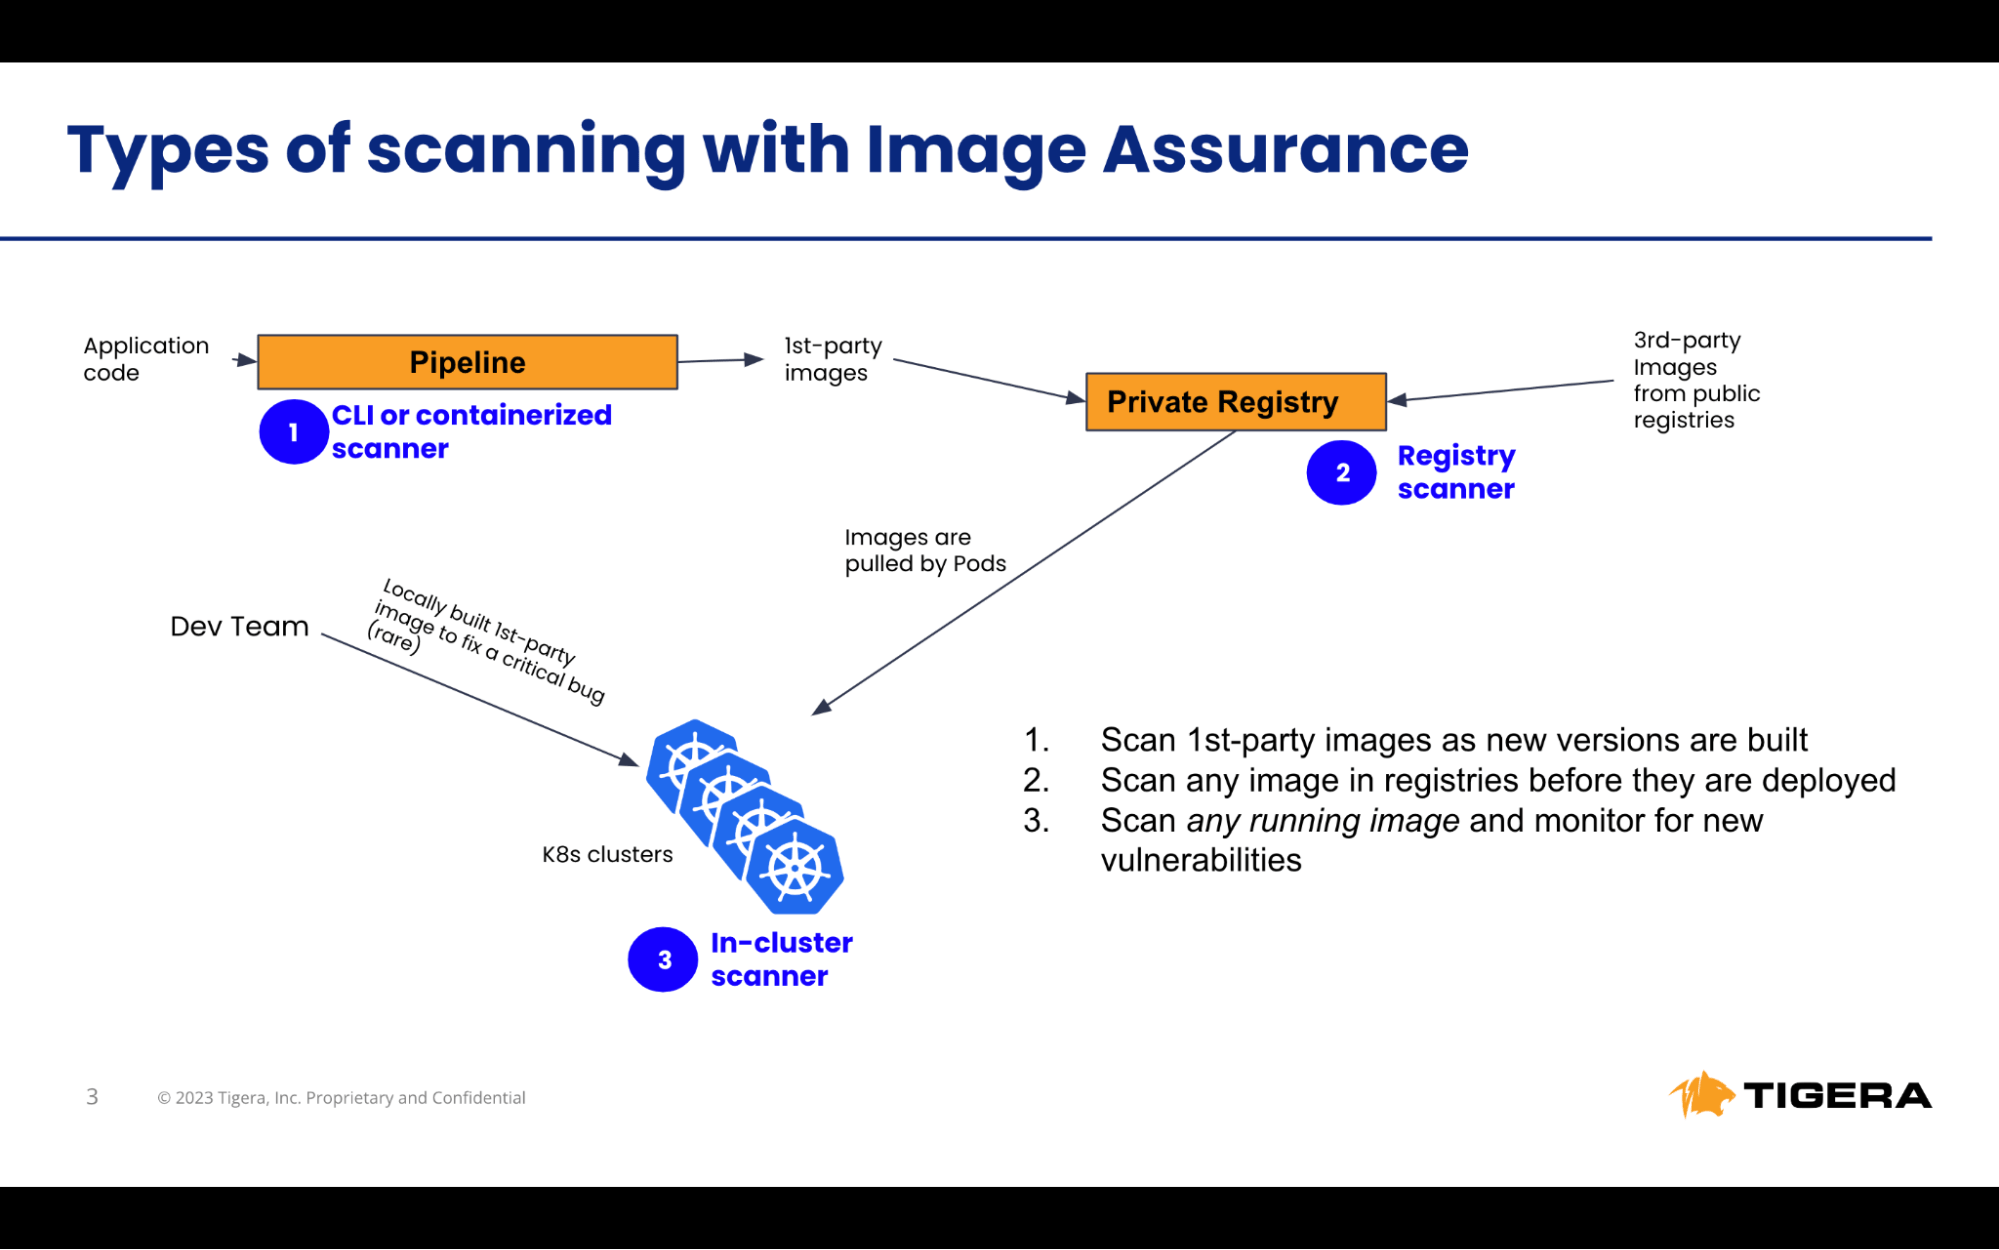
Integration Methods with Amazon EKS
In Cluster Scanning:
- Scope: Scans every image running on your Amazon EKS cluster. This is inclusive of both third-party and locally-built images.
- Advantage: Achieve broad coverage quickly, making it the ideal starting point for organizations new to vulnerability scanning.
Pipeline Integration:
- Scope: Targets images in your CI/CD pipeline and private registries, ensuring security before deployment on EKS. It is pertinent for locally developed images, third-party images, and those sourced from public repositories.
- Advantage: A proactive approach, integrating the scanner within the build pipeline offers real-time vulnerability detection, facilitating quicker remediation.
Let’s look at the in-cluster image scanning feature of Calico Cloud deployed on an EKS cluster.
The Image Assurance scanner is essentially a pre-configured security tool designed specifically for Kubernetes clusters. Right out of the gate, it’s deploy-ready with no additional configuration needed.
Here’s a breakdown:
- Deployment: The scanner operates as a daemonset. This means it’s installed across all nodes in your Kubernetes cluster, ensuring all images within the cluster are scrutinized.
- Vulnerability Detection Workflow:
- SBOM Generation: Using Syft, the scanner generates a Software Bill of Materials (SBOM), which is a detailed list of all dependencies for a given image.
- CVE Matching: The SBOM is uploaded to Calico Cloud. Here, Grype comes into play, cross-referencing the dependencies against known CVEs (Common Vulnerabilities and Exposures) from various vulnerability databases.
- Routine Checks: One standout feature is that Calico Cloud doesn’t just check once. Every 24 hours, it revisits the running images to spot any new vulnerabilities. Post-scan, you can head over to the Image dashboard within the Manager UI to see the findings.

In essence, if you’re working with Kubernetes and need an efficient, no-fuss vulnerability scanner, this tool streamlines the process, providing regular insights on your image security.
We have the following Cluster running in our environment:
- An EKS Cluster running K8s 1.26 having containerD as the run time
- Calico Cloud v3.17.1 Deployed on top of it.
Activating the Image Assurance Scanner:
The Image Assurance tool capitalizes on the plug-and-play approach, which means integration into your existing infrastructure is straightforward. If you’ve already got the latest Calico Cloud on your EKS clusters, here’s how to get the scanner up and running:
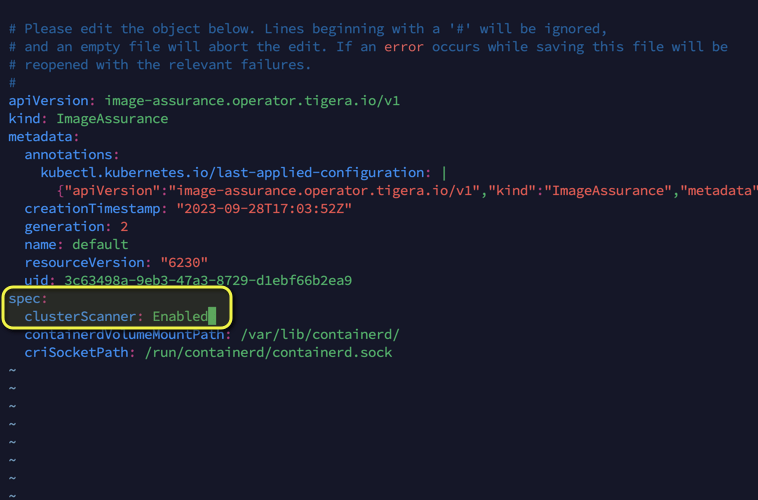
1. Update the imageassurances Custom Resource:
Kick-off by making modifications to the imageassurances custom resource.
kubectl edit imageassurances default
2. Enable the Cluster Scanner:
In the file you’ve opened, set the clusterScanner field to Enabled. Save and close the file. Internally, the cluster scanner is encapsulated as a container within the tigera-image-assurance-crawdad daemonset.
3. Verification:
Verify that a new container with name, cluster-scanner is created inside the daemons.
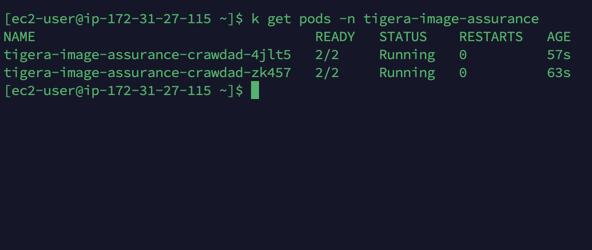
That’s it. Images will start scanning now.
Understanding the image scan results in the Manager UI
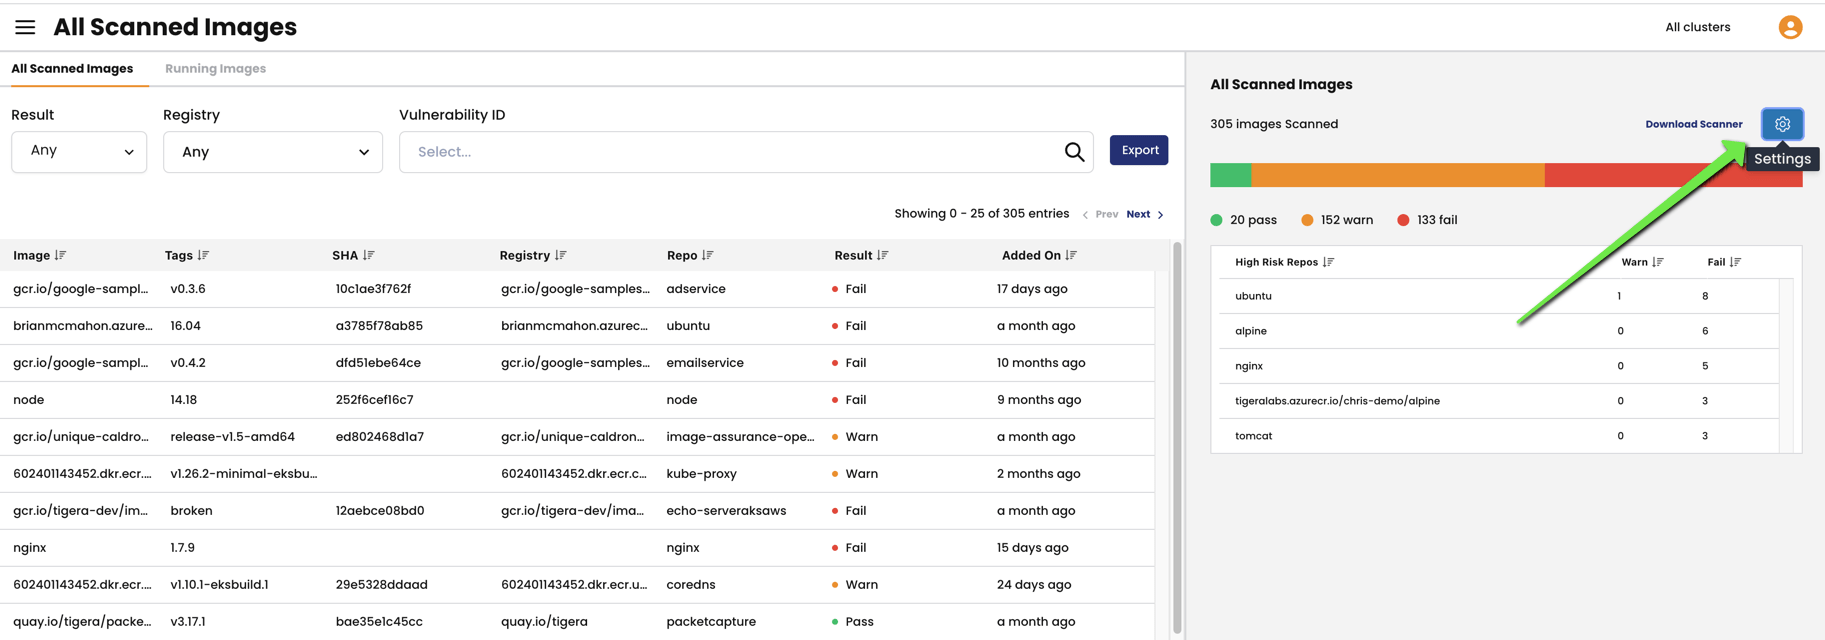
Now that we have enabled the in-cluster scanner and everything is set up, we should start seeing the scan results for all the images currently running in our cluster in the Manager UI. To take a deeper look at it, let’s head over to the Calico Cloud management UI and click on the image assurance tab as shown below:
On clicking the image assurance tab, we can see two options to select viz, All Scanned Images and Vulnerability Exception,

Let’s first explore the All Scanned tab:
We see two entries inside the all-scanned tab,
- All Scanned Images
- Running Images
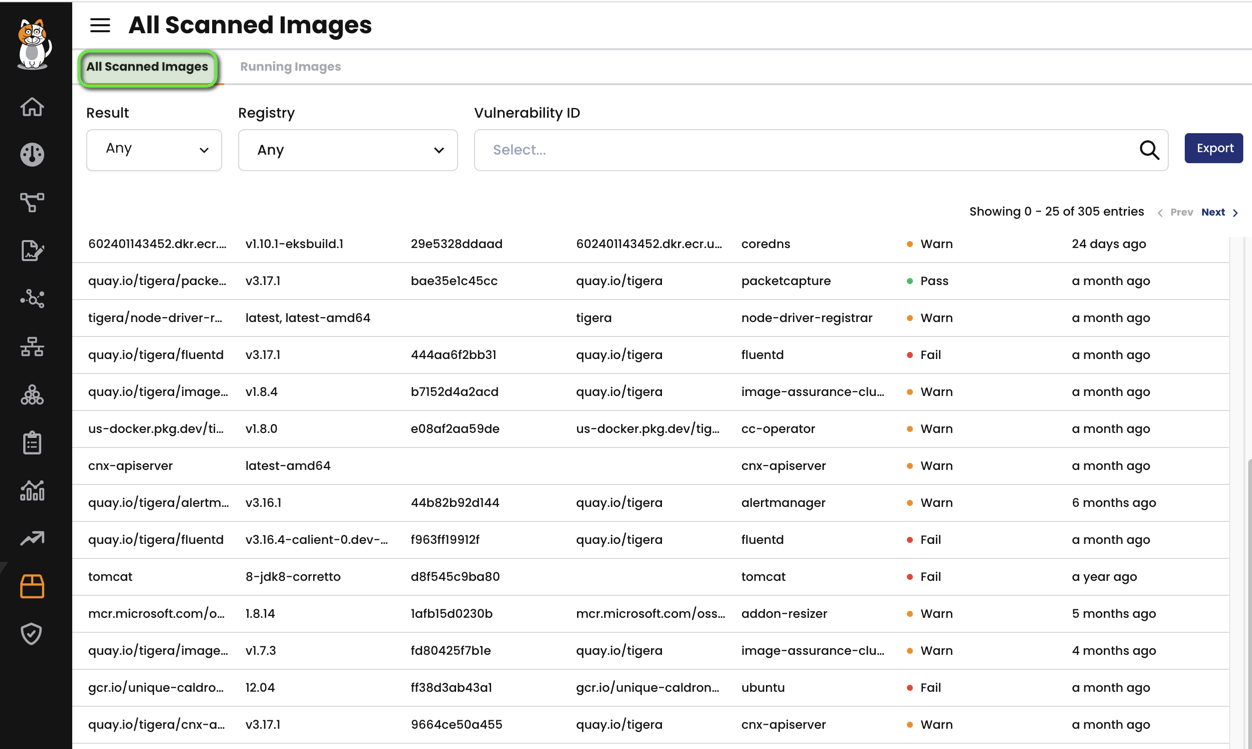
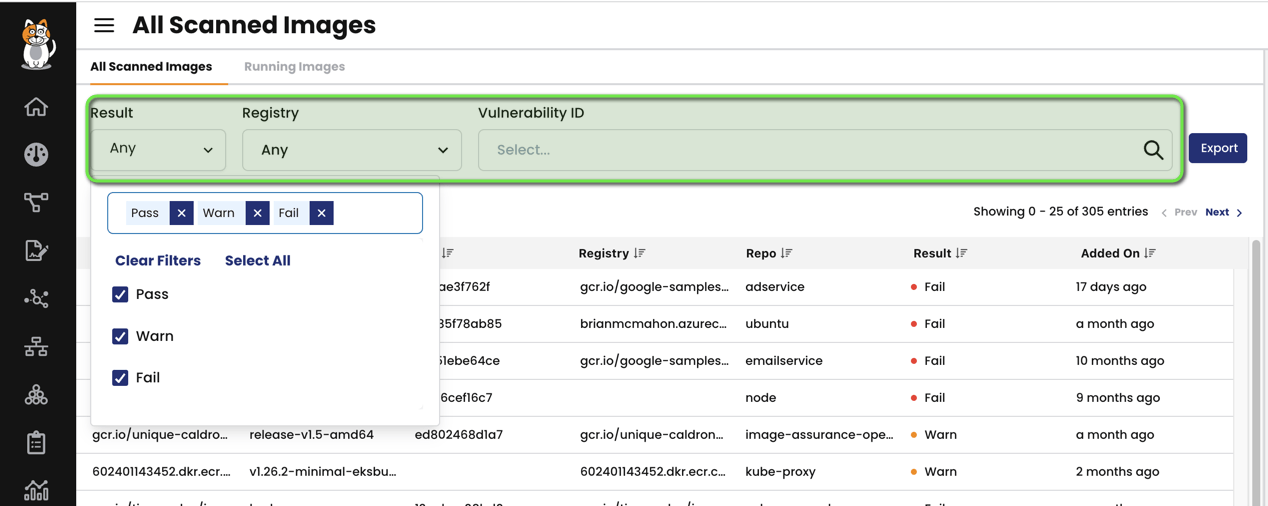
All Scanned Images:
In this panel, you can:
- View all scanned images for CVEs
- Change default scan settings
- Exclude vulnerabilities from scan results
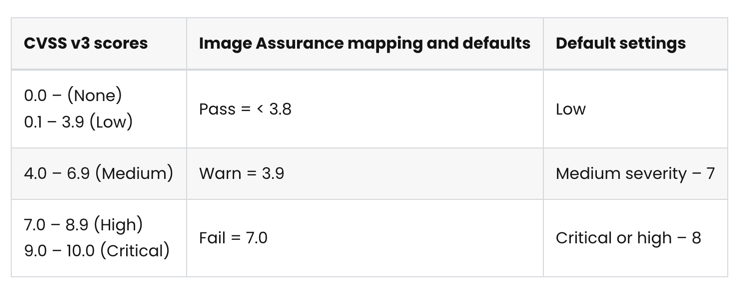
Scan results for Image Assurance is based on the Common Vulnerability Scoring System v3 (CVSS Scores). The default Pass, Warn, and Fail values will work for the majority of Calico Cloud deployments. However, you may need to change the defaults because of security requirements.
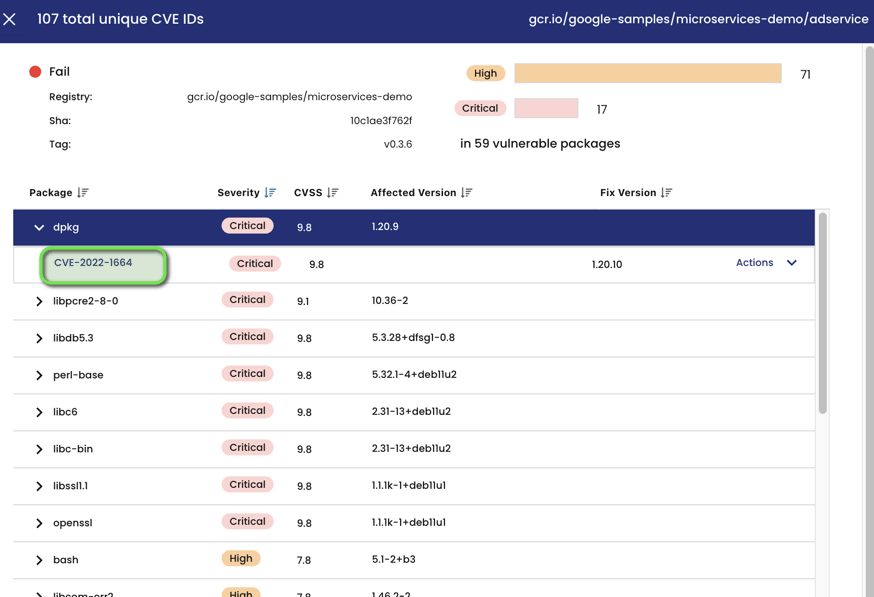
Let’s take an example to understand this better when we sort the images by fail category and click the first image from the list as below:
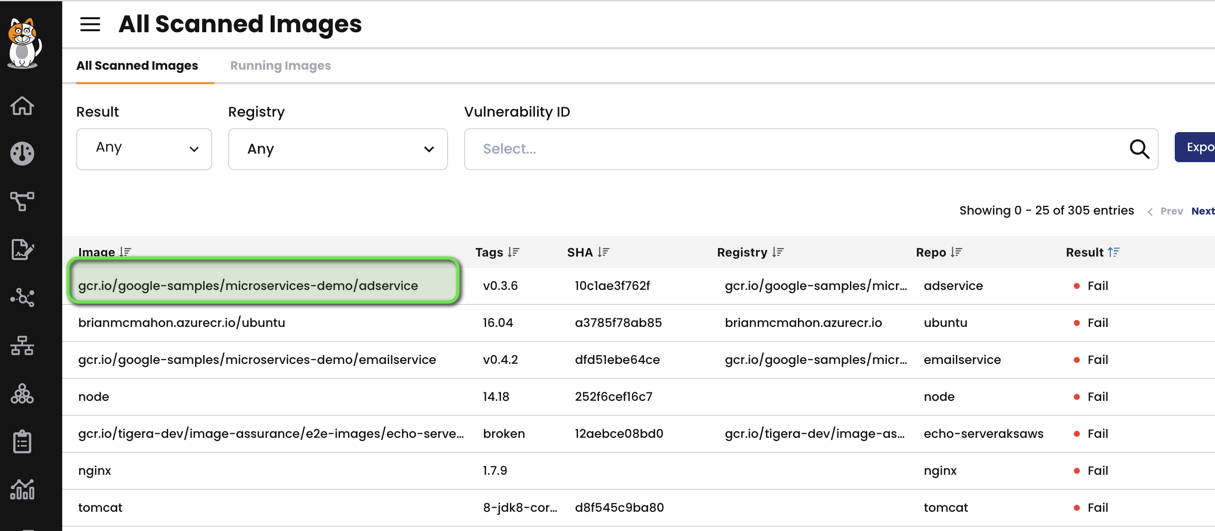
We see a detailed analysis of this image with scan results for all the packages that constitute this image along with their CVSS scores as well as the severity level based on those scores. As we can see in the below screenshot, we can further dig deeper into each package and from the drop-down can have a look at the related CVE ID as published in the NIST database for vulnerabilities.
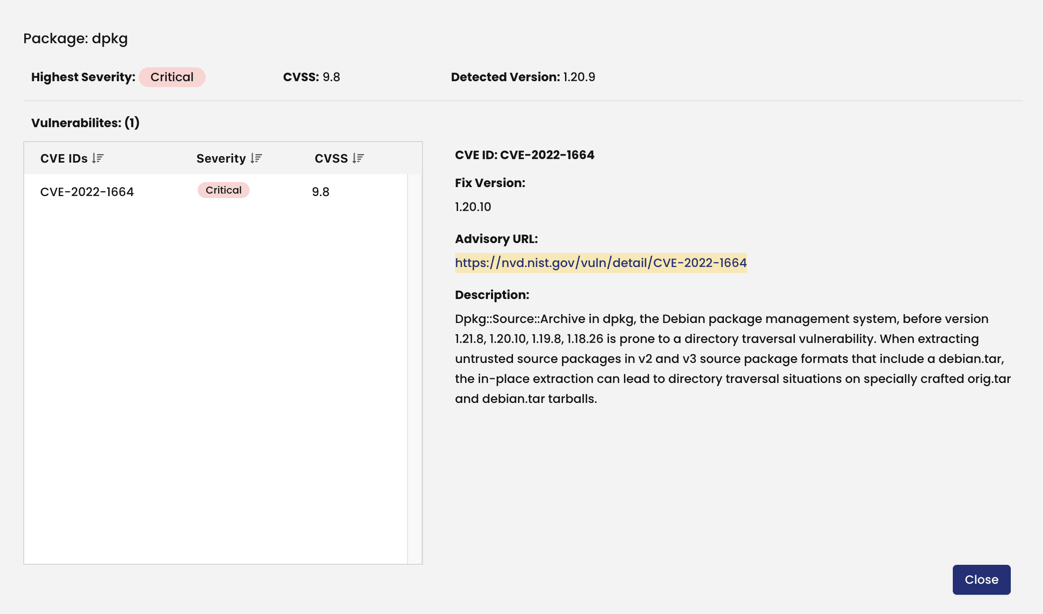
Clicking further on the CVE ID link, a new tab opens up for us which goes through explaining that specific CVE and also provides the full advisory URL from the NIST database.
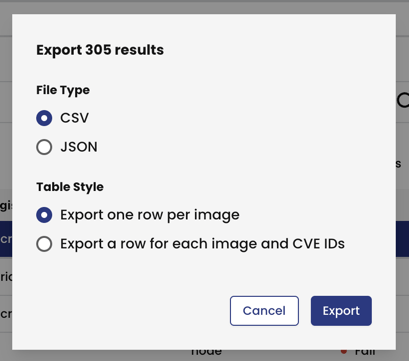
This functionality can be very handy for security folks who quickly want to scan the clusters and have the vulnerabilities pin-pointed in an easy user-friendly GUI. On top of it, the users can also export these results in CSV or JSON file format to be shared with teams internally like security, platform, or dev teams for easy collaboration and tracking.
A quick look at the exported csv file reveals a few important things users can quickly including the pods utilizing those specific vulnerable images:
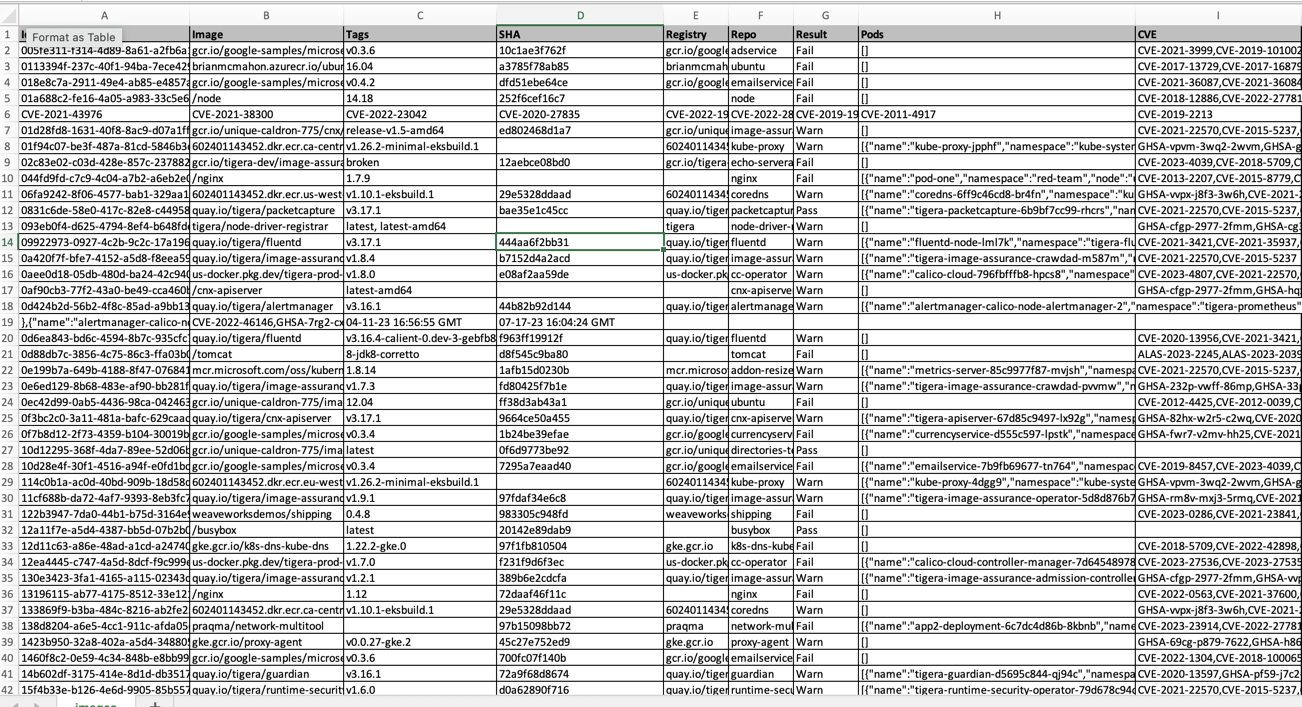
For a team having a huge number of workloads running in the cluster, this feature can be very useful to quickly identify the workloads being affected by the vulnerable images.
Moving back to the UI, let’s explore a few more interesting things, for example, users have the ability to quickly sort and export images based on results (like Fail, Warn or Pass) as well as sort on the basis of registries. They can also quickly search for the image with the vulnerability ID as shown in the screenshot below:
Let’s move to the next interesting tab available in the scan results, the scan settings tab as shown below:
Let’s check that out:
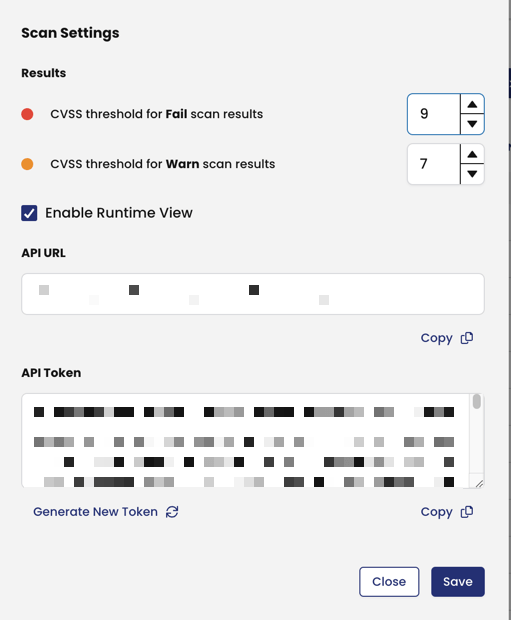
The first two settings that stand out here are Results settings which allow users to tweak the threshold values for the test to show as Failed or Warn based on the obtained CVSS score for the specific image. For example, if the user wants the scan result to show images as failed in the scan results if they hit a threshold of 8 instead of 9 as the default shown in the image above, they can do so by tweaking those values. Same for the Warn scan results as well.
A few things to note here about these settings:
Changing the CVSS thresholds
On the right panel, click the Settings icon. When changing the CVSS threshold values, note the following:
- Changes to values take effect immediately, and alter the scan results for images already in the system
- If you are using admission controller policies, changing a value may allow pods in your Kubernetes cluster that were previously blocked, to now be deployed or vice versa.
By this time, you may also be wondering what the below fields are (as can be seen in the above screenshots).
What is the Enable Runtime View checkbox?
Runtime view allows you to view vulnerable images that are running in your cluster. You can then remediate the vulnerabilities using the CVSS scores as a guideline to triage CVEs.
If you disable Runtime View, some runtime information for existing images will remain in the system.
Download Scanner link
This link goes to the docs with steps to integrate the Image Assurance scanner as part of your build pipeline.
What are the API URL and API Token fields used for?
They are used to authenticate API requests between the scanner to the Image Assurance API if you have integrated the Image Assurance scanner in your build pipeline.
Exclude vulnerabilities from scan results
Sometimes, you might want to leave out certain security weak points from your scanning outcomes. Imagine you get a warning, but you know it’s a mistake, or a “false positive,” due to how you’re using a software package. You can make a “vulnerability exception” which tells the Image Assurance tool to overlook a specific Common Vulnerabilities and Exposures (CVE) entry for a particular image, all images in a repository, or all images outright.
Here’s a step-by-step breakdown:
- Head over to Image Assurance and click on “All Scanned Images.”
- Pick an image from your list.
- Click on any package you see on the side menu.
- Find and select a CVE, then click “Actions” and choose “Add Exception.”
- In the pop-up that appears, (“Add Exception” dialog), choose how widely you want to apply this exception, add some details about why, and hit “Save.” Your exception takes effect in your scan findings straight away.
The below screenshot shows this well:

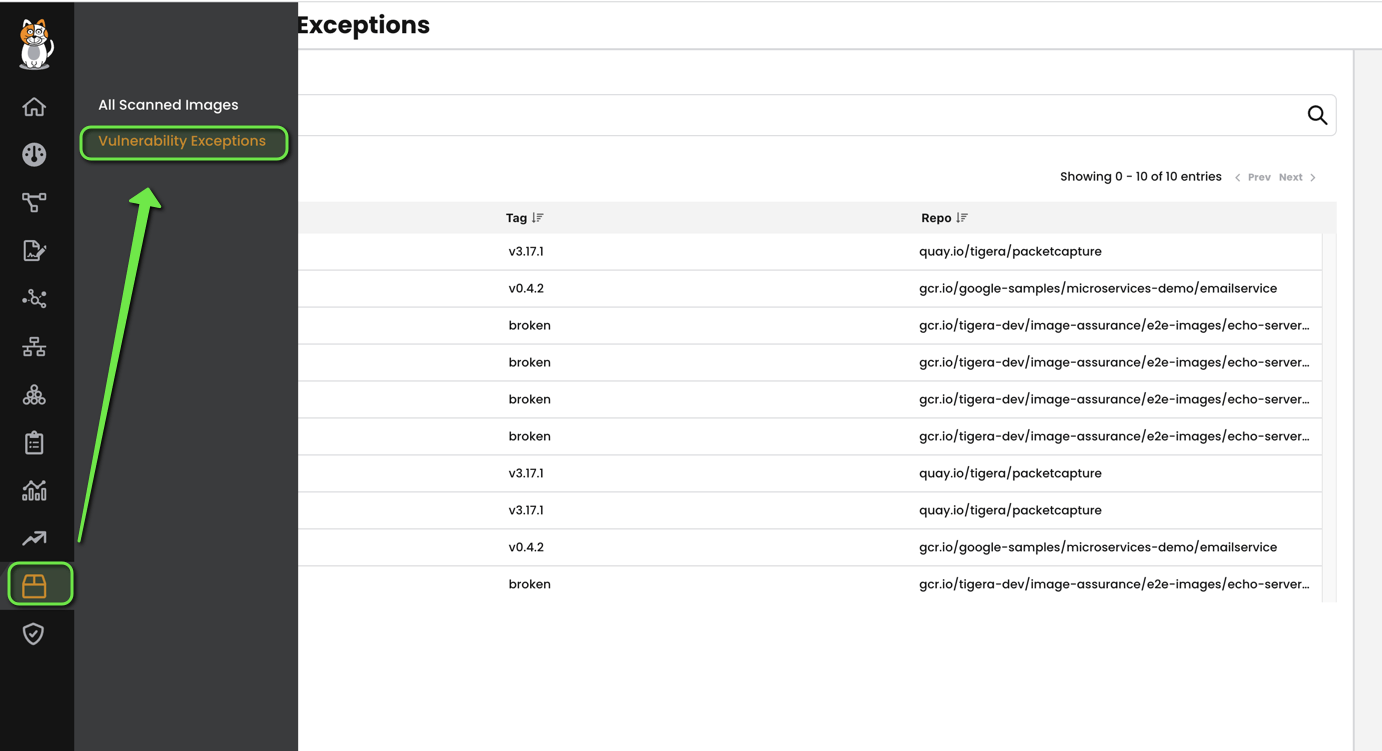
In the screenshot, you can see the scanner indicates the version where the vulnerability was resolved as well. To have a look at all the vulnerability exceptions you’ve set, simply go to: Image Assurance, then click on “Vulnerability Exceptions.”
A Word Of Caution about Exceptions
When you add a vulnerability exception, it can really shift the way Image Assurance assesses the safety of your images.
- Top CVSS Score: The highest CVSS (Common Vulnerability Scoring System) score an image has might go down. By setting an exception, you might remove the highest scoring (most risky) vulnerability from an image’s scorecard.
- Scan Outcomes: The results of your scans (like “Pass,” “Warn,” or “Fail”) could shift, as these are tied to the max CVSS score. For instance, a “Fail” could become a “Warn,” and a “Warn” might turn into a “Pass.”
- Alerts on a Global Scale: You might stop getting some alerts. Usually, alerts pop up based on scan outcomes or the highest CVSS scores in images.
- Admission Controller: Pods that might have been stopped before could now be created. This is because the policies set by the admission controller depend on vulnerability data (like scan results and/or max CVSS scores).
Remember, it’s crucial to be mindful and deliberate when deciding to exclude vulnerabilities, ensuring that it doesn’t accidentally put your systems at risk.
Let’s have a look at the “Running Images” Tab!
Imagine a space where you can see potential security risks (CVEs) linked to the pods currently running in your cluster. Well, that’s what the “Running Images” tab is for! It gives you a peek into the vulnerabilities of your running pods, helping you figure out what might need a little fixing or extra protection.
For a practical example, this tab lets you see how exposed your image (a sort of blueprint for your pods) is by showing you two super helpful columns: “Clusters” and “Running Instances.” These columns tell you how many instances (or copies) of your image are running and in which clusters that are hooked up to Calico Cloud. In simple words, it’s a handy spot to check on the health and safety of your active pods and to make any needed changes to keep things running smoothly!
Difference between “Running Images” and “All Scanned Images” Tab
As the name suggests, Running images shows all the images currently running in your cluster while the All Scanned Images shows the scan results from all the sources like results obtained at the build time, or scan results from your private repository or any manual scanning performed using the Image Scanning CLI tool including the running images in the cluster. To clarify, the running images tab is a subset of the All Scanned Images.
Setting up alerts on vulnerabilities
Imagine being able to get a heads-up whenever something specific happens, like if an image fails, or if something goes a bit wonky in a particular repo with a high Common Vulnerabilities and Exposures (CVSS) score. Well, you can set up alerts for different happenings like these!
- Failed Image Alert: Get notified if an image doesn’t make the threshold..
- Repo Alert: An alert when a specific repo hits the maximum allowed CVSS score.
- Failed Scan Result Alert: Get to know if a scan doesn’t go through successfully within a pod in a particular namespace.
Example Alert Setup
Let’s say we want to create an alert for a very specific situation: If an image from a particular registry or repo gets more than one ‘Fail’ in a 30-minute window, we want to know about it! So, we set up an alert to notify us whenever this happens.
apiVersion: projectcalico.org/v3
kind: GlobalAlert
metadata:
  name: example-1
spec:
  summary: 'Vulnerabilities for a specific repo based on results'
  description: 'Vulnerabilities for a specific repo based on results'
  severity: 100
  period: 30m
  lookback: 30m
  dataSet: vulnerability
  query: registry="quay.io/tigera" AND repository="node" AND result="Fail"
  metric: count
  condition: gt
  threshold: 1
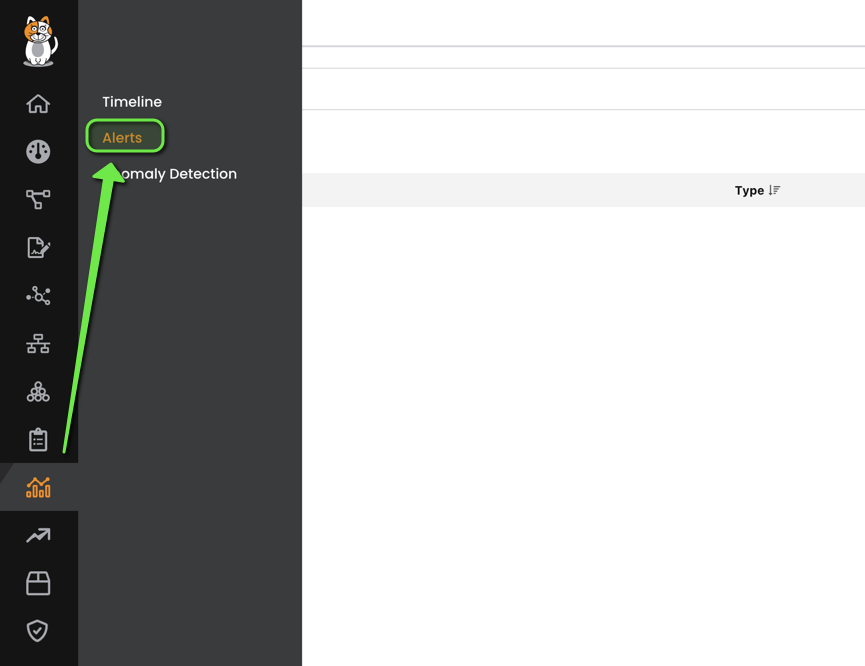
To view the alerts, you can simply go to the alerts tab inside the activity window:
And that’s it! We’ve created a little watchdog that gives us a nudge whenever specific issues pop up, keeping us in the loop to handle things swiftly.
Create a policy to block vulnerable images from your cluster
Securing a cluster against vulnerable images is no easy task. Today’s secure image might be tomorrow’s vulnerability headache, with fresh susceptibilities emerging at any moment. Timely response to such swiftly altering circumstances can undeniably be a taxing venture.
Introducing Calico Cloud’s Image Assurance Admission Controller
The Image Assurance Admission Controller from Calico Cloud serves as an automatic safeguard against the perplexities of real-time threat management. It ensures that resources, that would instantiate containers from potentially vulnerable images, are preemptively barred from being deployed into your cluster. Utilizing up-to-the-minute vulnerability data and scan results, it meticulously assesses each image, negating the entry of any that could potentially jeopardize the secure environment of your cluster. Thus, your operational integrity is maintained, safeguarding your deployments against the ever-looming specter of newfound vulnerabilities. In essence, it’s an automated resilience layer, perpetually securing your cluster against emergent image vulnerabilities with precision and timeliness.
Calico Cloud employs the Kubernetes Validating Webhook Configuration to affiliate the Calico Cloud Admission Controller, establishing it as a callback entity designed to permit or prohibit resources tasked with creating pods, such as deployments and daemonsets.
The Assessment Mechanism of the Admission Controller
Operational evaluation by the Calico Cloud Admission Controller involves hindering the inception or alteration of resources that spawn pods. Once a pod-creating resource is granted admission, the Admission Controller ceases further evaluations of the pods it establishes. Consider a scenario involving a deployment creation; the Admission Controller deciphers an admission request, proceeding to either sanction or decline it. Should approval be granted, subsequent requests for the resultant replica set, and the pod it germinates, escape further scrutiny by the Admission Controller. This practice stems from a preventive approach to avoid potential destabilization of a production cluster, particularly in instances where newly identified vulnerabilities within deployed images might instigate inadvertent pod restarts. Nonetheless, in situations where a pod is fashioned directly, the Admission Controller deliberates over the admission request for said pod, proceeding to either authenticate or repudiate it.
Exploring Container Admission Policies
Container admission policies, manifested as custom Kubernetes resources, empower you to stipulate criteria for the Admission Controller, directing it to reject admission requests for pod-creating resources. This configuration engenders a precise filter, allowing system administrators to meticulously control the deployment and modification of pod resources, thereby ensuring optimal stability and security within the cluster environment.
Here’s a sample container admission policy that allows admission requests for pod-creating resources whose image is in the registry/repository gcr.io/company/production-repository/*, with a scan status of either Pass or Warn, and rejects all other admission requests.
apiVersion: containersecurity.tigera.io/v1beta1
kind: ContainerAdmissionPolicy
metadata:
  name: reject-failed-and-non-gcr
spec:
  selector: all()
  namespaceSelector: all()
  order: 10
  rules:
    - action: 'Reject'
      imagePath:
        operator: IsNoneOf
        values:
          - '^gcr.io/company/production-repository/.*'
    - action: Allow
      imageScanStatus:
        operator: IsOneOf
        values:
          - Pass
          - Warn
    - action: Reject
Conclusion
In the realm of container security, Calico Cloud is not merely a tool but a vigilant guardian, ensuring that your image assurance stands robust against the fluctuating tides of the cybersecurity landscape. Let’s encapsulate some of the distinct advantages and forthcoming innovations which fortify our solution’s stature in the ecosystem of image scanning and assurance:
- Versatile Scanning Capabilities: Our scanning utility doesn’t just come as a CLI but also as a container-based image, affording you the flexibility to scan images both during the build stage and from private repositories, and crucially, inspect images while they are executing within the cluster.
- Proactive and Continuous Scanning: The CLI scanner isn’t static, with its capacity to execute recursive scans over designated periods on your resting images. This ensures that any lurking vulnerabilities, which may not be apparent today but emerge tomorrow, are promptly identified, ensuring your results are persistently current and robust.
- Tailored Scan Results: Navigate through your scan results with an image or package-centric lens, enabling you to sift through results contingent on a potentially vulnerable library employed across disparate images.
In this expedition through the evolving terrains of container security, Calico Cloud stands as your steadfast ally, shielding, informing, and guiding your strategies to navigate through the concealed perils of the cybersecurity panorama.
Ready to get started? Try Calico Cloud for free.
Join our mailing list
Get updates on blog posts, workshops, certification programs, new releases, and more!