Many organizations have adopted IP address allowlisting for their corporate cloud applications as an added layer of security. Many sanctioned cloud applications and web services enforce access restrictions based on the source IP address of incoming traffic. To establish a connection with these remote SaaS services, your traffic must originate from a particular IP address that is pre-registered. Any traffic originating from different IP addresses will be denied access by these remote applications.
Egress Gateway
By using Calico Egress Gateways for AWS, you can control the public source IP address of Kubernetes workload traffic destined for internet-bound services. This is accomplished by linking AWS Elastic IP addresses to Kubernetes namespaces and pods. Calico manages this seamlessly in the background. This ensures that egress traffic from these workloads consistently utilizes one of the pre-registered public IP addresses.
Calico Egress Gateways ensures that traffic originating from your Kubernetes environment (e.g., an Amazon EKS cluster) to external services (like a SaaS platform) consistently comes from a specific, predictable IP address or set of IP addresses. This is crucial for scenarios where you might be interacting with external services that employ IP allowlisting as a security measure, ensuring that they only accept traffic from known, safe IP addresses.
Solution Overview
We’re going to establish an Infrastructure as Code (IaC) pattern that combines and abstracts Calico’s advanced custom resources and AWS Cloud resources. This approach will automate the process of creating the necessary AWS and Calico resources for Kubernetes workloads that must connect to authorized SaaS (Software as a Service) platforms. Let’s take a look at what makes up Calico Egress Gateways for AWS.
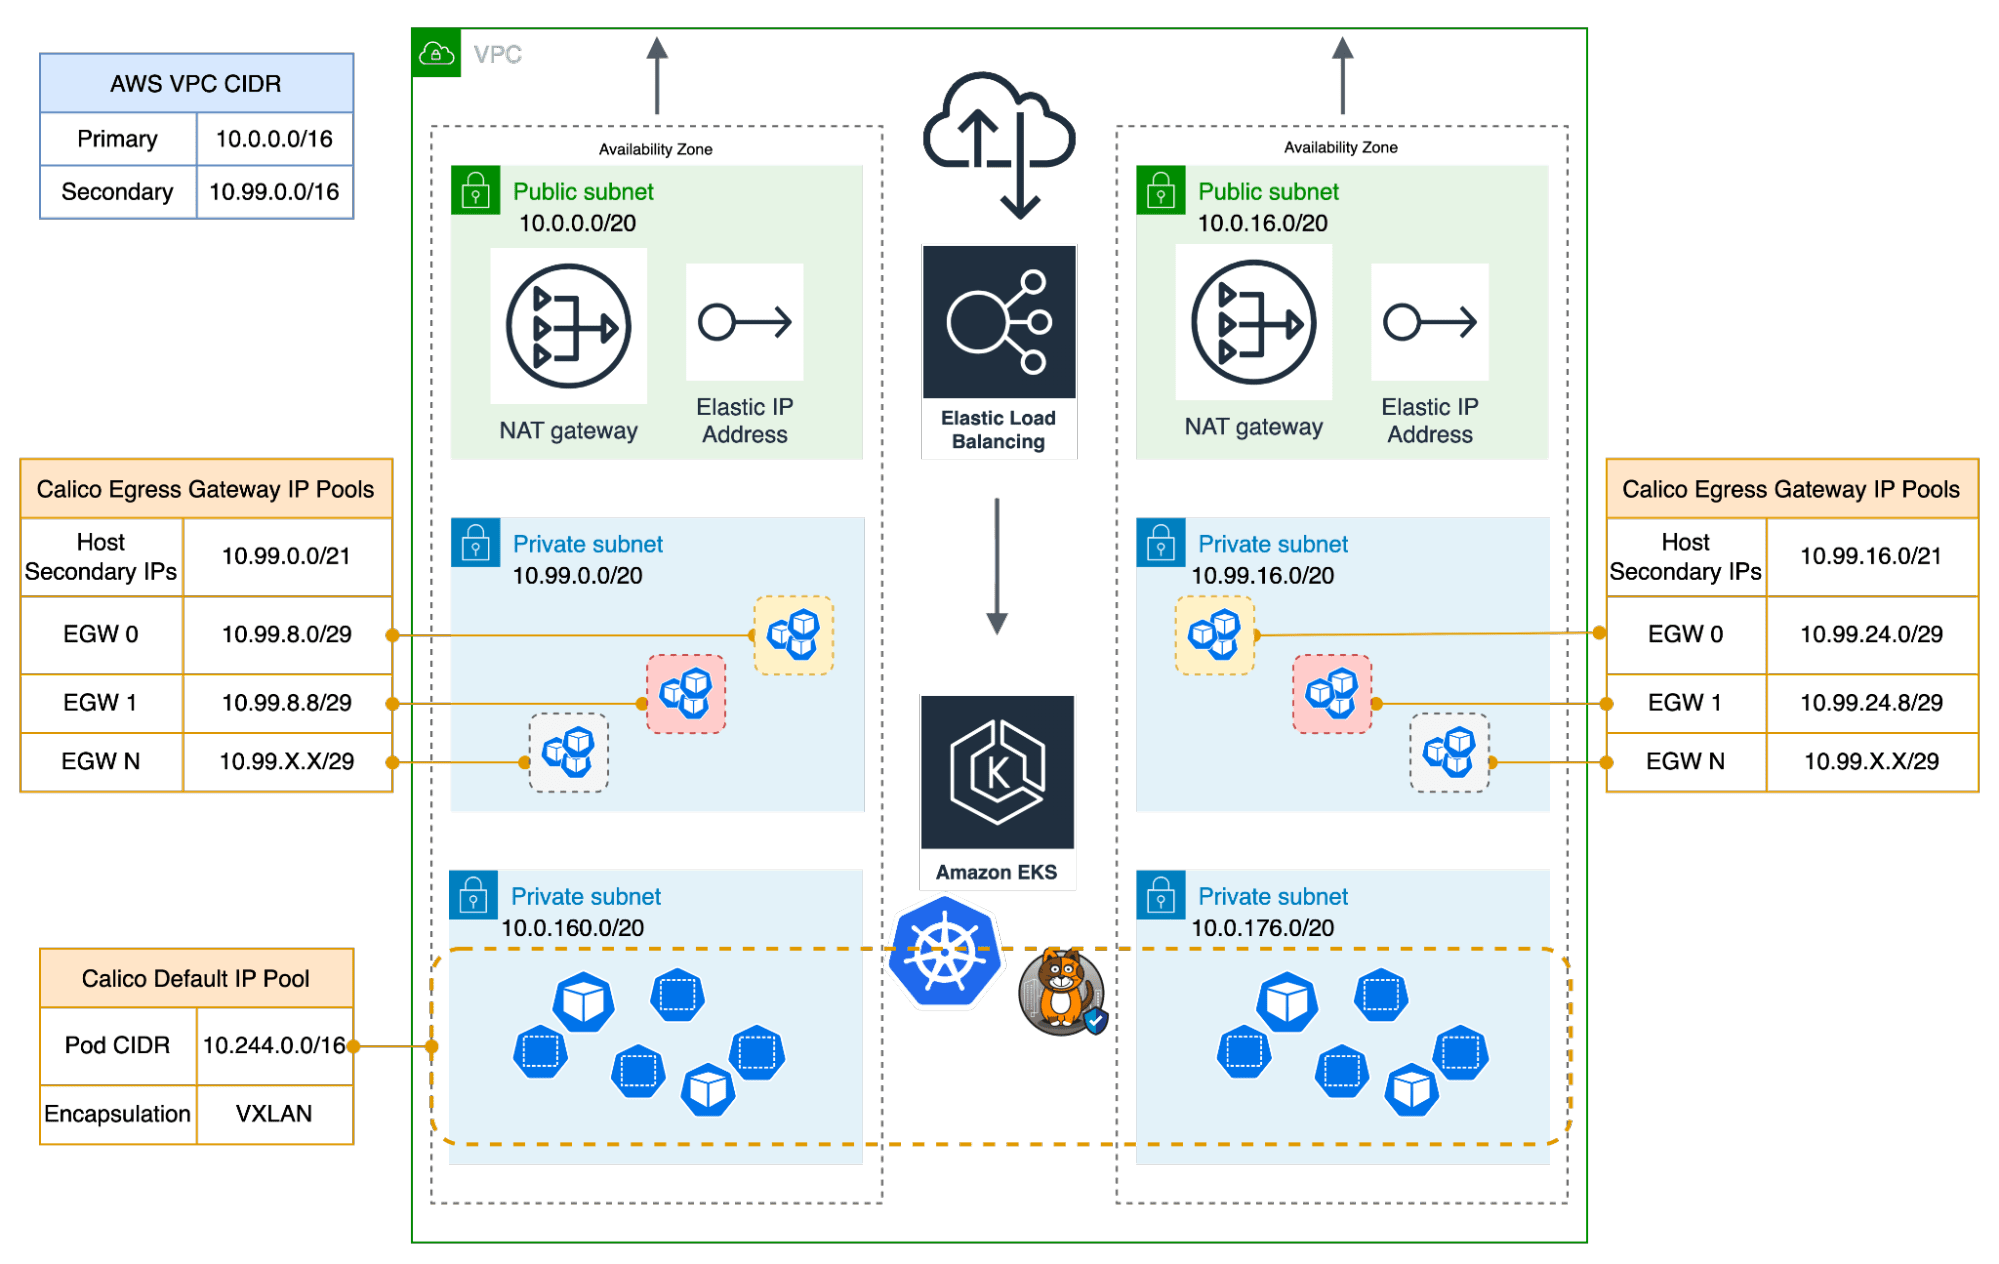
AWS-Backed Calico IP Pools
Calico assigns IP addresses to Egress Gateways from IPPools backed by AWS address space. Demonstrating its versatility, Calico can leverage address space from various AWS sources. This includes dedicated VPC Subnets, shared VPC subnets with specific Subnet CIDR reservations, and VPC subnets using Secondary VPC CIDRs. They operate effectively in both public and private subnets and have the capability to use AWS Elastic IPs for their public-facing IP addresses.
Secondary Elastic Network Interfaces (ENIs)
Calico offers dynamic allocation of Elastic Network Interfaces (ENIs) and effective management of AWS-backed IP addresses through two distinct methods: ENI-per-workload and Secondary-IP-per-workload. The ENI-per-workload approach assigns a separate secondary ENI to each workload, simplifying the management of IP addresses. On the other hand, the Secondary-IP-per-workload method permits multiple workloads to share the same ENI, which improves the system’s flexibility in responding to changes in workload demands.
Walkthrough
We’ll use Terraform, an infrastructure-as-code tool, to deploy this reference architecture automatically. We’ll walk you through the deployment process and then demonstrate how to utilize Egress Gateways with Calico on AWS.
Prerequisites
For this walkthrough, you need the following:
This walkthrough assumes you’ve setup your AWS cli credentials.
Step 1: Checkout and deploy the Terraform blueprint
1. Clone the Terraform Blueprint
Make sure you have completed the prerequisites and then clone the Terraform blueprint:
git clone git@github.com:tigera-solutions/calico-egress-gateway-public-source-ip-anchoring.git2. Navigate to the AWS Directory
Switch to the aws subdirectory:
cd aws3. Customize Terraform Configuration
Optional: Edit the variables.tf file to customize the configuration.
4. Deploy the Infrastructure
Initialize and apply the Terraform configurations:
terraform init
terraform apply
5. Update Kubernetes Configuration
Update your kubeconfig with the EKS cluster credentials as indicated in the Terraform output:
aws eks --region us-east-1 update-kubeconfig --name demo --alias demo6. Verify Calico Installation
Check the status of Calico in your EKS cluster:
kubectl get tigerastatus
NAME        AVAILABLE   PROGRESSING   DEGRADED   SINCE
apiserver   True        False         False      9m30s
calico      True        False         False      9m45s
Step 2: Link your EKS Cluster to Calico Cloud
1. Join the EKS Cluster to Calico Cloud
Join your EKS cluster to Calico Cloud as illustrated:
2. Verify the Cluster Status
Check the cluster status:
kubectl get tigerastatus
NAME                            AVAILABLE   PROGRESSING   DEGRADED   SINCE
apiserver                       True        False         False      50m
calico                          True        False         False      49m
cloud-core                      True        False         False      50m
compliance                      True        False         False      49m
image-assurance                 True        False         False      49m
intrusion-detection             True        False         False      49m
log-collector                   True        False         False      50m
management-cluster-connection   True        False         False      49m
monitor                         True        False         False      49m
Step 3: Egress Gateway for the AWS Elastic Kubernetes Service
1. Update the Felix Configuration
Enable egress IP support, AWS secondary IP support, and set the flow logs flush interval:
kubectl patch felixconfiguration default --type='merge' -p '{
  "spec": {
    "egressIPSupport": "EnabledPerNamespaceOrPerPod",
    "awsSecondaryIPSupport": "Enabled",
    "flowLogsFlushInterval": "15s",
    "flowLogsFileAggregationKindForAllowed": 1
  }
}'
2. Go to the Kubernetes Directory
Change to the k8s directory:
cd ..
cd k8s
3. Review the Variables Configuration
Examine the variables.tf file for Calico Egress Gateways settings.
4. Deploy Egress Gateways
Use Terraform to create six egress gateways, ensuring that each gateway has only one replica:
terraform init
terraform apply --auto-approve
  --var egress_gateway_replica_count="1"
  --var egress_gateway_count="6"
Validate the Deployment and Review the Results
1. Deploy Netshoot Pod and Calico NetworkSets
Return to the project root and apply the manifests:
cd ..
kubectl apply -f manifests
2. Implement Calico Egress Gateway Source-Based Routing
Test the configuration of each Egress Gateway:
for egw in {1..3}; do
    echo -n "Elastic IPs for EGW-${egw}: "
    kubectl get egressgateway egw-${egw} -o json | jq -r '.spec.aws.elasticIPs[]'
    kubectl annotate pod netshoot --overwrite egress.projectcalico.org/selector="egress-gateway == 'egw-${egw}'"
    echo -n "Public IP for netshoot pod via EGW-${egw}: "
    kubectl exec -it netshoot -- curl ifconfig.me
    echo
    echo "----------"
    echo
done
We connect the netshoot pod to each egress gateway, one after another. After each connection, we use a website called ifconfig.me to see what IP address it recognizes as coming from us. This website acts like a mirror, showing us the IP address we’re using. By doing this, we can clearly see that we have control over setting the public IP address for the outgoing traffic from a specific pod or namespace.
Use the Calico Cloud Dynamic Service Graph to monitor the traffic originating from your workloads as it passes through the egress gateways and travels over the internet to reach ifconfig.me.
3. Implement Calico Egress Gateway Policy-Based Routing
Apply the Egress Gateway policy, and then annotate the default namespace to utilize this policy.
kubectl apply -f manifests/egw-policy.yaml
kubectl annotate ns default egress.projectcalico.org/egressGatewayPolicy="egress-gateway-policy"
4. Review the Egress Gateway Policy Configuration
Check the egw-policy.yaml file to understand how traffic is directed.
5. Verify Egress Traffic
Test egress traffic from the netshoot pod:
kubectl exec -it netshoot -- ping -c 2 8.8.8.8
kubectl exec -it netshoot -- ping -c 2 4.2.2.2
kubectl exec -it netshoot -- ping -c 2 8.8.4.4
Traffic sent to 8.8.8.8 (Google DNS) will be routed through egw-5, while traffic to 4.2.2.2 (Level3) will go through egw-6. Any traffic to destinations other than these will default to using egw-4. This configuration showcases how we can direct traffic through designated egress gateways based on its destination, all managed by Calico Egress Gateway policy.
Use the Calico Cloud Dynamic Service Graph to observe and track the traffic flow from your workloads as it is routed through the egress gateways according to the defined policy.
6. Reset and Repeat
Reset the configurations and repeat the process if needed:
kubectl annotate ns default egress.projectcalico.org/egressGatewayPolicy-
kubectl annotate pod netshoot egress.projectcalico.org/selector-
Conclusion
In conclusion, IP address allowlisting is a vital security layer for organizations, especially concerning sanctioned cloud applications and web services enforcing strict access controls based on source IP addresses. Calico Egress Gateways for AWS offer a seamless solution by enabling precise control over the public source IP address of Kubernetes workload traffic. By seamlessly integrating with AWS Elastic IP addresses within Kubernetes namespaces and pods, managed effortlessly by Calico, this ensures that egress traffic consistently originates from predetermined public IP addresses. This capability is essential for establishing secure connections with remote SaaS services relying on IP allowlisting.
Whether you manage an Elastic Kubernetes Service (EKS) cluster or another Kubernetes environment, Calico Egress Gateway streamlines adherence to strict IP allowlisting policies, fortifying security measures and simplifying interactions with external services. In an era where cybersecurity is paramount, Calico Egress Gateway for AWS Elastic IP provides a valuable tool to bolster an organization’s defenses and ensure secure and dependable connections to trusted SaaS platforms.
Reference
Tigera – Enterprise Grade Egress Gateway for Kubernetes
Tigera – Using Calico Egress gateway and access controls to secure traffic
Ready to try Calico node-specific policies? Sign up for a free trial of Calico Cloud
Join our mailing list
Get updates on blog posts, workshops, certification programs, new releases, and more!