Many AWS customers have security requirements that are well beyond what AWS Security Groups or AWS Network Access Control Lists can offer in terms of scalability and security. That’s why many of them turn to AWS Network Firewall as a common solution.
However, when it comes to securing Kubernetes workloads deployed in EKS clusters, or vanilla k8s clusters deployed on EC2 instances, the AWS Network Firewall faces a challenge in identifying the exact source of traffic when deployed applications need to connect to external services. In typical scenarios, this traffic is NATed by the k8s worker nodes, so the AWS Network Firewall relies on the workers IP addresses to identify this traffic, and apply the required security controls.
One potential problem arises from the dynamic nature of EKS clusters and the use of autoscale groups, as those render the IP-based approach ineffective due to the fact the node addresses would be changing constantly. Thus, these changes would need to be tracked down, and related rules would need to be updated.
To address these challenges, integrating Calico Egress Gateways with AWS infrastructure provides the necessary context to extend the identity of applications running inside our Kubernetes clusters to anything else within our VPCs. This enables the AWS Network Firewall, for instance, to identify these applications by a fixed IP that remains constant. This can help us to cover different requirements:
- Compliance: To meet industry regulations and prevent data exfiltration, it is essential to effectively implement egress controls for our applications.
- Cost Management: Gaining a comprehensive understanding of how various services are accessed within our organisation can help us to determine potential cost optimisations based on traffic patterns and other related information.
- Troubleshooting: Having a clear picture of the communication between our services, and the ability to implement more granular security rules can have a direct impact on the time spent troubleshooting potential problems when they arise.
Architecture
There are multiple deployment models for implementing the AWS Network Firewall:
- Distributed: Where the AWS Network Firewall is deployed within each VPC.
- Centralised: In this model, the AWS Network Firewall is attached to a dedicated VPC.
- Combined: Where the AWS Network Firewall is implemented in a centralised VPC, where it controls all internal traffic between other VPCs, but it does not control all traffic between them and external destinations.
Centralised deployments offer advantages in terms of simplifying VPC connectivity to the AWS Network Firewall. However, this architecture requires the use of an AWS Transit Gateway to establish the described Hub and Spoke type of connectivity.
Calico’ strong BGP foundation allows us to peer our Kubernetes clusters with the AWS Transit Gateway, enabling us to leverage the centralised AWS Firewall deployment.
Centralised AWS Network Firewall architecture
Using AWS Network Firewall you can implement traditional security controls (at the L3/L4 level) to traffic flowing between different VPCs, or towards external networks connecting to them. For this blog, we will be using a standard centralised filtering architecture for our AWS firewall implementation to extend these controls to individual pods running in a Kubernetes cluster inside one of those VPCs. Let’s examine this model in more detail:
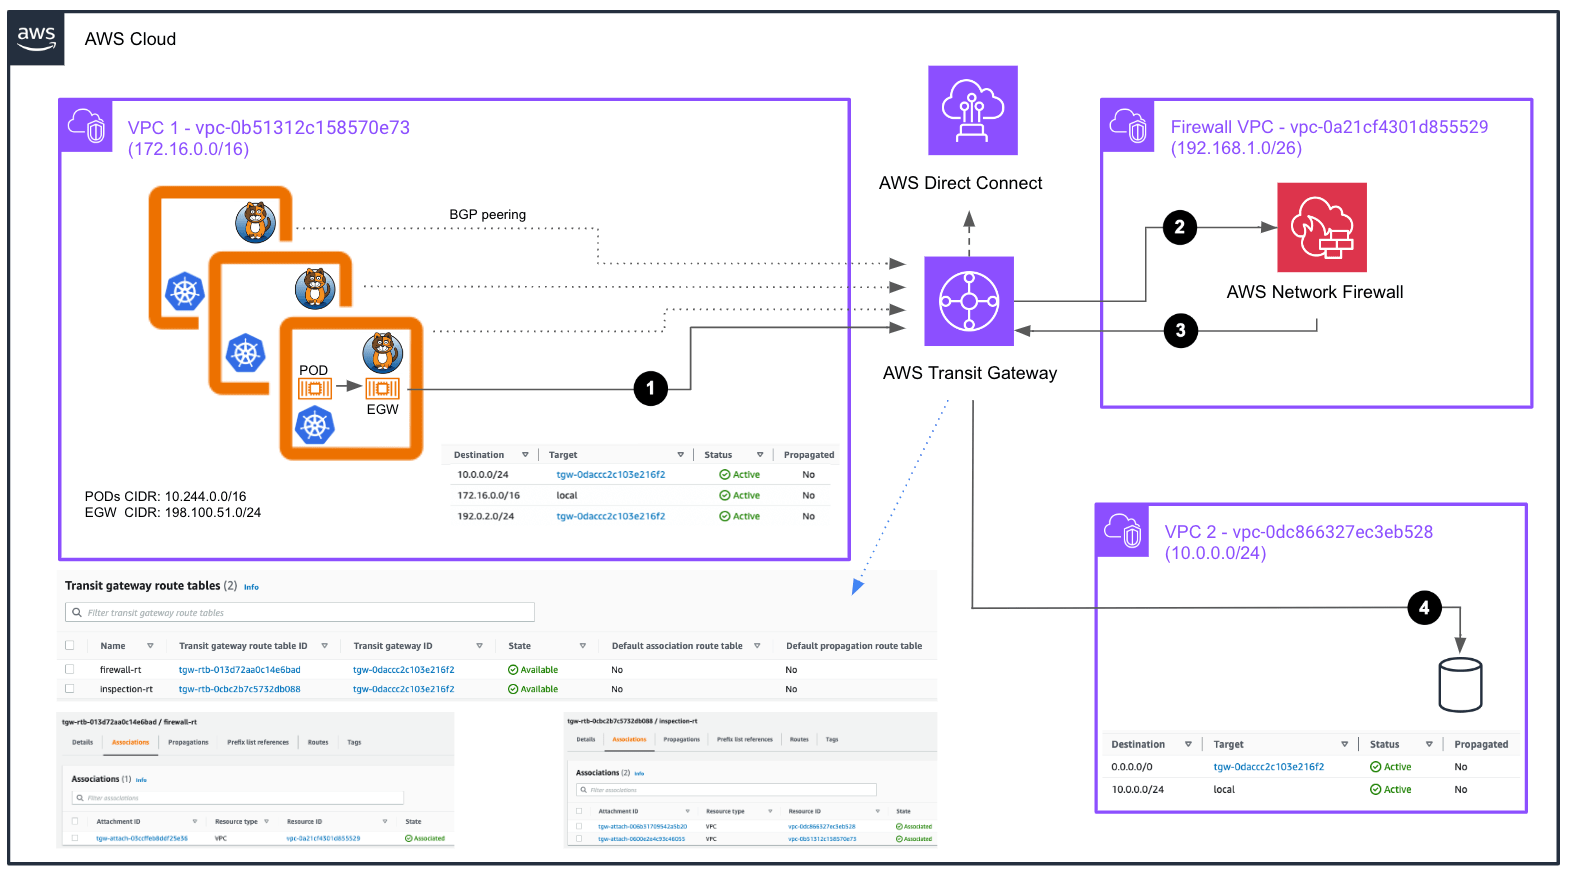
Figure 1
As depicted in Figure 1, the AWS Network Firewall is implemented in a dedicated VPC, and it is responsible for managing traffic control between private networks that connect to our AWS infrastructure through AWS Direct Connect and our VPCs, or across those different VPCs themselves, all of which is routed through the AWS Transit Gateway.
In this blog post, we will not be using the AWS Direct connect to demonstrate the Egress Gateway integration, but an EC2 instance running on a different VPC which will host the service that some of our pods need to access. Although we could potentially use AWS security groups to limit access to the EC2 instance used as the destination, we face a challenge when it comes to applying fine-grained rules at the pod level out of the box.
Imagine you have only a few pods running in your Kubernetes cluster that need to access a service, such as a database. If these pods can be scheduled on any of the nodes, you would likely need to open up access rules for all nodes, potentially exposing your infrastructure to security risks in case a compromised pod tries to launch an attack. Even if you use Calico to expose the pod subnet and advertise it to the Transit Gateway connecting all VPCs, you cannot predict which IP address from the Pod CIDR will be assigned to the pods needing access to the service. Consequently, you are forced to open up a wider range of IP addresses, increasing the security risk.
That is where Calico Egress Gateway can help, as it will allow connections to the database to originate from a trusted source IP address that you can control. Then, you can use AWS Network Firewall policies to create precise rules that permit only the required connectivity.
As shown in Figure 1, the source VPC (VPC 1) has a route to the destination VPC (VPC 2) through the AWS Transit Gateway. In the specific case of VPC 2, which lacks external access, all traffic is routed through the AWS Transit Gateway.
The AWS Transit Gateway manages two route tables, each associated with different VPCs. The firewall-rt is associated with the VPC where the AWS Firewall is located, while the inspection-rt is the Route Table associated with both the source and destination VPCs. So, the flow of communication for traffic that is forwarded to the Database service would be the following:
- Traffic originating in VPC1 is directed to the AWS Transit Gateway which routes it through the
inspection-rtRoute Table. This Route Table contains only a default route that redirects any traffic to the Firewall VPC. - Upon reaching the Firewall VPC, where the AWS Firewall is located, the traffic is analysed against its security rules.
- Subsequently, the traffic is sent back to the Transit gateway, which then looks up the destination in the
firewall-rtRoute Table. As a result, the traffic is forwarded to the appropriate VPC. - The traffic reaches our EC2 instance running the service.
Once we reach the service, this would be path the return traffic would take:
- The EC2 instance running the destination service forwards all traffic to the AWS Transit Gateway.
- The AWS Transit Gateway does a lookup operation in the
inspection-rtRoute Table, which only has a default route pointing to our Firewall VPC. - The traffic is analysed again by the AWS Network Firewall, and is then sent back to the AWS Transit Gateway.
- Once more, a lookup is performed for the destination IP of this return traffic, which is our source pod’s IP address, in the
firewall-rtRoute Table. This process requires the AWS Transit Gateway to learn the IP address of our Egress Gateway. We achieve this through a BGP peering, enabling the advertisement of this information from Calico to the AWS Transit Gateway. - Finally, the traffic is delivered to the appropriate connected peer associated with the Transit Gateway Attachment where this route is received. I will delve into this last point further in the next section.
AWS Transit Gateway integration with Calico
As I have discussed in the preceding section, a crucial aspect of this integration is the ability to reroute traffic from our VPCs to the AWS Network Firewall. In this section of the blog post, I will provide general guidelines on how to integrate Calico with the AWS Transit Gateway, enabling us to receive the corresponding route information for our Egress Gateway. We will later bring the AWS Network Firewall into the picture.
I will be only highlighting the necessary steps from the Calico perspective. If you are not familiar with AWS Transit Gateway, I recommend you to check the official AWS documentation on that topic.
The Egress Gateway deployments operate as pods within our Kubernetes cluster. This offers us distinct advantages when it comes to routing traffic from our namespaces or Kubernetes deployments through them, as they are not bound to specific nodes, and retain all the benefits inherent to native Kubernetes workloads.
Since Egress Gateways can be scheduled on any node, it is imperative for the AWS Transit Gateway to have means to reach them back. Here, we leverage Calico’s ability to establish BGP peering with external devices to advertise the subnets associated with our Egress Gateways.
However, there are a couple of important considerations when peering with the AWS Transit Gateway. Lets zoom in on that specific aspect from the overall architecture already presented:
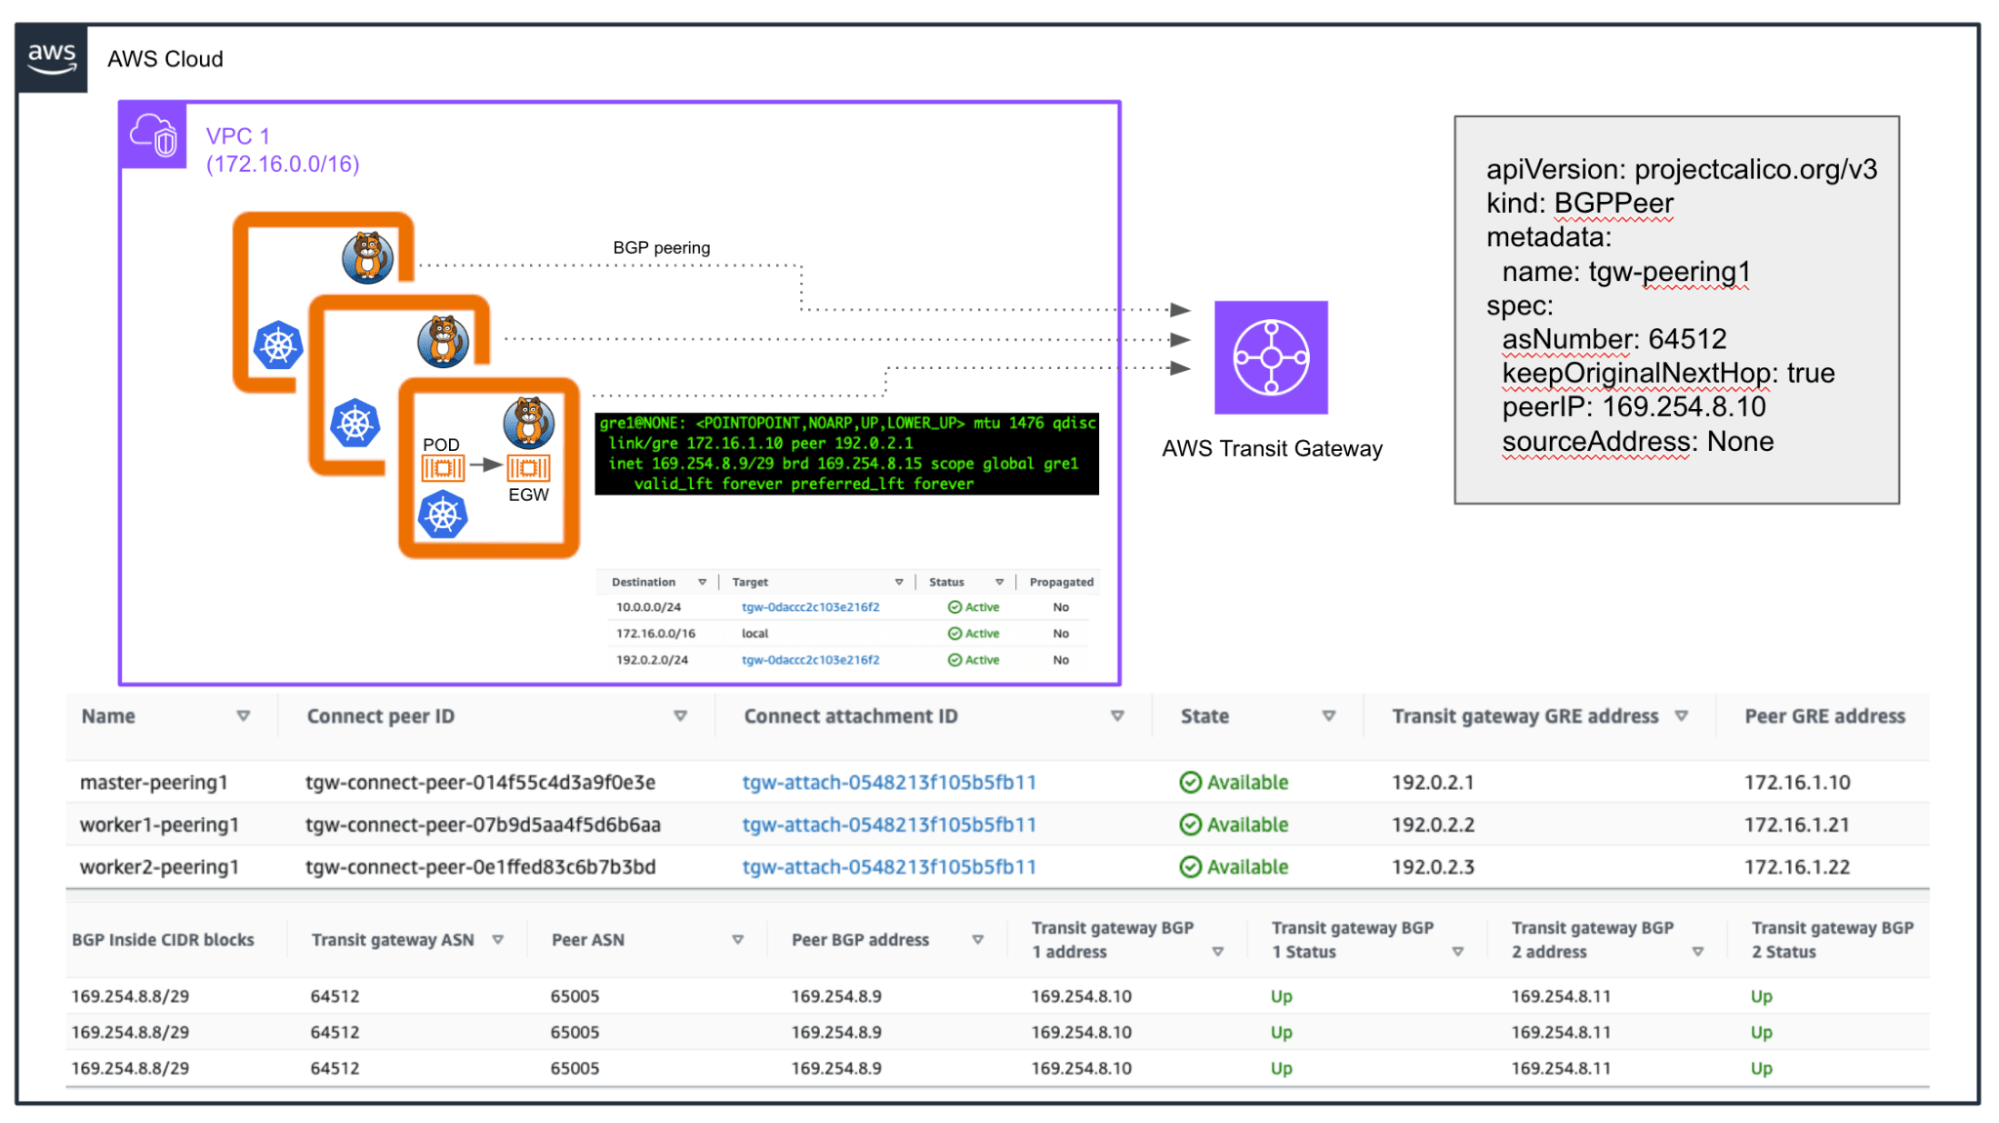
Figure 2
There are several requirements we must meet in order to connect with the AWS Transit Gateway. It will only accept BGP peering connections from endpoints with an APIPA address (in the range 169.254.0.0/16) established via point-to-point GRE tunnels. This means we need to boot up our Kubernetes nodes with the right interface. In the example above, I used a vanilla Kubernetes cluster deployed on EC2 instances, so we need the right GRE module loaded on those, and we must adjust the netplan or network-scripts configuration files depending on our Linux distro.
When creating the AWS Transit Gateway, we specify a CIDR block to serve as the destination for our GRE tunnel traffic (192.0.2.0/24 in the examples above). Please note that in Figure 1, we created a route to this network with the next hop as our AWS Transit Gateway. This ensures that instances in the VPC will know how to route this traffic. If you are using any Security Groups or ACLs, you must allow traffic from that AWS Transit Gateway’s CIDR block.
The Transit Gateway will only accept updates that include an AS-Path. However, Calico does not expose the ability to prepend that attribute by default for iBGP connections. Similarly, if using eBGP, as the peer falls within the same subnet (169.254.8.9/29 in the example), Calico will not enable multihop automatically. In both cases, we must adjust the BGP configuration. This customisation can be achieved in Calico Enterprise, allowing you to specify these settings using a custom configmap based on a confd template.
Taking the default confd template, we can change the line for directly connected networks to use multihop, so we can peer through the GRE tunnel. This change is illustrated in the following figure:

Figure 3
In Figure 2, I include how the manifest for these BGP peers in Calico would look like. Note the following two stanzas defined there: keepOriginalNextHop and sourceAddress.
The first argument is required because we are utilising eBGP to connect to the AWS Transit Gateway. However, since the AWS Transit Gateway has direct point-to-point connections with each Calico Node, we must preserve the original next hop regardless which Calico Node advertises the route (all Calico Nodes will have iBGP connections to each other by default).
The second argument is used to allow Calico to employ different source IP addresses for the BGP peerings based on the reachability information towards those peers. In our case we want to use the internal IP of the tunnel (169.254.8.9/29) for this particular peerings.
We can reuse the internal IPs for each tunnel since the AWS Transit Gateway associates the “Connect” attachment (where we configured the peer) with each route learnt. This is how the firewall-rt Route Table will look like in our example:
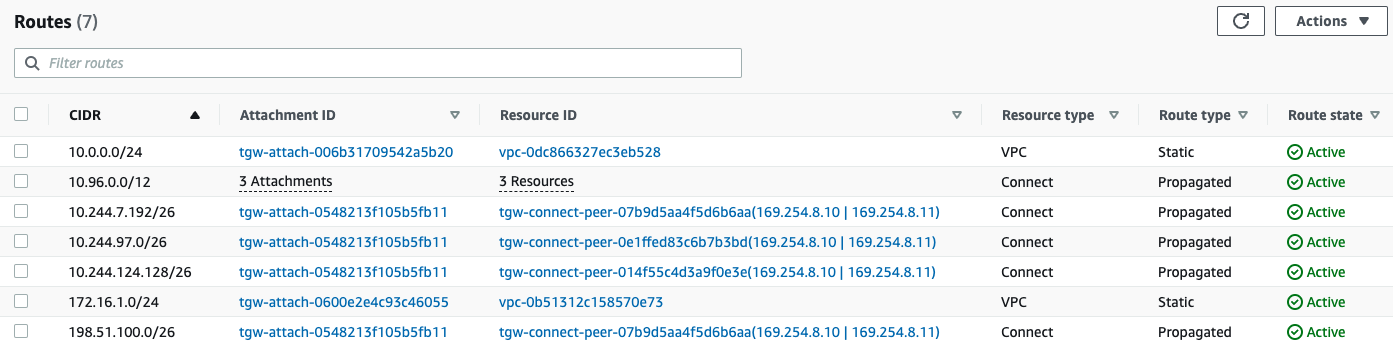
Figure 4
In Figure 1, we observed that we can assign different VPCs to AWS Route Tables, so when the traffic arrives from these VPCs, the AWS Transit Gateway will perform a lookup on those. But how do we redistribute the routes learnt through our BGP peerings on a specific table?. In the AWS Transit Gateway we accomplish this by “Propagating” certain routes from one type of Transit Gateway Attachment to another.
In the configuration of the firewall-rt table, I enabled Propagation for the routes received in the Transit Gateway Connect attachment. This attachment is where the BGP peers are defined. Consequently, we will have all the routes learnt through those peers on the Route Table associated to the Firewall VPC. This enables the AWS Network Firewall to route traffic back to our Egress Gateway pod, as Calico Nodes advertise the IP address range obtained by the Egress Gateway.
If you look at Figure 4, you will notice that one of our peers is advertising the IP address range we use to assign to the running Egress Gateway in this example (198.51.100.1):

Figure 5
Let’s expose a port in our destination EC2 instance running in VPC2 (10.0.0.55), and try to access it from a pod running in a namespace configured to use the Egress Gateway:

Figure 6a
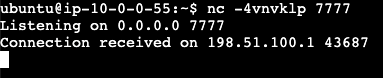
Figure 6b
As you can see in the Figure 6a and 6b above, we received the connection from the Egress Gateway IP address, and the returning traffic is properly routed back from the destination EC2 instance to the Node where the Egress Gateway is running.
If trying to reach that same exposed service port from any of the k8s nodes themselves, we should still be able to reach the service:
![]()
Figure 7a
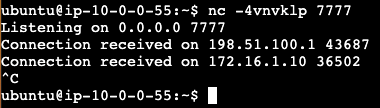
Figure 7b
AWS Network Firewall
Now let’s create a couple of firewall rules that will only allow the pods using our Egress Gateway to reach the service, and deny all other traffic to the EC2 instance:

Figure 8
As we expect, only the Egress Gateway is able to reach the service now, as the connection times out after 10 seconds when we attempt to connect from the node:

Summary
Calico Egress Gateway allows us to have better granularity to access specific services across our AWS environment from our Kubernetes workloads, which improves the overall security of our environment, and minimises the attack surface should any pod get compromised. When coupled with Calico’s robust capabilities for seamless integration with the underlying network infrastructure, such as with AWS Transit Gateway, Calico establishes a strong foundation for comprehensive control and security, regardless of whether we opt to run Kubernetes workloads on-premises or within our preferred cloud provider.
Ready to try Calico node-specific policies? Sign up for a free trial of Calico Cloud.
Join our mailing list
Get updates on blog posts, workshops, certification programs, new releases, and more!