In today’s rapidly evolving technology landscape, containerized workloads have emerged as a key enabler for scalable and agile application deployment. However, the benefits of containerization come hand-in-hand with potential security challenges. As organizations increasingly rely on continuous integration and continuous deployment (CI/CD) pipelines to streamline software delivery, the risk of vulnerabilities making their way into production environments becomes a significant concern. According to recent studies, over 80% of organizations have reported at least one security incident related to their containerized applications. These vulnerable workloads create an attractive target for malicious actors seeking to exploit weaknesses and gain unauthorized access to sensitive data or disrupt critical services.
To combat this rising threat landscape, organizations must prioritize vulnerability management as a crucial aspect of their container security strategy. By implementing robust vulnerability management practices, businesses can proactively identify and address vulnerabilities within container images before they are deployed into production. Not only does this bolster security by preventing the deployment of compromised images, but it also enhances visibility and monitoring during runtime, enabling swift responses to newly discovered threats. In this blog, we will delve deeper into the importance of vulnerability management for containerized workloads and explore how Calico Cloud’s image assurance capabilities can mitigate risks and safeguard the integrity of Kubernetes workloads.
What is Image Assurance?
Image assurance is a Calico Cloud feature that provides comprehensive vulnerability management with support for image scanning, automated admission controller, and policy generation to reduce the risks of vulnerable workloads in production. Using Calico’s admission controller, you can review overall and individual risk scores for vulnerabilities and enforce automated deployment rules. The runtime view of vulnerable workloads combined with the security policy recommender provides a real-time risk-mitigation strategy to prevent an attack from spreading within a cluster. Calico Cloud continuously monitors existing workloads and alerts if a workload is affected by a newly discovered vulnerability. Calico Cloud’s Image Assurance will help you quickly identify and mitigate vulnerabilities in your environment.By enabling this feature you eliminate the risks of deploying vulnerable workloads and you will also be informed about workloads with active vulnerabilities.
Behind the scenes: Calico Image Scanner
There are two scanning methods: Automatic Image Scanning and Manual Scanning(CLI). Why two methods? While building this product, we have understood that users have their own approach for vulnerability management. Some of them have sophisticated automation tools in place to make their CI/CD pipeline fully automated. Others rely on a more manual approach tailored to their requirements. Whatever approach you take, Calico supports both and offers a flexible scanning feature for your needs.
Manual scanning
- Easily integrated with your CI/CD pipeline as a step in the build process of an application/image.
- Lets you manually scan a private repository or single images pulled from public repositories.
Automatic scanning
- Once Image Assurance is enabled, everything will be done in the background and you will get all the information in the Image Assurance UI dashboard.
We will cover both methods here. Before going over the details, here are some requirements that you need to keep in mind while using the image scanner.
- Cluster requirements for Automatic scanning:
- User needs to use containerd as container runtime
- Image requirements for Automatic scanning:
- Workloads must be running images which have RepoDigest IDs
Automatic scanning
Automatic scanning is configured in a single step by changing the “imageassurances” custom resource on the cluster:
kubectl edit image assurances
	clusterScanner: Enabled
When Image Assurance is enabled, it will deploy a “Tigera-image-assurance-crawdad” daemonset in your cluster. To verify if the scanner is deployed, check if a container with name “cluster-scanner” is created inside the above daemonset.
kubectl get ds -n tigera-image-assurance   tigera-image-assurance-crawdad -o yaml | grep image-assurance-cluster-scanner:
        image: quay.io/tigera/image-assurance-cluster-scanner:v1.7.3
You can further customize the cluster-scanner to your needs:
- You can set the container runtime path “
criSocketPath” to the one you use. Default is/run/containerd/containerd.sock. - You can set the filesystem root path “
containerdVolumeMountPath” to the path you use. Default is/var/lib/containerd.
Once the cluster-scanner is enabled it will start scanning the images of containers already running in the cluster.
Manual Scanning – CLI scanner
This method makes use of Calico Cloud Image Assurance CLI scanner which can be downloaded from the Calico Cloud UI or directly from here for Linux. You can use it to manually scan images on your Linux or MacOS workstation/laptop or via a CI/CD pipeline, please see this blog post for integration with a popular CI/CD tool ArgoCD.
This method has the following requirements:
- Image requirements
- Images must be available locally through the container runtime environment where the CLI scanner is running
- Image must have a RepoDigestID
- CLI scanner requirements
- Must have internet connection to download and update the vulnerability database
- To see image scan results in Calico Cloud UI, the CLI scanner must communicate with an external API endpoint outside your environment
Example
Here is an example of CLI scanner of local docker images:
1. List the RepoDigest IDs of docker images:
ubuntu@ip-172-31-24-241:~$ sudo docker images --digests
REPOSITORY TAG   DIGEST                IMAGE ID     CREATED      SIZE
alpine 3.15 sha256:794bc829ea39d85926be70fedfc9fb1 d51a1e6a80db 4 hours ago 5.59MB
2. Run the CLI scanner command against the above image:
ubuntu@ip-172-31-24-241:~$ sudo ./tigera-scanner scan alpine:3.15 --apiurl https://xoxoxoxo-management.calicocloud.io/bast --token eyJhbGc...
INFO[0000] Vulnerability database director not set, setting it to the cache default direct /root/.cache.

Scanning alpine:3.15...
NOTE: Uploading results, this might take a while...
NOTE: Uploaded vulnerability results for repository path / digest alpine:3.15@sha256:794bc829ea39d85926be70fedfc9fb17aa4244d82b2fbecb5634b03e5dd97aca

Summary:

Name: alpine:3.15
Digest: sha256:794bc829ea39d85926be70fedfc9fb17aa4244d82b2fbecb5634b03e5dd97aca
Number of dependencies: 14.
Total vulnerabilities: 0, critical: 0, high: 0, medium: 0, low: 0, N/A: 0

Scan result: ✔ PASS (warn_threshold - 7.0, fail_threshold - 9.0, Using thresholds from Calico Cloud)
3. Results uploaded to CC UI:
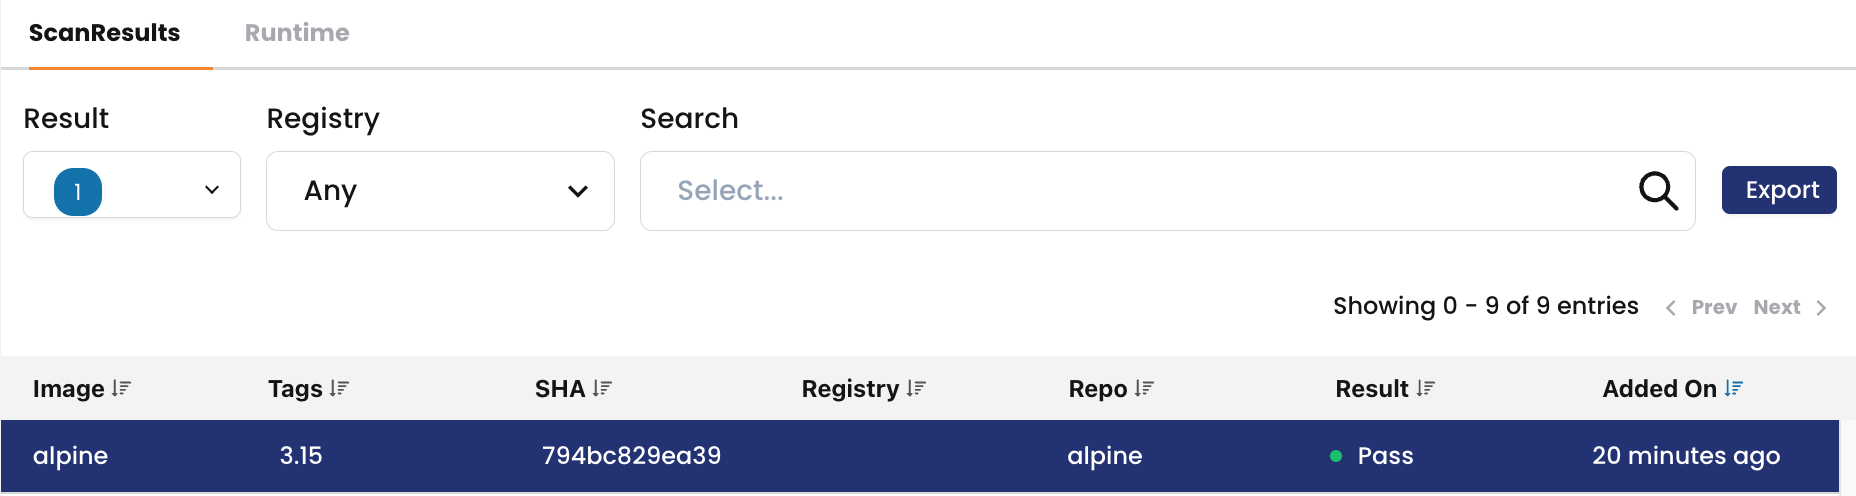
Image Assurance UI in Calico Cloud
In Calico Cloud UI, Image Assurance has two views/dashboards (Scan Results and Vulnerability Exceptions). In the Scan Results there are two tabs, ScanResults and Runtime.
In the “Scan Results” tab:
- The left pane shows a list of scanned images.
- The right pane provides information on the number of images grouped by “Fail,” “Warn,” “Pass,” and “Unknown” (scanner has not reported results for these images).
- High Risk Repos are based on the total number of Fail results.
- Selecting an image on the left pane displays associated CVEs (Common Vulnerabilities and Exposures).
In the “Runtime” tab:
- The left pane lists the images running in your cluster, along with the number of running instances in clusters connected to Calico Cloud.
- The right pane displays the number of running pods with scan results categorized as Fail, Warn, Pass, or Unknown.
- High Risk Namespaces are based on the total number of Fail results.

Calico Cloud image scanning is based on CVSSv3 scores. You can change the CVSS score threshold between a Pass and a Warn and between a Warn and a Fail. Changes to threshold values take effect immediately and alter the scan results for images already in the system. You can export the Scan results into a CSV or JSON file. More information here (https://docs.tigera.io/calico-cloud/image-assurance/understanding-scan-results#export-scan-results). Also, if you use admission controller policies, changing a CVSS value may allow pods which were previously blocked, to be deployed and vice versa.
Conclusion
Calico Cloud’s Image Assurance is an essential tool for cloud-native organizations seeking to enhance the security of their container and Kubernetes-based applications. By offering both Automatic and Manual scanning methods, it provides the necessary flexibility to integrate security seamlessly into your CI/CD pipeline or perform ad-hoc scans as needed. With the ability to customize the cluster-scanner and fine-tune CVSS scoring thresholds, Calico Cloud empowers you to identify and mitigate vulnerabilities effectively, safeguarding your Kubernetes environment and ensuring the deployment of secure workloads.
Ready to try Calico for yourself? Get started with a free Calico Cloud trial.
Join our mailing list
Get updates on blog posts, workshops, certification programs, new releases, and more!