One recurrent point in our first interaction with Kubernetes users is the difficulty of implementing security controls on their Kubernetes clusters where tenant or workload isolation is required during rollout or runtime. This happens due to one of the following reasons:
- The lack of familiarity with the structure and the syntax to build security policies.
- For generic policies that affect several workloads and namespaces in the cluster. There is a gap of knowledge on the traffic required by the affected applications by the teams in charge of building those policies.
- The inability to understand if a policy implementation will match the traffic the way it has been designed.
- The lack of tools to visualize if the policy is working effectively after it has been implemented.
Calico provides several features and capabilities to cover each one of the above points with Policy Recommendation, Policy Board, and Dynamic Service and Threat Graph.
In this technical blog post, I will focus on Calico Staging Policies and how we can understand if our policy workflow design will match Kubernetes cluster traffic effectively.
Calico Staged Policies
Calico manages three custom resources called StagedNetworkPolicy, StagedKubernetesNetworkPolicy, and GlobalStagedNetworkPolicy. As those names imply, the first two would allow us to stage Calico network policies, or Kubernetes network policies, while the third option will create a staged policy that matches endpoints across all namespaces.
Being a resource that matches individual endpoints (pods or Kubernetes hosts) based on well-known structures as labels and selectors, enables staged policies in Calico does not imply a compromise in the overall security of the cluster, and can be done on a granular basis.
To better understand how staged policies work, we will use Policy Tiers to match certain traffic, and Calico Staged Policies to build the desired microsegmentation for an application, so we can verify the traffic is matching our design. Even when you would like to filter inbound and outbound traffic, specially when the source or destination of our traffic lies outside the cluster, in order to simplify this example, let’s consider an approach where our security posture is filtering the traffic hitting our microservices (ingress traffic policy from every service perspective).
Demo Application
For this particular example, let’s consider the hipstershop application. This application represents an e-commerce website built with microservices. If we took a look at Calico Dynamic Service and Threat Graph, we can see the relationship between these different components:
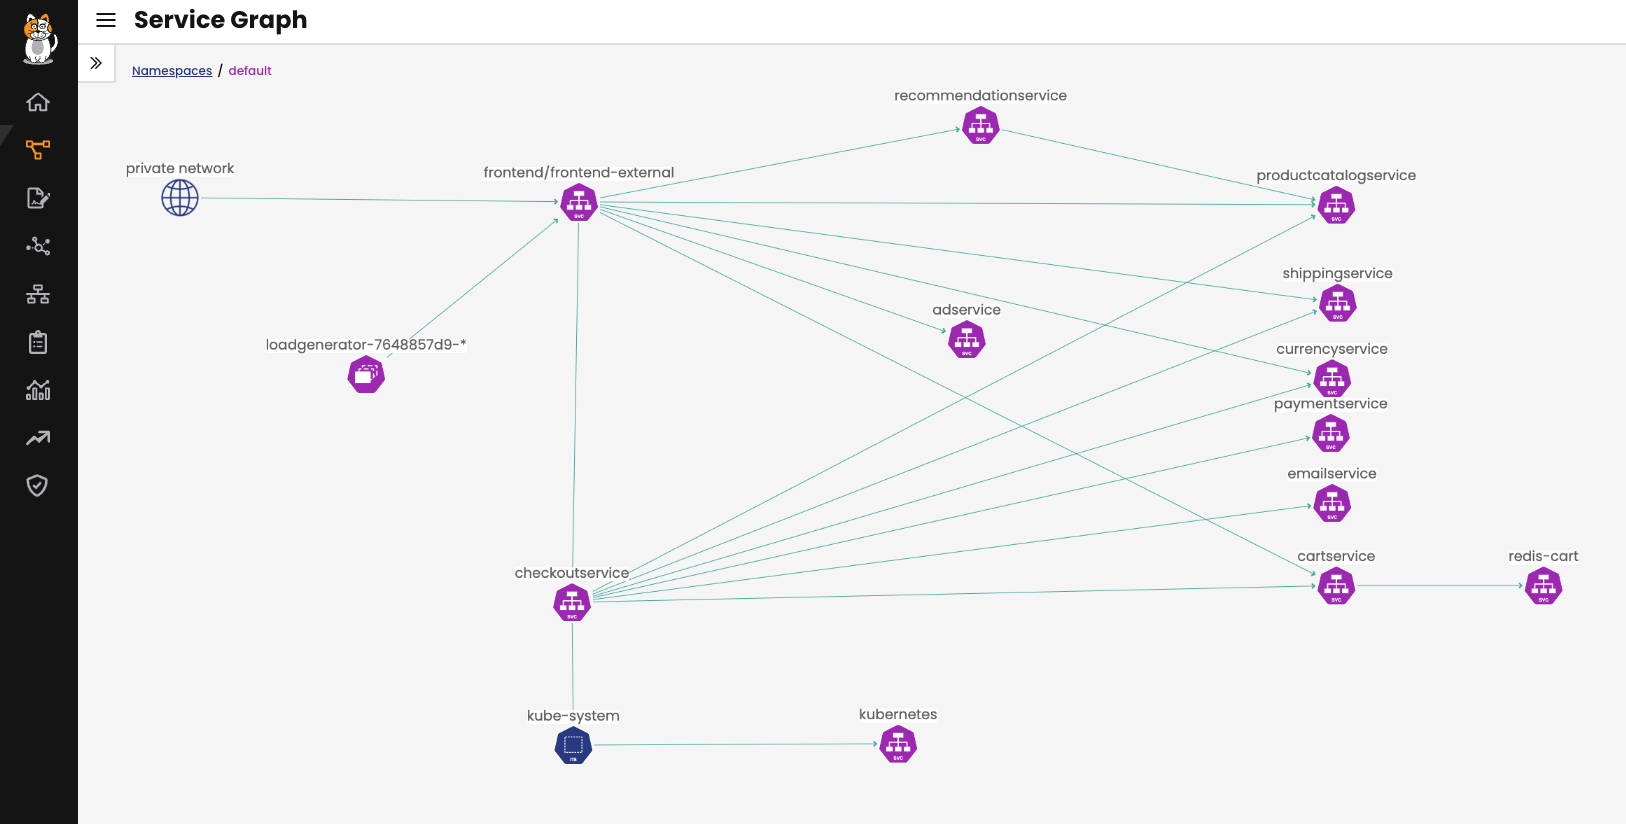
Figure 1
We can use the policy recommendation engine in Calico to create the needed policies for us in each namespace, as Calico will propose those based on the observed traffic gathered from the application. Once these policies are added to the board, they are instantiated as Staged Policies. For this example, I have created these policies as Staged policies in three different Tiers. Let’s concentrate in the policy for one of the services in the graph above, for instance, the “currencyservice”. This service only should allow traffic from the frontend service and the checkout service on TCP port 7000. Our policy would look like the one in Figure 2.
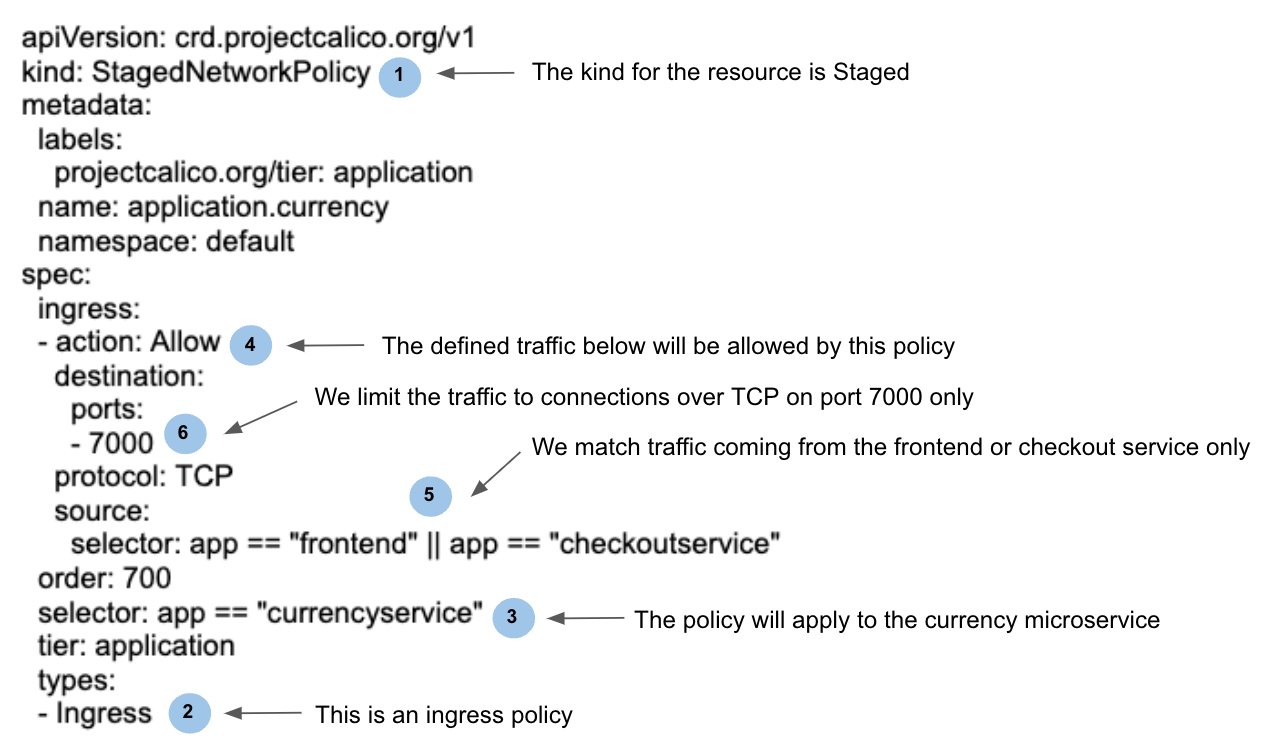
Figure 2
Once we apply the policy, traffic will not be affected, however, we can check if our policies will match as intended, and more importantly, we will be able to verify if the order of operation in which the traffic is inspected is evaluated according to our plan. To dig further in this concept, let’s take a look at our policy board:
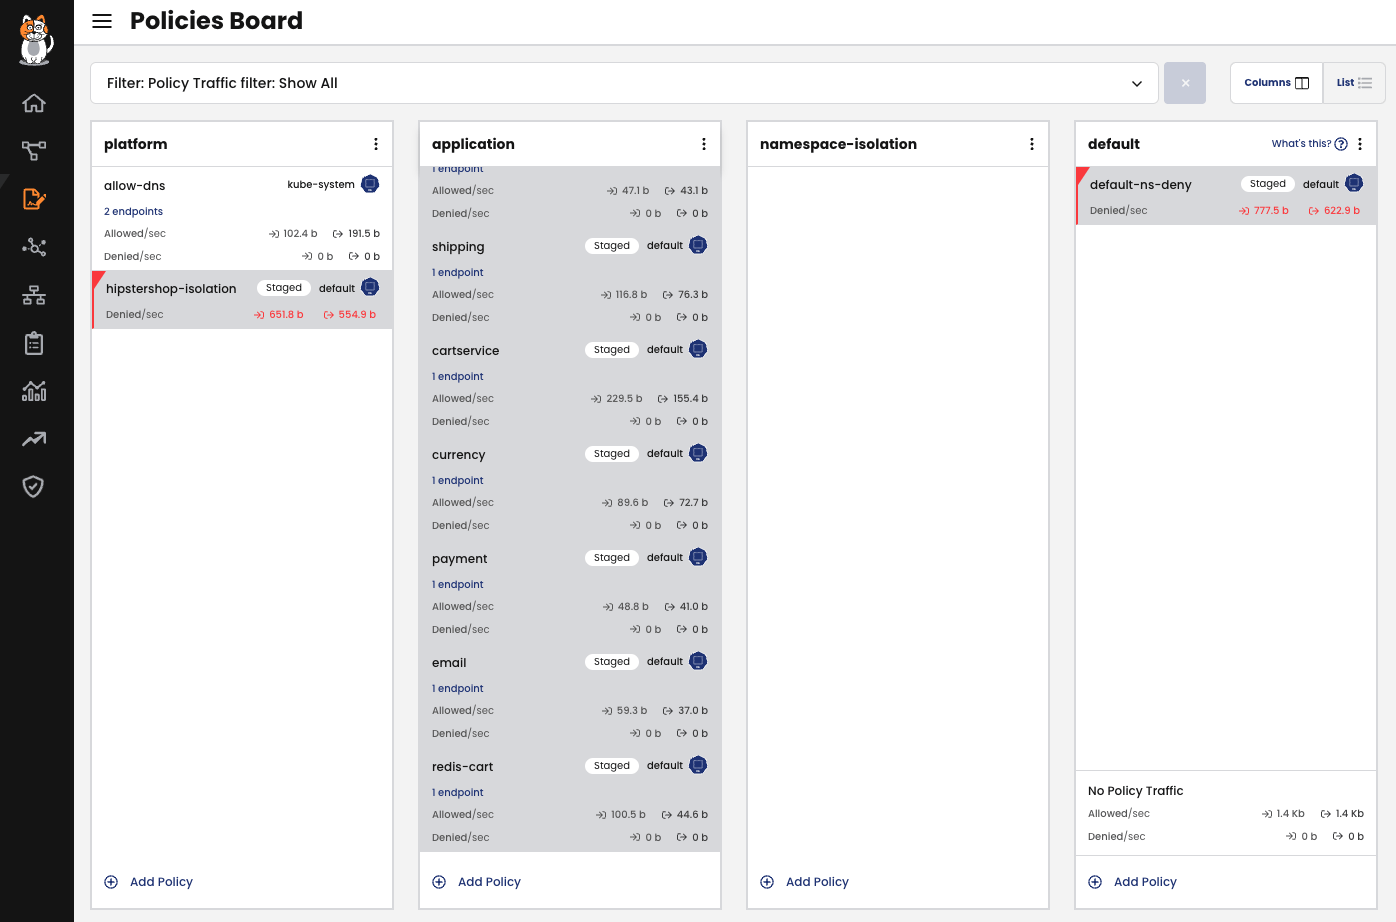
Figure 3
In Figure 3, we can see we have 4 Tiers configured. If you are not familiar with Calico Policy Tiers, please check the documentation in the Reference section at the end of this blog post.
In the first Tier, called “platform”, we have a policy which is not staged named “allow-dns”. Note the colour for this policy is different (white background), and the word “Staged” does not appear in the policy. This policy is in enforcing mode, and applied in the kube-system namespace to control access to our coreDNS service, so traffic other than DNS will be dropped.
Below that policy, we have staged a different policy which will isolate the hipstershop application. This policy will make sure our namespace is isolated, as only traffic that comes from the namespace the application belongs to will be allowed (“default” namespace in our example). However this “Pass” action, will not just allow what is defined, but it will handover the traffic to the following Tiers for further evaluation:

Figure 4
Thus, we will hit that policy first, and then we will match our currency policy shown on Figure 2 to have more granular control of our traffic. Finally, any traffic that has not been selected by our policies will be denied at the last Tier with the “default-ns-deny” policy.
Staging Policies not only allows us to verify if there is traffic matching them (as we can see in the counters in our Policy Board), but we can see if the order of operation in which we expect our policies to be matched is correct.
We can see this policy order if we expand our flow in Dynamic Service and Threat Graph, or filtering for the specific traffic we want to inspect in the Kibana frontend provided by Calico. We access this raw data from the Logs’ menu in our Calico Cloud or Calico Enterprise UI.
Once there, we can craft a DSL filter as the one shown in Figure 5:
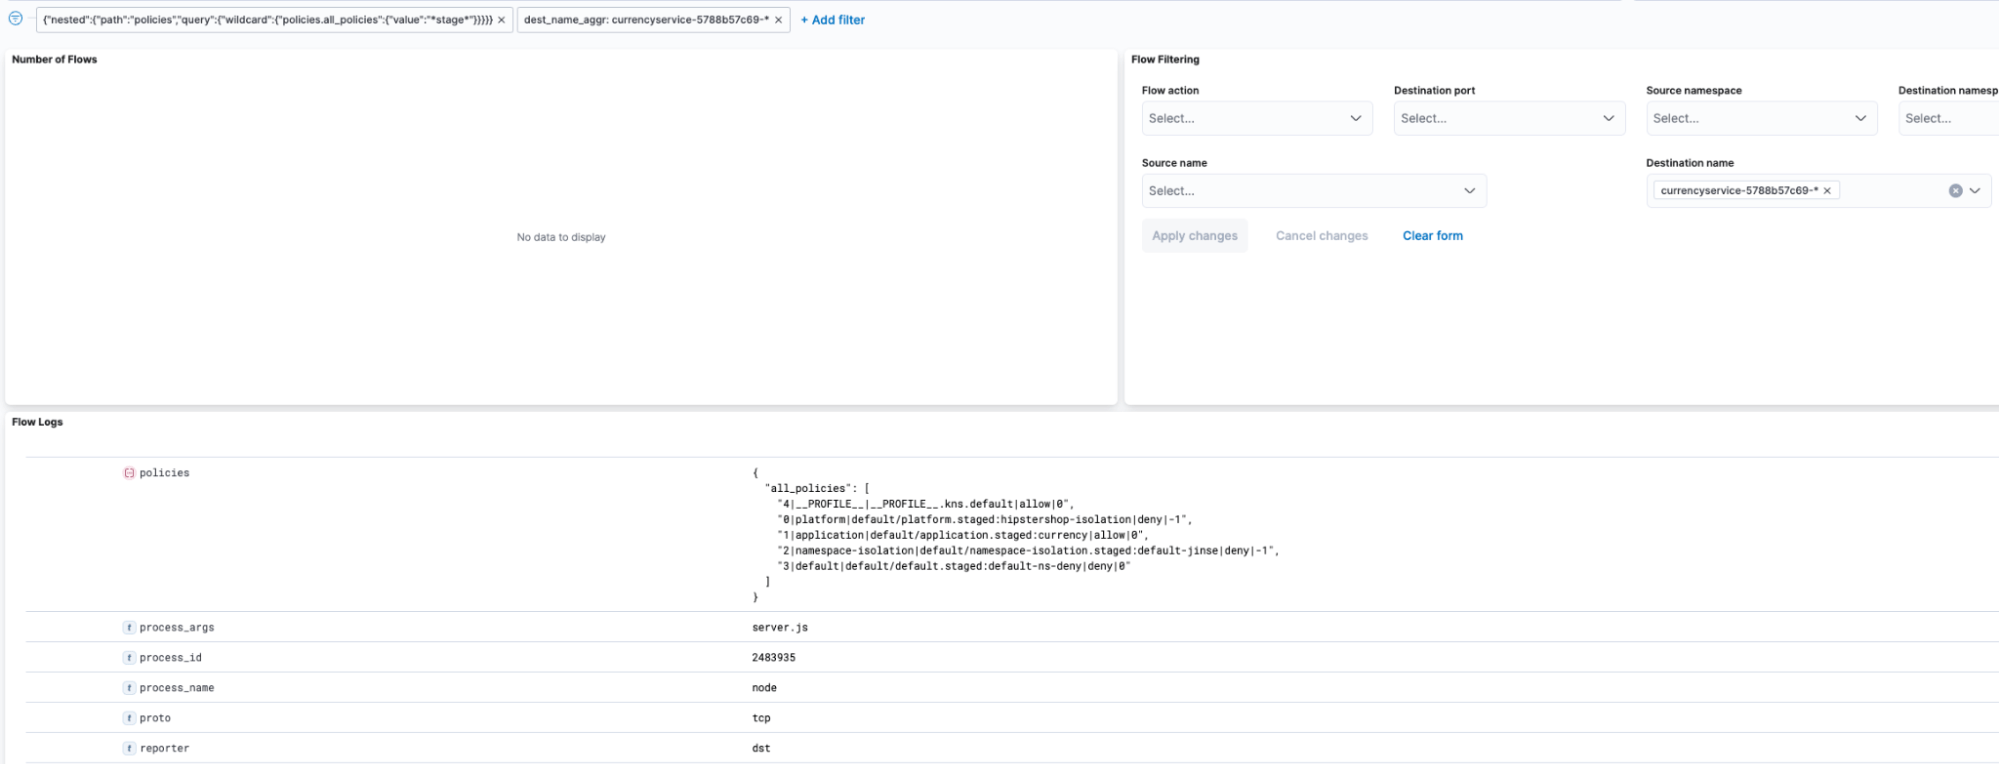
Figure 5
This filter allows us to observe only Staged flows that would have denied the traffic if they are enforced, and it shows us the order in which the policies would have matched.
As shown in the “policies” section of the flow information that Calico exports, we can see an index at the beginning which tells us how the different policies have been matched (starting with the policy with index zero), and a number at the end indicating the rule matched (0 for the first rule, -1 for no rule matched).
As staged policies will not be enforced, whenever a Staged policy is evaluated, traffic will finally be allowed by a default profile. In our example in Figure 5, should we enforce the policies, the last policy being hit before the profile would have discarded the traffic, as it matches the first rule of our default-ns deny. This exercise would have allowed us to determine any impact our traffic would have before even implementing our policies.
An additional note on Staged Policies: as they are a kind of resource managed by Calico in Kubernetes, administrators can be use Role Based Access Control to restrict their implementation to specific users, so they have the ability to have teams that can configure Calico policies while only specific team members can actually enforce those.
Summary
Staged Policies in Calico are an effective tool to make an assessment of our microsegmentation design for workload and tenant isolation during deploy and runtime, and reduce the barrier of entry to implement security controls in our Kubernetes environment. As they can be configured in an atomic way, enabling them for specific workloads strengthens the overall security of the cluster in real-time.
Ready to try Calico node-specific policies? Sign up for a free trial of Calico Cloud.
Reference
Join our mailing list
Get updates on blog posts, workshops, certification programs, new releases, and more!