In my previous blog post, What you can’t do with Kubernetes network policies (unless you use Calico): TLS Encryption, I talked about use case number two from the list of 9 things you cannot implement using basic Kubernetes network policy—anything TLS related. In this blog post, we’ll be focusing on use case number three: node specific policies.
Use case: Node specific policies
Kubernetes offers Network Policies as a tool to secure workloads by defining the allowed network connections for pods, whether for internal pod-to-pod communication within a cluster or for connections to and from outside the cluster. However, it’s essential to recognize that network policies primarily apply to pods within the cluster, and safeguarding the nodes hosting these workloads is equally crucial in the larger Kubernetes security landscape.
Implementing network perimeter security with static, IP-based rules to control external traffic to the entire cluster is considered a best practice. However, safeguarding your nodes against potential internal threats requires a more targeted approach. Since nodes, like pods, can be dynamic within a cluster, adopting a similar strategy for creating node-level segmentation is essential, akin to the approach used for enforcing network policies for pods. Indeed, by implementing this additional layer of protection, a compromised node or a pod without an adequately strict network policy would be efficiently contained, thereby preventing uncontrolled spreading throughout the cluster.
Securing Kubernetes nodes with Calico
Calico provides the capability to automatically create and manage network policies for the nodes in your Kubernetes cluster. When you enable this feature, it designates each node’s interface as a host endpoint and applies a predefined set of rules to every network interface on every host. Let’s explore how to leverage Calico Cloud to enhance the security of these network interfaces on the nodes themselves rather than concentrating solely on the workloads within the cluster. These interfaces are specifically called host endpoints to differentiate them from workload endpoints.
Host endpoints
Calico Cloud provides robust security policy capabilities for host endpoints, similar to what it offers for workload endpoints. Host endpoints can be labeled, and these labels reside within the same namespace as the labels for workload endpoints. This alignment enables security rules for either type of endpoint to reference the other type or a combination of both, using labels and selectors.
Calico Cloud distinguishes between workload endpoints and host endpoints using a customizable prefix. By default, this prefix is set to cali. Unless you have host interfaces with names matching this default prefix, there’s usually no need to modify it. However, if you encounter situations where you do need to adjust this prefix, you can refer to the InterfacePrefix configuration value in the Configuring Felix documentation. Interfaces beginning with a value specified in the InterfacePrefix are considered workload interfaces, while those with other prefixes are treated as host interfaces.
You can apply host endpoint policies to three types of traffic:
- Traffic that is terminated locally.
- Traffic that is forwarded between host endpoints.
- Traffic that is forwarded between a host endpoint and a workload endpoint on the same host.
Set the applyOnForward flag to true to apply a policy to forwarded traffic.

Automatic Host Endpoints
You can distinguish automatic host endpoints from other host endpoints by looking at the label projectcalico.org/created-by: calico-kube-controllers. To control whether automatic host endpoints are active, adjust the settings in the default KubeControllersConfiguration resource.
Calico Cloud regularly syncs these managed host endpoints to ensure they stay in sync with their node’s labels and IP addresses. This ensures that policies targeting these automatic host endpoints will continue to work correctly, even if the node’s labels or IP addresses change over time. In the following example, we will enable the host endpoint automatically for the nodes in an AKS cluster. Note that it will require eBPF data plane to be enabled, as iptables are not supported.
A note on eBPF
eBPF, short for “extended Berkeley Packet Filter,” is a versatile technology enabling the attachment of secure small programs to different low-level entry points within the Linux kernel. eBPF finds applications in diverse domains such as networking, security, and tracing. While it is employed in numerous non-networking projects, our primary emphasis within Calico Cloud centers on networking. Specifically, we aim to explore the full extent of networking capabilities offered by the most recent Linux kernel versions, but this is material for another blog post.
To enable eBPF, follow the steps in the documentation, Enable eBPF on an existing cluster. To activate automatic host endpoints, you should edit the default KubeControllersConfiguration instance and change the value of spec.controllers.node.hostEndpoint.autoCreate to true:
> kubectl patch kubecontrollersconfiguration default \
--patch='{"spec": {"controllers": {"node": {"hostEndpoint": {"autoCreate": "Enabled"}}}}}'
If successful, host endpoints are created for each of your cluster’s nodes:
> kubectl get heps -o wide
The output may look similar to this:
> kubectl get heps -o wide
NAME CREATED AT
aks-nodepool1-42419267-vmss000002-auto-hep 2023-09-28T14:12:44Z
aks-nodepool1-42419267-vmss000003-auto-hep 2023-09-28T14:12:44Z
You can get more information about the hostendpoints using the following command:
> kubectl get hostendpoint aks-nodepool1-42419267-vmss000002-auto-hep -o yaml
apiVersion: projectcalico.org/v3
kind: HostEndpoint
metadata:
  creationTimestamp: "2023-09-28T14:12:44Z"
  labels:
    agentpool: nodepool1
    beta.kubernetes.io/arch: amd64
    beta.kubernetes.io/instance-type: Standard_B4ms
    beta.kubernetes.io/os: linux
    failure-domain.beta.kubernetes.io/region: canadacentral
    failure-domain.beta.kubernetes.io/zone: "0"
    kubernetes.azure.com/agentpool: nodepool1
    kubernetes.azure.com/cluster: MC_rmartins_blog_canadacentral
    kubernetes.azure.com/consolidated-additional-properties: bb33b2ed-44d1-11ee-8781-62145a7fd233
    kubernetes.azure.com/kubelet-identity-client-id: 52cec951-a589-4b20-bf23-2f7de1c1dc04
    kubernetes.azure.com/mode: system
    kubernetes.azure.com/node-image-version: AKSUbuntu-2204gen2containerd-202308.10.0
    kubernetes.azure.com/nodepool-type: VirtualMachineScaleSets
    kubernetes.azure.com/os-sku: Ubuntu
    kubernetes.azure.com/role: agent
    kubernetes.azure.com/storageprofile: managed
    kubernetes.azure.com/storagetier: Premium_LRS
    kubernetes.io/arch: amd64
    kubernetes.io/hostname: aks-nodepool1-42419267-vmss000002
    kubernetes.io/os: linux
    kubernetes.io/role: agent
    node-role.kubernetes.io/agent: ""
    node.kubernetes.io/instance-type: Standard_B4ms
    projectcalico.org/created-by: calico-kube-controllers
    storageprofile: managed
    storagetier: Premium_LRS
    topology.disk.csi.azure.com/zone: ""
    topology.kubernetes.io/region: canadacentral
    topology.kubernetes.io/zone: "0"
  name: aks-nodepool1-42419267-vmss000002-auto-hep
  resourceVersion: "9289816"
  uid: 58a8f642-7c1e-4d38-8d10-431f7a172a95
spec:
  expectedIPs:
  - 10.224.0.208
  interfaceName: '*'
  node: aks-nodepool1-42419267-vmss000002
  profiles:
  - projectcalico-default-allow
You can see similar information in the Calico Cloud interface:
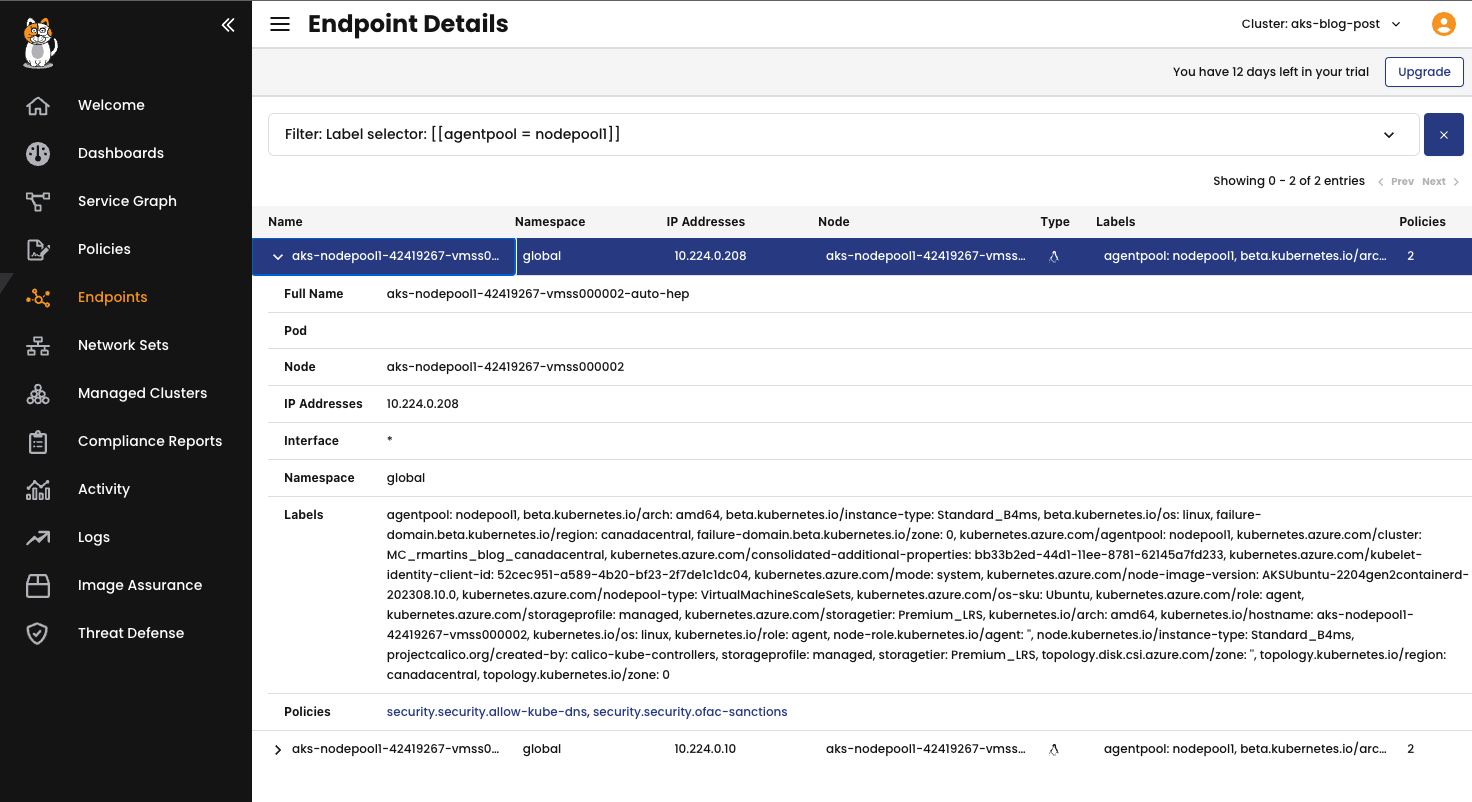
Now, you can use the current labels to create a policy for a specific node or even create a customized label. For this exercise, I will use an existing label kubernetes.io/hostname: aks-nodepool1-42419267-vmss000002. Applying the following policy, we will secure the node aks-nodepool1-42419267-vmss000002 against any unauthorized connection.
kubectl apply -f - <<EOF
apiVersion: projectcalico.org/v3
kind: GlobalNetworkPolicy
metadata:
  name: default.node-aks-nodepool1-42419267-vmss000002
spec:
  tier: default
  selector: kubernetes.io/hostname == "aks-nodepool1-42419267-vmss000002"
  namespaceSelector: ''
  serviceAccountSelector: ''
  ingress:
    - action: Allow
      source: {}
      destination:
        nets:
          - 127.0.0.1/32
    - action: Allow
      protocol: TCP
      source:
        selector: has(node-role.kubernetes.io/master)
      destination:
        ports:
          - '10250'
    - action: Allow
      protocol: UDP
      source: {}
      destination:
        ports:
          - '53'
    - action: Allow
      protocol: TCP
      source:
        selector: prometheus == "calico-node-prometheus"
      destination:
        ports:
          - '9900'
    - action: Allow
      protocol: TCP
      source:
        selector: app == "konnectivity-agent"
      destination:
        ports:
          - '10240:10260'
  doNotTrack: false
  applyOnForward: false
  preDNAT: false
  types:
    - Ingress
EOF
If you want to authorize a connection to node the aks-nodepool1-42419267-vmss000002 you will need to create a rule for it. Let’s test it in the following scenario:
Log in to nodes aks-nodepool1-42419267-vmss000002 and aks-nodepool1-42419267-vmss000003 using the procedure described in Connect to Azure Kubernetes Service (AKS) cluster nodes for maintenance or troubleshooting.
Let’s create an HTTP server that listens to port 8080 in the node aks-nodepool1-42419267-vmss000002 using the following command:
# mkdir http; cd http; python3 -m http.server 8080
You will see the following output:
Serving HTTP on 0.0.0.0 port 8080 (http://0.0.0.0:8080/) ...
Now, from the node aks-nodepool1-42419267-vmss000003, let’s try to connect to this http server on node aks-nodepool1-42419267-vmss000002 using the following command:
# curl -m3 http://10.224.0.208:8080
Because there is no rule allowing ingress traffic to this port on aks-nodepool1-42419267-vmss000002, the connection will timeout with the following error:
curl: (28) Connection timed out after 3001 milliseconds
Let’s now create a policy with a rule allowing this ingress traffic:
kubectl apply -f - <<EOF
apiVersion: projectcalico.org/v3
kind: GlobalNetworkPolicy
metadata:
  name: default.allow-8080-node-vmss000002
spec:
  tier: default
  order: 200
  selector: kubernetes.io/hostname == "aks-nodepool1-42419267-vmss000002"
  namespaceSelector: ''
  serviceAccountSelector: ''
  ingress:
    - action: Allow
      protocol: TCP
      source:
        selector: kubernetes.io/hostname == "aks-nodepool1-42419267-vmss000003"
      destination:
        ports:
          - '8080'
  doNotTrack: false
  applyOnForward: false
  preDNAT: false
  types:
    - Ingress
EOF
With this policy created, let’s give it another try.
From the node aks-nodepool1-42419267-vmss000003 rerun the following command:
# curl -m3 http://10.224.0.208:8080
Now, you will see a different output, which is the returned HTML page from the server running on node aks-nodepool1-42419267-vmss000002:
<!DOCTYPE HTML PUBLIC "-//W3C//DTD HTML 4.01//EN" "http://www.w3.org/TR/html4/strict.dtd">
<html>
<head>
<meta http-equiv="Content-Type" content="text/html; charset=utf-8">
<title>Directory listing for /</title>
</head>
<body>
<h1>Directory listing for /</h1>
<hr>
<ul>
</ul>
<hr>
</body>
</html>
You will also be able to confirm the connection by looking into the logs from the server running in the node aks-nodepool1-42419267-vmss000002.
Serving HTTP on 0.0.0.0 port 8080 (http://0.0.0.0:8080/) ...
10.224.0.10 - - [28/Sep/2023 20:35:55] "GET / HTTP/1.1" 200 -
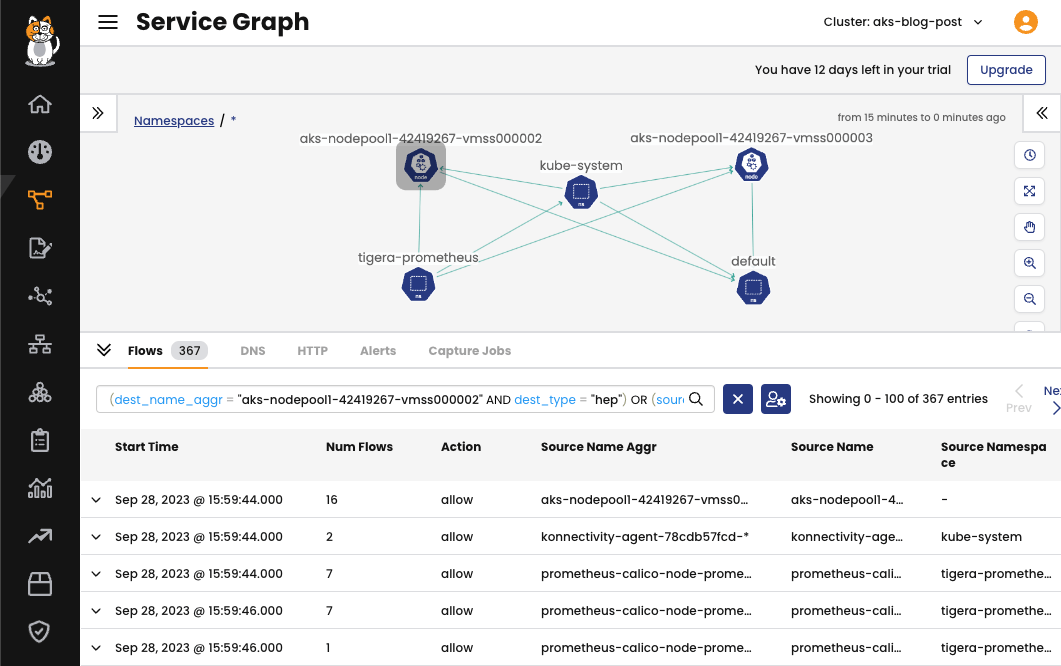
The ingress and egress traffic to the nodes can be observed in the Calico Cloud UI, using the Service Graph.
Benefits of node specific policies
Defense in depth
Calico brings an additional layer of protection for your cluster with node specific policies. Just like you define policies for pods, you can now create policies tailored specifically for nodes. This capability is essential for containing potential threats and preventing lateral movement of threat within the cluster.
Security-as-code
With Calico, you can automatically create and manage network policies for nodes, ensuring your cluster’s nodes remain secure. Host endpoints can be labeled and subject to robust security policy rules. These host endpoints can be distinguished from workload endpoints, allowing you to apply policies that reference both, using labels and selectors.
Zero-trust workload access
Enabling host endpoints with Calico is a straightforward process, and it ensures that your nodes are protected against unauthorized connections. By creating policies like the one described in this blog post, you can control ingress traffic to specific nodes, enhancing your cluster’s overall security.
In the example provided, we demonstrated how to create a policy that allows ingress traffic to a specific port on a node. This policy ensures that only authorized connections are permitted, adding an extra layer of security to your Kubernetes environment.
Calico empowers you to implement node-specific policies, filling a gap in Kubernetes’ native network policy capabilities. By doing so, you can enhance the security of your cluster’s nodes and ensure that your Kubernetes environment remains robust and protected against internal threats.
Conclusion
In this multi-part blog series, we are exploring some of the limitations of Kubernetes network policies and how you can overcome them by using Calico. In this post, we delved into a crucial use case: node-specific policies. In the upcoming blog post, we will discuss the limitations of native Kubernetes network policies, specifically the default policies that are applied to all namespaces or pods. We will showcase how Calico can overcome this limitation by using global network policies that can affect pods in all namespaces within your cluster. Stay tuned!
Ready to try Calico node-specific policies? Sign up for a free trial of Calico Cloud.
Join our mailing list
Get updates on blog posts, workshops, certification programs, new releases, and more!