Microservices security is a growing concern for businesses in the face of increasing cyber threats. With application layer attacks being a leading cause of breaches, it’s more important than ever to safeguard the HTTP-based communication between microservices within a Kubernetes cluster. Traditional web application firewalls (WAFs) are not designed to address this specific challenge, but Calico WAF offers a unique solution.
What is a workload-centric WAF?
Calico WAF, a workload-centric web application firewall, brings a fresh, cloud-native approach to securing microservices communication. Unlike traditional WAFs deployed at the edge of a Kubernetes cluster, Calico WAF focuses on protecting the intra-cluster traffic and applies zero-trust rules specifically designed for microservices within your cluster.
This innovative solution defends against common HTTP-layer attacks, such as server-side request forgery (SSRF), improper HTTP header type, occurring within the cluster. It seamlessly integrates with Calico Cloud network policies, enabling the enforcement of security controls at the host level for selected pods.
Calico WAF ensures the secure communication between microservices within your Kubernetes cluster, reducing the risk of vulnerabilities and threats. By adopting Calico WAF, businesses can confidently fortify the HTTP-based communication channels within their microservices architecture. This comprehensive approach enhances the overall security posture of the Kubernetes cluster, allowing for secure and reliable operation of microservices.
Deploying and Leveraging Calico Cloud WAF
Calico Cloud’s WAF is architecturally deployed as an Envoy DaemonSet within the Kubernetes cluster. By proxying selected service traffic through Envoy, HTTP requests are evaluated based on the industry-standard open-source ModSecurity WAF module. This rule set that comes bundled with Calico WAF, can be found here.
WAF can be enabled via the Manager UI, allowing you to specify the services requiring WAF protection. To facilitate real-time tracking and response, WAF events are logged as HTTP logs and can be accessed via the Dynamic Service and Threat Graph, and Kibana. Global alerts can be configured to trigger notifications based on these logs.
Below we will go step-by-step through deploying the Calico Cloud workload-centric WAF.
Prerequisites
1. Install Calico Cloud and verify that all components are running.
2. Enable the Policy Sync API in Felix. To do this cluster-wide, modify the default FelixConfiguration to set the field policySyncPathPrefix to /var/run/nodeagent:
[ec2-user@ip-172-31-20-71 ~]$ kubectl patch felixconfiguration default --type='merge' -p '{"spec":{"policySyncPathPrefix":"/var/run/nodeagent"}}'
felixconfiguration.projectcalico.org/default patched
Configure the cluster for WAF
Step 1: Configure ApplicationLayer CRD
Create or update the ApplicationLayer resource to include the webApplicationFirewall section of the file. Ensure the value of the field is set to Enabled.
apiVersion: operator.www.tigera.io/v1
kind: ApplicationLayer
metadata:
name: tigera-secure
spec:
webApplicationFirewall: Enabled
Apply the manifest: kubectl apply -f application.yaml
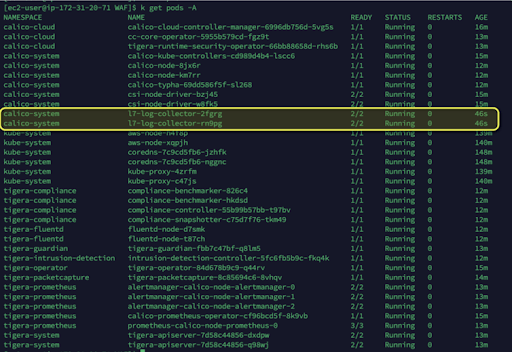
You will see new pods spinning up in the clusters in the calico-system namespace:
Optional: Launch a sample application using the following commands (we will test the WAF functionality on this):
kubectl apply -f -<<EOF
apiVersion: v1
kind: Namespace
metadata:
name: yaobank
labels:
istio-injection: disabled
tenant: tenant1

---
apiVersion: v1
kind: Service
metadata:
name: database
namespace: yaobank
labels:
app: database
tenant: tenant1
spec:
ports:
- port: 2379
name: http
selector:
app: database

---
apiVersion: v1
kind: ServiceAccount
metadata:
name: database
namespace: yaobank
labels:
app: yaobank
tenant: tenant1

---
apiVersion: apps/v1
kind: Deployment
metadata:
name: database
namespace: yaobank
spec:
selector:
matchLabels:
app: database
version: v1
tenant: tenant1
replicas: 1
template:
metadata:
labels:
app: database
version: v1
tenant: tenant1
spec:
serviceAccountName: database
containers:
- name: database
image: calico/yaobank-database:certification
imagePullPolicy: IfNotPresent
ports:
- containerPort: 2379
command: ["etcd"]
args:
- "-advertise-client-urls"
- "http://database:2379"
- "-listen-client-urls"
- "http://0.0.0.0:2379"

---
apiVersion: v1
kind: Service
metadata:
name: summary
namespace: yaobank
labels:
app: summary
tenant: tenant1
spec:
ports:
- port: 80
name: http
selector:
app: summary

---
apiVersion: v1
kind: ServiceAccount
metadata:
name: summary
namespace: yaobank
labels:
app: yaobank
database: reader
tenant: tenant1

---
apiVersion: apps/v1
kind: Deployment
metadata:
name: summary
namespace: yaobank
spec:
replicas: 2
selector:
matchLabels:
app: summary
version: v1
tenant: tenant1
template:
metadata:
labels:
app: summary
version: v1
tenant: tenant1
spec:
serviceAccountName: summary
containers:
- name: summary
image: calico/yaobank-summary:certification
imagePullPolicy: Always
ports:
- containerPort: 80

---
apiVersion: v1
kind: Service
metadata:
labels:
app: customer
tenant: tenant1
name: customer
namespace: yaobank
spec:
ports:
- name: http
port: 80
selector:
app: customer

---
apiVersion: v1
kind: ServiceAccount
metadata:
name: customer
namespace: yaobank
labels:
app: yaobank
summary: reader
tenant: tenant1

---
apiVersion: apps/v1
kind: Deployment
metadata:
name: customer
namespace: yaobank
spec:
replicas: 1
selector:
matchLabels:
app: customer
version: v1
tenant: tenant1
ingress: "true"
template:
metadata:
labels:
app: customer
version: v1
tenant: tenant1
ingress: "true"
spec:
serviceAccountName: customer
containers:
- name: customer
image: calico/yaobank-customer:certification
imagePullPolicy: Always
ports:
- containerPort: 80
EOF
Optional: Expose the svc customer as a LoadBalancer service to quickly access it using the browser. You can use any other service you may like to expose and test.
Step 2: Select traffic for WAF
Annotate the services you wish to enable WAF for as shown.
kubectl annotate svc <service-name> -n <service-namespace> projectcalico.org/l7-logging=true
[ec2-user@ip-172-31-20-71 WAF]$ kubectl annotate svc customer -n yaobank projectcalico.org/l7-logging=true
service/customer annotated
Note: In case you want to disable WAF on the service, remove the annotation likewise:
kubectl annotate svc <service-name> -n <service-namespace> projectcalico.org/l7-logging-
Step 3: Test your installation
To test your installation, you must first know the URL to access services. The URL can be either of the following:
- The external address of your cluster/service
- The cluster IP of your application’s service (if testing within the cluster).
After identifying the URL, curl your service with a command to trigger an OWASP rule. This is a simple example of potential SQL Injection attack:
curl<http://<host>//test/artists.php?artist=0+div+1+union%23foo*%2F*bar%0D%0Aselect%23foo%0D%0A1%2C2%2Ccurrent_user>
curl http://af7ad88cf23b34ed084cb75b28e330ea-1400749873.ca-central-1.elb.amazonaws.com//test/artists.php?artist=0+div+1+union%23foo*%2F*bar%0D%0Aselect%23foo%0D%0A1%2C2%2Ccurrent_user
In the l7-log-collector pods, you should notice a warning log when the attack triggered (dikastes container)
[ec2-user@ip-172-31-20-71 WAF]$ k logs l7-log-collector-2fgrg -n calico-system -c dikastes | grep SQL
time="2023-03-21T18:25:30Z" level=info msg="WAF Found Rules File[8]('/etc/modsecurity-ruleset/RESPONSE-951-DATA-LEAKAGES-SQL.conf')"
time="2023-03-21T18:25:30Z" level=info msg="WAF Found Rules File[13]('/etc/modsecurity-ruleset/REQUEST-942-APPLICATION-ATTACK-SQLI.conf')"
time="2023-03-21T19:17:42Z" level=warning msg="WAF Process Http Request [eabbf6c3-7964-4063-81be-c2abb8c66740] URL '//test/artists.php?artist=0+div+1+union%23foo*%2F*bar%0D%0Aselect%23foo%0D%0A1%2C2%2Ccurrent_user' OWASP Warning'[2] Host:'192.168.60.185' File:'/etc/modsecurity-ruleset/REQUEST-942-APPLICATION-ATTACK-SQLI.conf' Line:'45' ID:'942100' Data:'' Severity:'0' Version:'OWASP_CRS/3.3.2' Message:'Warning. detected SQLi using libinjection.''"

Add or edit a rule set
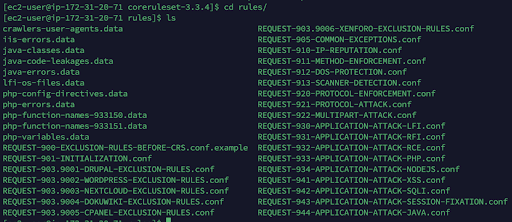
Create a directory, and download the core rules set files that you want to use, for example:
mkdir my-ruleset && cd my-ruleset
curl -O https://raw.githubusercontent.com/coreruleset/coreruleset/v3.3/dev/rules/REQUEST-942-APPLICATION-ATTACK-SQLI.conf
Note: Download the following required bootstrapping configuration files (Reference).
ModSecurity is a popular open-source module for web application firewalls (WAF). It is used by Tigera-Operator. ModSecurity helps protect web applications from various attacks and exploits by monitoring HTTP traffic in real-time. It uses a set of rule configurations to filter and log activity, allowing it to prevent attacks categorized as SQL injection, cross-site scripting (XSS), and others.
curl -O https://raw.githubusercontent.com/lsgroup/SmartReverseProxy/master/modsecdefault.conf
curl https://raw.githubusercontent.com/coreruleset/coreruleset/v3.3/dev/crs-setup.conf.example > crs-setup.conf
NOTE
The two bootstrapping files modsecdefault.conf and crs-setup.conf MUST be named lowercase i.e. lowercase “m” and lowercase “c” respectively in order to ensure they are loaded into ModSec before any REQUST-*.conf Core Rules Set files. Presence of these two files is required and enforced by the operator. Change your current directory to the my-ruleset folder where your core rules set files live. Create a configMap containing all the files downloaded into your new directory and replace the existing rule set with it
Have a look at the configmap for modsecurity in namespace calico-system:

kubectl create cm --dry-run=client --from-file=. -o yaml -n tigera-operator modsecurity-ruleset > ../my-ruleset.yaml
kubectl replace -f ../my-ruleset.yaml
Check the config map created above using the following command:
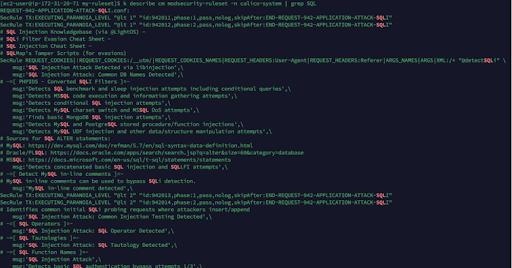
Kubectl describe cm modsecurity-ruleset -n calico-system | grep SQL
To add more rulesets, we can include them in the same directory and replace the configmap accordingly.
We can download the extensive rulesets from:
wget https://github.com/coreruleset/coreruleset/archive/refs/tags/v3.3.4.tar.gz (change versions as required)
Viewing WAF events in Kibana and Manager UI
In order for logs to be pushed and seen in Kibana and Manager UI, core rulesets have to be modified to deny or drop traffic. When WAF is configured in the cluster by default, modsecurity rules are programmed in the l7-log-collector to log a warning but not deny or drop the traffic.
For example, modify the modsecurity core rulesets’ SecDefaultAction to deny rules by commenting and uncommenting these sections in the crs-setup.conf, which will change the SecDefaultAction from pass to deny with a 403 response.
Comment
SecDefaultAction "phase:1,log,auditlog,pass"
SecDefaultAction "phase:2,log,auditlog,pass"
Uncomment
SecDefaultAction "phase:1,log,auditlog,deny,status:403"
SecDefaultAction "phase:2,log,auditlog,deny,status:403"
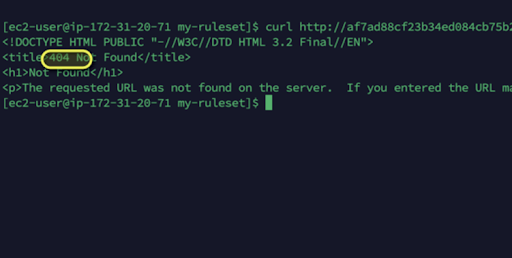
Before updating the config map it was returning 404 as shown below:
curl http://af7ad88cf23b34ed084cb75b28e330ea-1400749873.ca-central-1.elb.amazonaws.com//test/artists.php?artist=0+div+1+union%23foo*%2F*bar%0D%0Aselect%23foo%0D%0A1%2C2%2Ccurrent_user
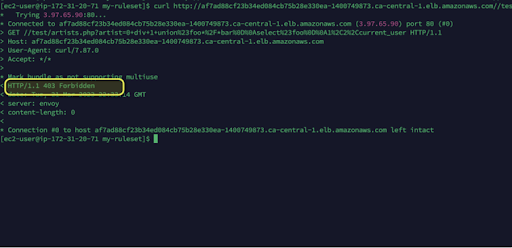
After replacing the configmap it should return 403 forbidden (we will need to run the above command to replace the configmap with the new rulesets again to take effect)
NOTE: Switching to deny means it will stop processing the request and return a 403 forbidden error when a rule is triggered. All denied traffic in this case means any HTTP request will return HTTP 403 Response Code from Envoy to the originating service like below:
curl http://af7ad88cf23b34ed084cb75b28e330ea-1400749873.ca-central-1.elb.amazonaws.com//test/artists.php?artist=0+div+1+union%23foo*%2F*bar%0D%0Aselect%23foo%0D%0A1%2C2%2Ccurrent_user -v
Viewing logs in Kibana
In Kibana you will have to create tigera_secure_ee_waf* index pattern. Instructions on how to create an index pattern can be found here.
Now view the WAF logs in Kibana by selecting the tigera_secure_ee_waf* index pattern. You should see the relevant WAF assessment from your request recorded.
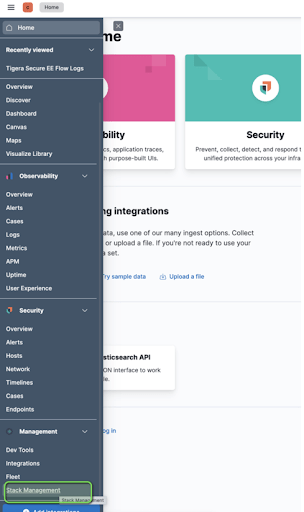
Go into Stack Management in Kibana and create the index pattern:
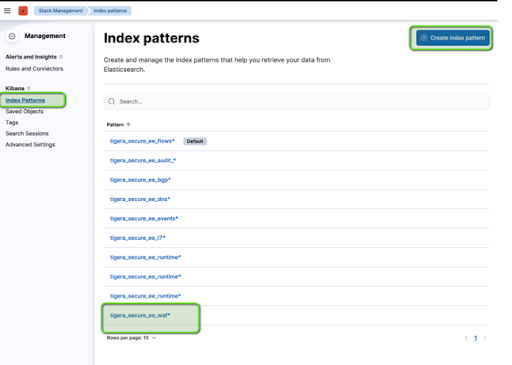
Now view the WAF logs in Kibana by selecting the tigera_secure_ee_waf* index pattern. You should see the relevant WAF assessment from your request recorded:
Now if we go into discover and filter with the above index pattern, we should see the flow.
Calico Manager UI Set-up
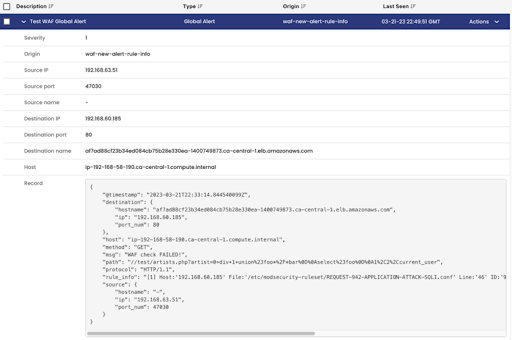
Create a new Global Alert for WAF using Calico Manager UI, or using standard YAML. For example, we would like to trigger a Global Alert for SQL Injection attack specifically Rule ID 942100 as per custom version of Core Rule Set file that will “deny” all traffic instead of “block”.
apiVersion: projectcalico.org/v3
kind: GlobalAlert
metadata:
name: waf-new-alert-rule-info
spec:
summary: 'WAF new waf-alert-942100'
description: 'Test WAF Global Alert'
severity: 1
dataSet: waf
period: 1m
lookback: 1h
query: '"rule_info" IN {"*942100*"}'
threshold: 0
condition: gt
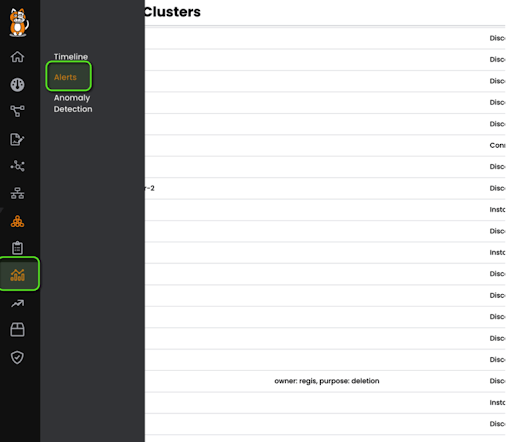
Once the file is applied, if a SQL Injection attack is detected for rule ID 942100, you will see the global alert in Manager UI, Activity, Alerts.
Considerations and Caveats
While Calico Cloud WAF offers a novel approach to web security, it is crucial to acknowledge the associated limitations. This solution currently does not extend support to Windows, eBPF dataplane, RKE, and RKE2 clusters. Additionally, WAF is not applicable for host-networked client pods, and the selection and deselection of traffic for WAF may disrupt active connections.
Particular caution should be exercised while enabling WAF for system services as it may lead to undesirable cluster states. Avoid enabling WAF for system services prefixed with “tigera-“, “calico-“, or “kube-system”.
Prior to enabling Calico Cloud WAF, Felix must be configured for syncing WAF policy. If L7 logs have already been configured, this step can be bypassed. It is also crucial to enable the Policy Sync API in Felix cluster-wide by setting the policySyncPathPrefix field to /var/run/nodeagent.
Looking Ahead
Calico Cloud’s Workload-based WAF represents an evolutionary step in microservices security. By operating at the workload level within the cluster, it provides more refined and targeted security measures that align with the dynamics of cloud-native applications. As we navigate the landscape dominated by microservices, leveraging tools such as Calico Cloud’s WAF is integral to maintaining the integrity and reliability of valuable data exchanged between microservices against an ever-evolving threat landscape. Embracing this innovative solution allows businesses to ensure the security of their microservices and confidently adapt to the changing security landscape.
Ready to try Calico for yourself? Get started with a free Calico Cloud trial.
Join our mailing list
Get updates on blog posts, workshops, certification programs, new releases, and more!