Kubernetes operations (kOps) is one of the official Kubernetes (K8s) projects. The kOps project allows for rapid deployment of production-grade K8s clusters in multiple cloud platforms. By leveraging yaml manifests, kOps delivers a familiar experience to users who have worked with kubectl. Similar to K8s clusters in popular cloud platforms, kOps helps set up self-managed clusters to easily deliver high availability. Given its ease of use, it is a very popular choice when users want to deploy self-hosted Kubernetes clusters.
With the recent release of kOps (v1.19), support for the Calico eBPF data plane was added to the utility. In addition to the above-mentioned features, the latest kOps update offers an effortless way to autodeploy K8s clusters utilizing Project Calico for networking and the Calico eBPF data plane. Calico eBPF data plane implementation replaces kube-proxy and delivers equivalent functionality; it also leverages the most optimal datapath for traffic. These changes deliver a network performance boost and source IP preservation to your cluster.
In this blog post, we will showcase the steps required to deploy a cluster that utilizes these newly available features.
What is eBPF?
eBPF is a virtual machine embedded within the Linux kernel. It allows small programs to be loaded into the kernel, and attached to hooks, which are triggered when some event occurs. This allows the behaviour of the kernel to be (sometimes heavily) customised. While the eBPF virtual machine is the same for each type of hook, the capabilities of the hooks vary considerably. Since loading programs into the kernel would otherwise be a security risk, the kernel runs all programs through a very strict static verifier; the verifier sandboxes the program, ensuring it can only access allowed parts of memory and ensuring that it must terminate quickly.
Calico’s eBPF data plane makes use of eBPF functionality to allow source IP preservation, Direct Server Return (DSR) and even better performance. Let’s explore this in more detail.
Source IP preservation
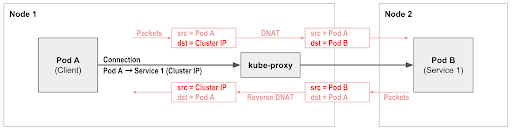
In a default networking setup, kube-proxy pods are in charge of routing inbound (ingress) traffic to target pods using network address translation (NAT) technology. NAT might be a good option to deliver packets; however, in the process of delivery, NAT replaces the original client source IP address, making troubleshooting and security implementation difficult since packets do not represent their original source.
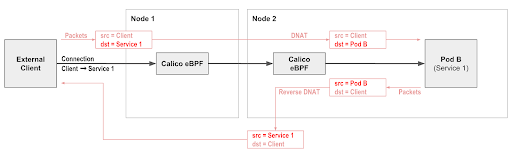
As an alternative to using Kubernetes standard kube-proxy, Calico’s eBPF data plane also supports native service handling. This preserves source IP to simplify network policy, offers DSR to reduce the number of network hops for return traffic, and provides even load-balancing independent of topology, with reduced CPU and latency compared to kube-proxy.
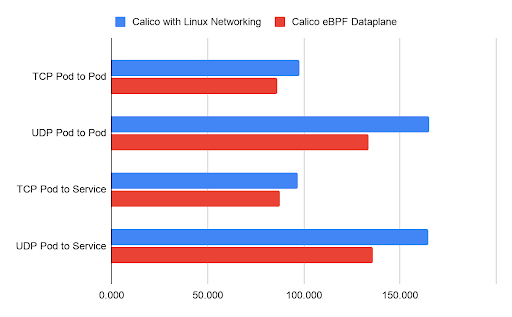
Performance
Calico eBPF data plane mode is an alternative to our standard Linux data plane mode (based on iptables) that pushes the performance limits further. In eBPF data plane mode, Calico leverages eBPF programs to process packets rapidly and efficiently without ever leaving the packet processing context of the Linux kernel. The efficiency achieved by this method is close to natively compiled code in the kernel.
Calico’s eBPF data plane attaches eBPF programs to each Calico interface as well as the data and tunnel interfaces. This allows Calico to spot workload packets early and handle them through a fast-path that bypasses iptables and other packet processing that the kernel would normally do.
Replacing kube-proxy
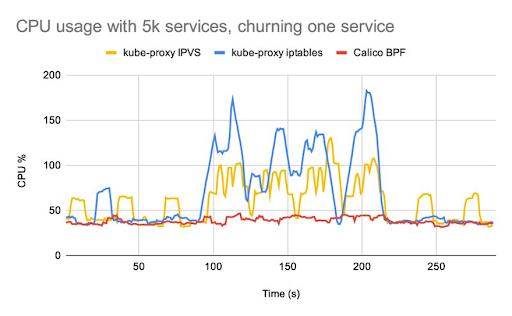
Calico’s eBPF data plane includes native service handling, so you no longer need to run kube-proxy. Calico’s native service handling outperforms kube-proxy both in terms of networking and control plane performance, and supports features such as source IP preservation.
The differences in performance are most noticeable if you have workloads that are particularly sensitive to network latency, or if you are running large numbers of services. You can read more about these performance advantages and find a range of different benchmark charts comparing kube-proxy performance with Calico’s native service handling in this blog from the Calico team.
Demo
Before we begin
In order to populate a cluster in the AWS public cloud, kOps utilizes aws-cli command line capabilities. Therefore, it is a requirement to install and configure aws-cli on your machine before following the below how-to section. You will also need kubectl in order to interact with your K8s API server. If you are not sure how to install these requirements, check out the following links:
- Install aws-cli
- Configure aws-cli
- Install kOps (version 1.19 or above)
- Install kubectl (version 1.13.8 or above)
How-to
kOps can create self-managed K8s clusters without hassle in a matter of seconds. There are a few configurations that are required in order to successfully deploy a kOps cluster.
S3 bucket (AWS specific)
Amazon S3 bucket is a storage server used to store objects in AWS cloud. kOps takes advantage of this storage system to store cluster configuration and deployment status.
First, execute the following command to create a new S3 bucket:
aws s3api create-bucket --bucket calico-kops-demo --region us-east-1
You should see a result similar to:
{
"Location": "/calico-kops-demo"
}
After creating the S3 bucket, we will need to store the name in an environment variable for kOps to use, using the following command:
export KOPS_STATE_STORE=s3://calico-kops-demo
If you are following this demo in Windows, please use the following PowerShell command:
$KOPS_STATE_STORE="s3://calico-kops-demo"
If you would prefer not to create an environment variable, use the `–state` argument to define your S3 store name.
Then, use the following command to create required configuration files in your S3 bucket:
kops create -f - <<EOF
apiVersion: kops.k8s.io/v1alpha2
kind: Cluster
metadata:
name: demo.k8s.local
spec:
api:
loadBalancer:
class: Classic
type: Public
authorization:
rbac: {}
channel: stable
cloudProvider: aws
configBase: s3://calico-kops-demo/demo.k8s.local
containerRuntime: docker
etcdClusters:
- cpuRequest: 200m
etcdMembers:
- instanceGroup: master-us-east-1a
name: a
memoryRequest: 100Mi
name: main
- cpuRequest: 100m
etcdMembers:
- instanceGroup: master-us-east-1a
name: a
memoryRequest: 100Mi
name: events
iam:
allowContainerRegistry: true
legacy: false
kubelet:
anonymousAuth: false
kubernetesApiAccess:
- 0.0.0.0/0
kubernetesVersion: 1.19.7
masterPublicName: api.demo.k8s.local
networkCIDR: 172.20.0.0/16
kubeProxy:
enabled: false
networking:
calico:
awsSrcDstCheck: Disable
encapsulationMode: vxlan
bpfEnabled: true
bpfExternalServiceMode: DSR
nonMasqueradeCIDR: 100.64.0.0/10
sshAccess:
- 0.0.0.0/0
subnets:
- cidr: 172.20.32.0/19
name: us-east-1a
type: Public
zone: us-east-1a
topology:
dns:
type: Public
masters: public
nodes: public
---
apiVersion: kops.k8s.io/v1alpha2
kind: InstanceGroup
metadata:
labels:
kops.k8s.io/cluster: demo.k8s.local
name: master-us-east-1a
spec:
image: 099720109477/ubuntu/images/hvm-ssd/ubuntu-focal-20.04-amd64-server-20210119.1
machineType: t3.medium
maxSize: 1
minSize: 1
nodeLabels:
kops.k8s.io/instancegroup: master-us-east-1a
role: Master
subnets:
- us-east-1a
---
apiVersion: kops.k8s.io/v1alpha2
kind: InstanceGroup
metadata:
labels:
kops.k8s.io/cluster: demo.k8s.local
name: nodes-us-east-1a
spec:
image: 099720109477/ubuntu/images/hvm-ssd/ubuntu-focal-20.04-amd64-server-20210119.1
machineType: t3.medium
maxSize: 1
minSize: 1
nodeLabels:
kops.k8s.io/instancegroup: nodes-us-east-1a
role: Node
subnets:
- us-east-1a
EOF
Let’s go through some of the parameters that were used to create the cluster.
By adding the following line to our configuration, we disabled `kubeproxy` pods and prevented them from being installed on our cluster, given that we are going to implement Calico in eBPF mode to take on the responsibility of directing our network traffic flow.
kubeProxy:
enabled: false
The networking section in kOps declares which CNI should be used in the cluster.
networking:
calico:
We can configure Calico using parameters available in kOps. For example, turning on the eBPF data plane is as easy as setting the `bpfEnabled` parameter with a `true` variable and appending it to the network section of the manifest.
bpfEnabled: true
We can also customize our installation further with parameters such as:
awsSrcDstCheck: Disable
encapsulationMode: vxlan
bpfExternalServiceMode: DSR
Now that we have created the cluster, we need to provide an SSH public key. Note that kOps and AWS can only import RSA keys, not other key types:
kops create secret --name demo.k8s.local sshpublickey admin -i ~/.ssh/id_rsa.pub
Note: AWS EC2 resources created by kOps require an SSH key to be imported for SSH authentication. Make sure you have a valid SSH key.
On Mac and Linux, creating an SSH key is as simple as running ssh-keygen.
If you are using Windows, SSH keys can be created using programs like PuTTYgen.
Use the following command to create the cluster resources:
kops update cluster demo.k8s.local --admin --yes
After issuing this command, EC2 and other required resources will be created in AWS. This will take some time.
Since cluster creation can be time consuming, you can use the following command to find out when creation is complete:
kops validate cluster --wait 10m
After some time, you should see a result similar to:
Your cluster demo.k8s.local is ready
That’s it, now you have a self-managed K8s cluster equipped with a Calico eBPF data plane.
Clean up
If you would like to remove the resources we have just created, use the following commands:
kops delete cluster --name demo.k8s.local --yes
aws s3api delete-bucket --bucket calico-kops-demo
Conclusion
As we have established in this blog post, running a self-managed K8s cluster equipped with Calico using an eBPF data plane is an easy task when we leverage the kOps deployment tool. kOps abstracts away much of the complexity, but still supports eBPF and Calico for excellent performance. The resulting cluster not only outperforms vanilla cluster networking, but offers additional features.
Did you know you can become a certified Calico operator? Learn Kubernetes networking and security fundamentals using Calico in this free, self-paced certification course.
If you enjoyed this blog, you might also like:
- Blog: Introducing the Calico eBPF data plane
- Getting started with Calico network policy
- Free, online webinars, workshops, and resources
- Learn about Calico Cloud
Join our mailing list
Get updates on blog posts, workshops, certification programs, new releases, and more!