A single Kubernetes cluster expends a small percentage of its total available assigned resources on delivering in-cluster networking. We don’t have to be satisfied with this, though—achieving the lowest possible overhead can provide significant cost savings and performance improvements if you are running network-intensive workloads. This article explores and explains the improvements that can be achieved in Microsoft Azure using Calico eBPF in AKS, including reducing CPU usage, decreasing complexity, enabling easier compliance and troubleshooting, and more.
Before going into details about how exactly Calico takes advantage of eBPF, it is important to note that in the context of this article, Calico is viewed as an additional networking layer on top of Azure CNI, providing functionality that turbocharges its performance. In particular, the standard instructions for installing Calico’s network policy engine with AKS use a version of Calico that pre-dates eBPF mode.
Accelerating network performance
Test methodology
To show how Calico accelerates AKS network performance using eBPF, the Calico team ran a series of network performance benchmarks based on the k8s-bench-suite. These performance benchmarks compared the latest Calico eBPF data plane (using the iptables data plane) with a vanilla AKS cluster.
Tests were run using Standard_D2s_v3 nodes, which are a typical machine type for AKS clusters, and each benchmark measured the CPU usage required to drive 10Gbps of traffic.
The performance benchmarks focus on the most common traffic flows between two nodes in a typical AKS cluster: direct pod-to-pod traffic and pod-to-service-to-pod traffic, for both TCP and UDP flows.
Test results
The chart below shows the total CPU utilization consumed by the benchmarks, measured in vCPUs. This is the sum of both client and server CPU utilization. In these tests, CPU utilization was reduced by between 11% and 41% (depending on the type of flow) compared to a cluster without Calico.

Beyond the controlled benchmark environment, this translates to Calico eBPF achieving a higher network throughput for the same amount of CPU utilization. If the throughput is limited by the environment, the lower CPU utilization for networking means more CPU available to run application workloads, which can in turn translate into significant cost savings if you are running network-intensive workloads.
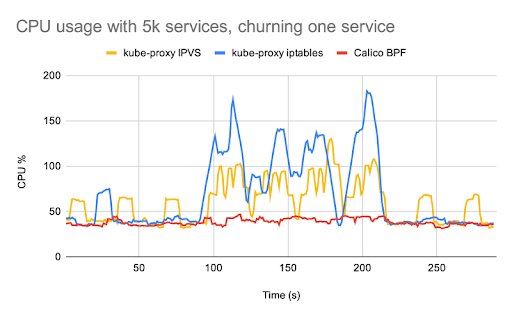
Replacing kube-proxy for better service handling
Calico’s eBPF data plane includes native service handling, so you no longer need to run kube-proxy. Calico’s native service handling outperforms kube-proxy both in terms of networking and control plane performance, and supports features such as source IP preservation.
The differences in performance are most noticeable if you have workloads that are particularly sensitive to network latency, or if you are running large numbers of services. You can read more about these performance advantages and find a range of different benchmark charts comparing kube-proxy performance with Calico’s native service handling in this blog post from the Calico team.
Source IP preservation for improved traffic visibility
The other major advantage of Calico’s native service handling is that it preserves client source IP addresses.
One frequently encountered friction point with Kubernetes networking is the use of Network Address Translation (NAT) by kube-proxy on incoming network connections to Kubernetes services (e.g. via a service node port). In most cases, this has the side effect of removing the original client source IP address from incoming traffic and replacing it with the node’s IP address.
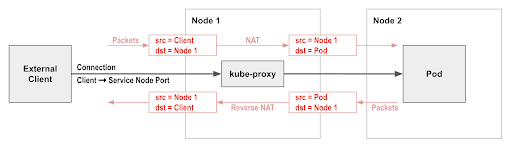
This means that Kubernetes network policies cannot restrict incoming traffic to specific external clients, since by the time the traffic reaches the pod it no longer has the original client IP address. This can also make troubleshooting applications harder, since logs don’t indicate the real client.
This is problematic because, for some applications, knowing the source IP address is desirable or required. For example, an application may need to perform geolocation decisions based on the client address, or there might be an industry compliance requirement to log the real source IP address.
Calico’s native service handling is able to preserve client source IP addresses.

To take advantage of this feature in an AKS cluster, you would typically create a Kubernetes service of type LoadBalancer. The resulting load balancer directs incoming connections to the corresponding service node port, preserving the client source IP. Calico’s native service handling then load balances the node port to the backing pods, again preserving client source IP. So you get end-to-end client source IP address preservation all the way to the backing pods!
This is great for making logs and troubleshooting easier to understand, and means you can now write network policies for pods that restrict access to specific external clients if desired.
Demo
Before we begin
This article assumes the user will have kubectl, and the Azure CLI (az) installed. If you already have `az` installed on your system, make sure you are using version 2.2.0 or above. You can check which version of `az` you are using by executing `az version`.
Create a resource group
Resource groups are used to hold related objects together in AKS public cloud infrastructure. You can decide what resources should be included in a resource group to manage resources efficiently.
In this article, we will group our Calico demo cluster resources to a resource group called CalicoDemoRG.
Use the following command to create the resource group:
az group create --name CalicoDemoRG --location canadaeast
Create the AKS cluster
Now that we have prepared the requirements for our cluster, let’s deploy it using the following command:
az aks create \
--resource-group CalicoDemoRG \
--name MyCalicoCluster \
--node-count 2 \
--kubernetes-version 1.20.2 \
--enable-managed-identity \
--load-balancer-sku standard \
--node-vm-size Standard_D2s_v3 \
--network-plugin azure \
--network-policy calico
This results in a cluster running a recent version of Calico using the iptables data plane.
By setting `network-plugin` to `azure` we specify our cluster CNI plugin will use Azure CNI, and by setting `network-policy` to `calico` we assign Calico to make policy decisions for our cluster’s network traffic.
Note: For a production environment you can also customize other arguments such as `node-vm-size` or `node-count` to your desire, if needed. If you would like to know more about other arguments and their responsibilities, please see this document.
Configure kubectl
If you have an existing kubeconfig, you might want to back it up at this stage:
cp -r ~/.kube ~/.kube.epochtime.$(date +%s).backup
Then, use the following command to generate the new Azure cluster context in your kubeconfig file:
az aks get-credentials --resource-group CalicoDemoRG --name MyCalicoCluster --admin
Set up eBPF
In eBPF mode, Calico implements Kubernetes service networking directly (rather than relying on kube-proxy). This means that, like kube-proxy, Calico must connect directly to the Kubernetes API server rather than via the API server’s ClusterIP.
Firstly, patch the installation to make sure the right IP addressing is used:
kubectl patch installation default --type=merge -p '{"spec":{"calicoNetwork": {"nodeAddressAutodetectionV4": {"canReach": "8.8.8.8"}}}}'
Next, since the AKS cluster implements a load balancing approach for communication with the API server, it is recommended that you use its DNS address and take advantage of the fault tolerance provided by it.
Using the following command we can determine our load balancer DNS address:
kubectl cluster-info | grep -i kubernetes
You should see a result similar to:
Kubernetes master is running at http://mycalicocl-calicodemorg-03a087-9388cb76.hcp.canadaeast.azmk8s.io:443
Use the result from the above command to create a file and replace `<API server host>` and `<API server port>` from the following ConfigMap before executing the following command:
kind: ConfigMap
apiVersion: v1
metadata:
name: kubernetes-services-endpoint
namespace: tigera-operator
data:
KUBERNETES_SERVICE_HOST: "<API server host>"
KUBERNETES_SERVICE_PORT: "<API server port>"
Now apply the file:
kubectl apply -f yourfile.yml
Wait 60 seconds for kubelet to detect the new ConfigMap; then, restart the operator to pick up the change:
kubectl delete pod -n tigera-operator -l k8s-app=tigera-operator
Configure kube-proxy
Calico replaces kube-proxy in eBPF mode, so running both would waste resources. You can disable kube-proxy (this is reversible) by adding a node selector to kube-proxy’s DaemonSet that matches no nodes. For example:
kubectl patch ds -n kube-system kube-proxy -p '{"spec":{"template":{"spec":{"nodeSelector":{"non-calico": "true"}}}}}'
Enable eBPF mode
To enable eBPF mode, change the Felix configuration parameter bpfEnabled to true.
kubectl patch felixconfiguration default --type=merge --patch='{"spec": {"bpfEnabled": true}}'
Note: Enabling eBPF mode should not disrupt existing connections but existing connections will continue to use the standard Linux datapath. You may wish to restart pods to ensure that they start new connections using the eBPF data plane. If you would like to know more about Calico eBPF, please see this Calico documentation.
Cleanup
You can clean up the resources created in this article using the following commands:
az aks delete --name MyCalicoCluster --resource-group CalicoDemoRG -y
az group delete --resource-group CalicoDemoRG -y
Conclusion
In summary, Calico eBPF on Azure provides an upgrade over and above the default Azure CNI on multiple fronts.
- Improved performance to enable reduced CPU/cost
- Improved traffic visibility, to enable easier compliance and troubleshooting
- Reduced first-packet latency, to enable more responsive applications
- Native service handling, to enable reduced complexity
- A simple upgrade path
If you enjoyed this article, you might also like:
- Free, self-paced Calico certification course
- Getting started with Calico network policy
- Free, online webinars, workshops, and resources
- Learn about Calico Cloud
Join our mailing list
Get updates on blog posts, workshops, certification programs, new releases, and more!