As you are using OpenShift or are planning to use it for your containerized applications, ensuring robust security is crucial. As you dive deeper and your workloads become more complex, the need for advanced security measures becomes apparent. This is where Calico’s microsegmentation capability helps to achieve tenant and workload isolation. Let’s explore how Calico can be a game-changer in strengthening the security posture of your OpenShift environment.
Understanding microsegmentation in Kubernetes
Before diving into Calico’s role, it’s crucial to understand what microsegmentation means in a Kubernetes context. In a Kubernetes cluster, all pods typically share the same network, making traditional network segmentation techniques like VLANs and DMZs ineffective. Microsegmentation addresses this by dividing a Kubernetes cluster into smaller, isolated segments. Each segment, typically a set of pods or services, has its own distinct security policies. This approach is essential in Kubernetes environments as it limits the potential damage in case of a security breach, preventing attackers from moving laterally across the cluster.
This concept of micro segmentation in Kubernetes is analogous to using VLANs and DMZ-based networks in traditional infrastructure. While VLANs segment a network at the data link layer to create isolated broadcast domains, and DMZs provide a buffer zone between the internal network and the internet, microsegmentation in Kubernetes offers a similar level of isolation and security. It acts as a necessary technique to mimic the functions of VLANs and DMZs, ensuring fine-grained network control and enhanced security within the cluster.
Managing policies in OpenShift
Kubernetes default policy engine
In Kubernetes (K8s), a crucial component is the Container Network Interface (CNI), which is responsible for facilitating network connectivity for pods. Essentially, a CNI plugs containers into the Kubernetes networking model, ensuring that pod-to-pod communication is seamless and efficient across the cluster. While a CNI primarily acts as a network engine, it doesn’t inherently include a policy engine for managing network security. However, Kubernetes provides a native policy engine, allowing users to implement network policies regardless of the CNI they choose. These network policies are essential for defining how pods communicate with each other and with other network endpoints.
However, as we will explore later in the blog, the default network policies provided by Kubernetes, especially in an OpenShift environment, can be complex and not very intuitive to use.
Creating your policies in OpenShift
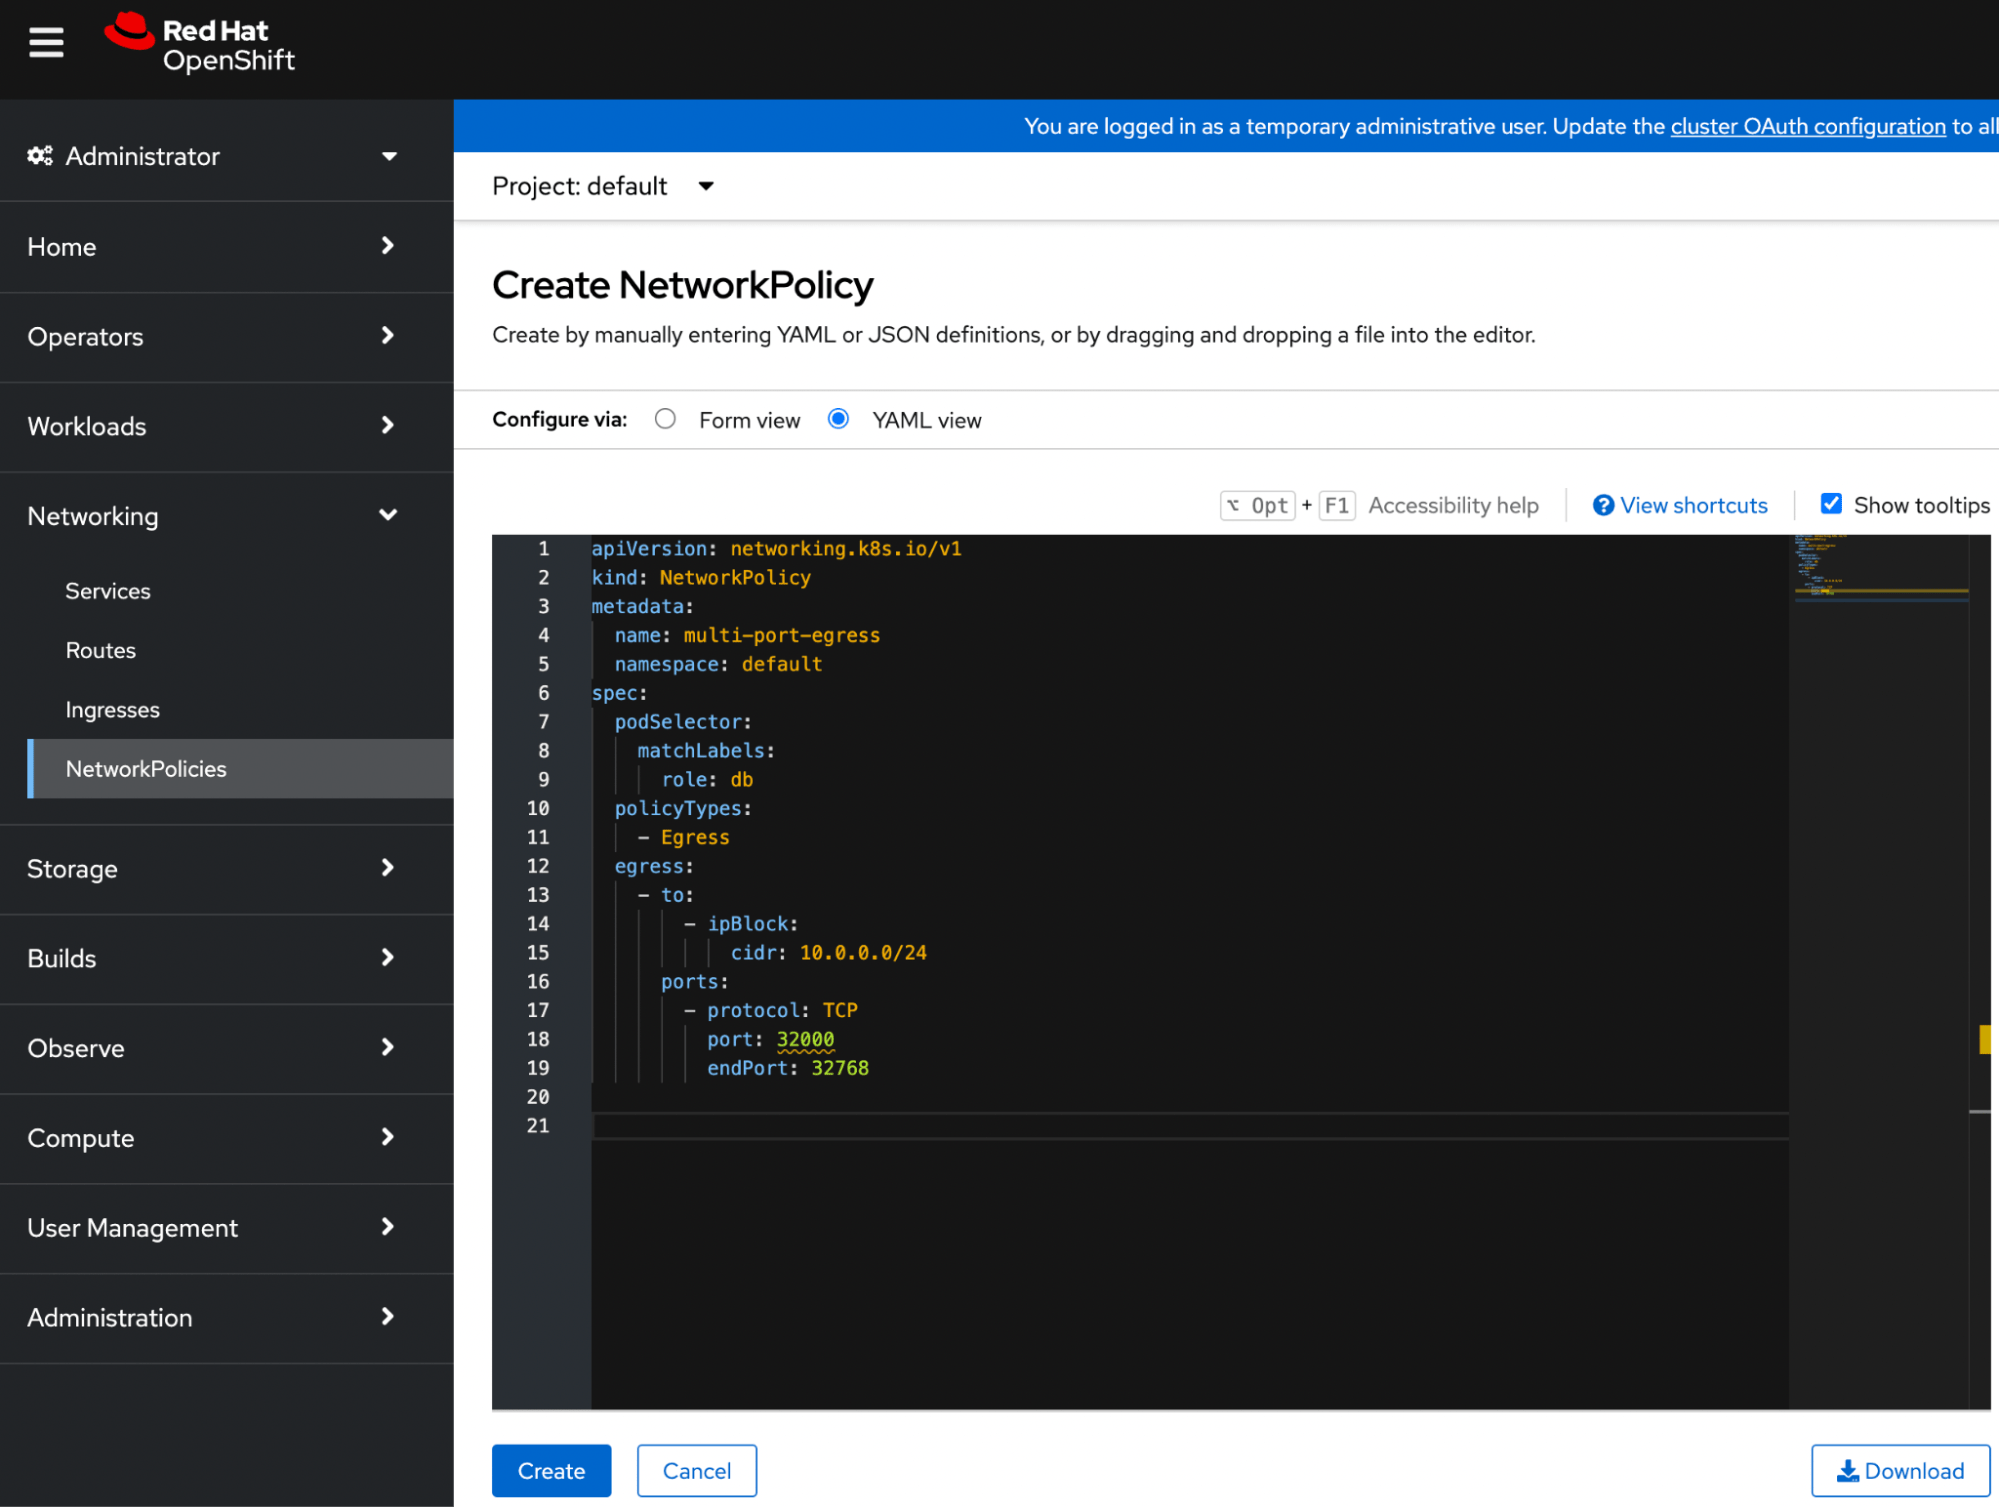
In an OpenShift environment, creating Kubernetes network policies can be accomplished through two primary methods: writing YAML files, or through the OpenShift Web UI.
- The YAML file specifies the policy’s scope, targeted pods, and the specific ingress and egress rules. Once the YAML file is ready, you apply it to your cluster using the
occommand, likeoc apply -f example-network-policy.yamlor by creating it in the WebUI. This method requires a clear understanding of YAML syntax and Kubernetes network policy specifications. It’s often preferred for its precision and ability to be integrated into version control and continuous deployment workflows.
- OpenShift’s Web UI provides a user-friendly, visual approach to creating network policies. This method guides users through a form-based process to define the policy’s parameters, eliminating the need to manually write YAML. Unfortunately, when using the OpenShift Web UI, you are restricted to using the default Kubernetes policy engine, which is not as powerful or advanced as Calico. This limitation can be a significant consideration for users requiring more sophisticated network policy configurations.
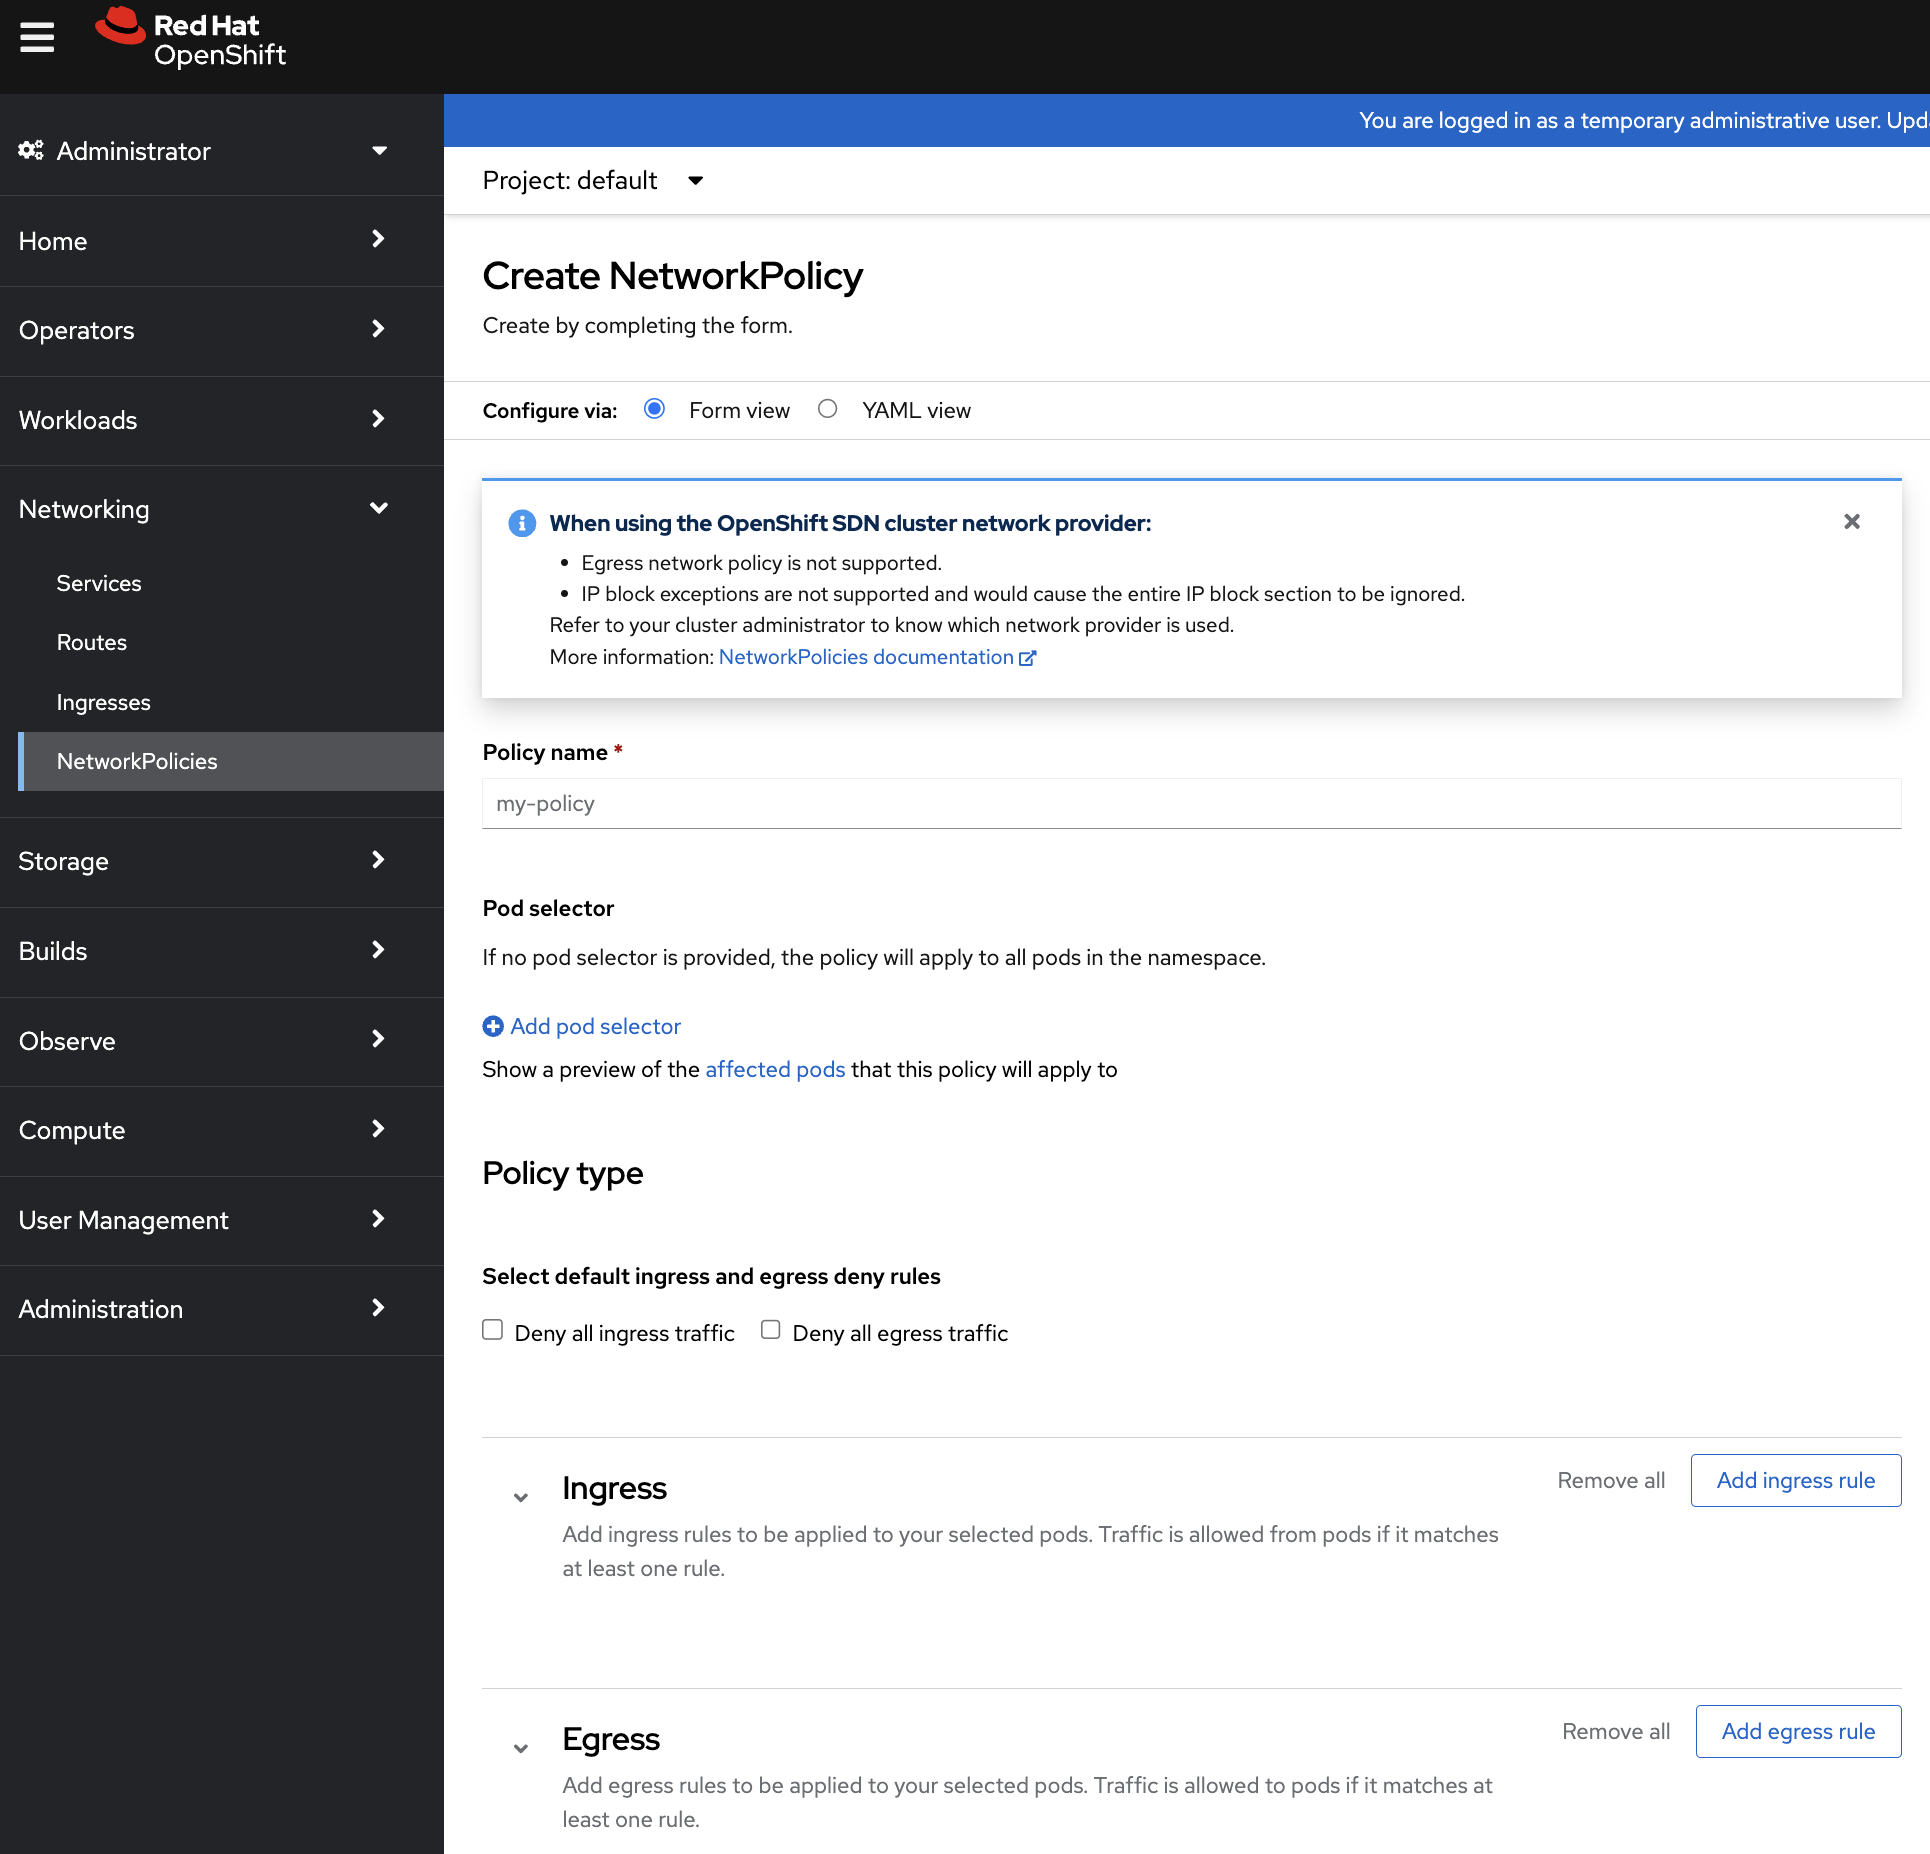
In both methods, it’s important to have a clear understanding of the network topology and the communication requirements of your pods. Policies must be crafted carefully to ensure they allow necessary traffic while maintaining security. Additionally, ensure that your OpenShift cluster network provider supports network policies, as this feature is dependent on the underlying network plugin.
The role of Calico in OpenShift security
This leads us to the role of specialized tools like Calico in enhancing OpenShift security. Calico, developed by Tigera, stands out as it combines the functions of both a CNI and a policy engine. It offers a comprehensive security and observability solution specifically designed for Kubernetes environments, including OpenShift. Calico enhances the security framework of these environments through advanced micro segmentation capabilities. By doing so, it not only simplifies network policy management but also significantly bolsters the overall security posture of Kubernetes clusters, particularly in the context of OpenShift’s unique operational environment. This integrated approach allows for more intuitive and effective management of network security, addressing the challenges typically associated with Kubernetes’ default network policies.
Essential Calico features for building microsegmentation with a zero-trust approach
Let’s quickly explore a few key features of Calico that will help you design, define and implement robust microsegmentation and zero-trust strategies in your OpenShift cluster:
- Advanced Network Policies: Calico extends beyond basic Kubernetes network policies, offering more nuanced control over pod-to-pod communications. This granularity is essential for creating effective microsegmentation strategies, ensuring that only authorized components can interact with each other.
- Implementing Zero Trust Security aka default-deny: In line with the zero trust model, Calico ensures strict verification of all connections within the cluster. This continuous validation is key to a microsegmentation strategy, as it prevents unauthorized access and lateral movement within the cluster.
- Enhanced Visibility and Monitoring: Understanding traffic flow is critical for effective microsegmentation. Calico provides deep insights into network activities, helping administrators identify and map out the necessary segmentation policies based on actual data flow patterns.
- Scalability and Flexibility: Calico is designed to handle the dynamic and scalable nature of OpenShift environments. Whether you’re dealing with a handful of services or thousands, Calico’s policy enforcement scales accordingly, maintaining consistent security across the entire landscape.
- Simplified Management: With its user-friendly interface, Calico simplifies the complex task of managing network policies. This ease of management is crucial for maintaining an effective microsegmentation strategy in fast-paced development environments.
Implementing microsegmentation and zero-trust with Calico in OpenShift
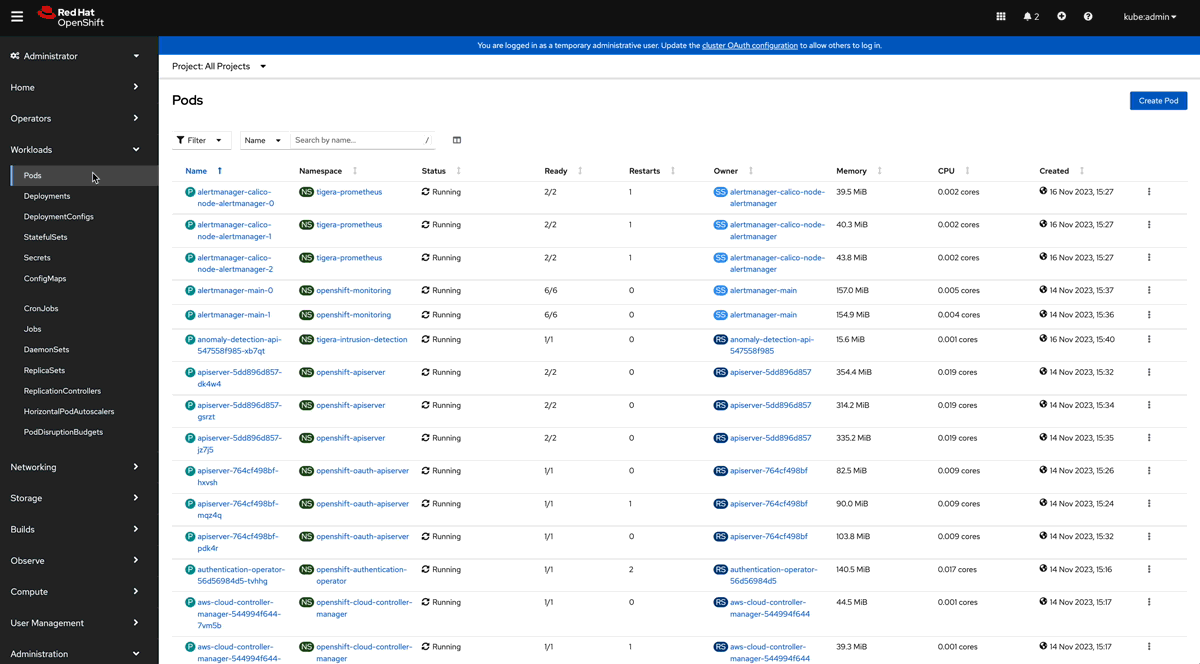
After deploying a fresh Openshift cluster you will be astonished by the sheer amount of resources that are already available. Without any applications deployed yet the number of namespaces and services are already above 60, and the pod count is in the hundreds.
Remember, in Kubernetes, there’s a single network where all pods can communicate with each other. This implies that in an OpenShift cluster, right after installation, you have numerous pods capable of accessing each other across all namespaces. Consequently, when you deploy new images in this cluster, these new pods will also have the ability to interact with your existing OpenShift resources. This is a scenario you’d typically want to avoid.
Calico Service Graph is capable of cataloging and mapping all the interactions among containers, services, and namespaces within the cluster. You’ll be surprised by how quickly and clearly Calico can reveal the inner workings of your cluster, highlighting the critical need for microsegmentation and a zero-trust approach.
Below is an illustration of my newly installed OpenShift cluster as visualized by the Service Graph. This will show you how not having a tool to track and display all the connections in your cluster can significantly complicate your security efforts. And it’s important to note that this is before we’ve deployed any applications. Just try to imagine the complexity when dealing with over 100 applications and multiple namespaces.
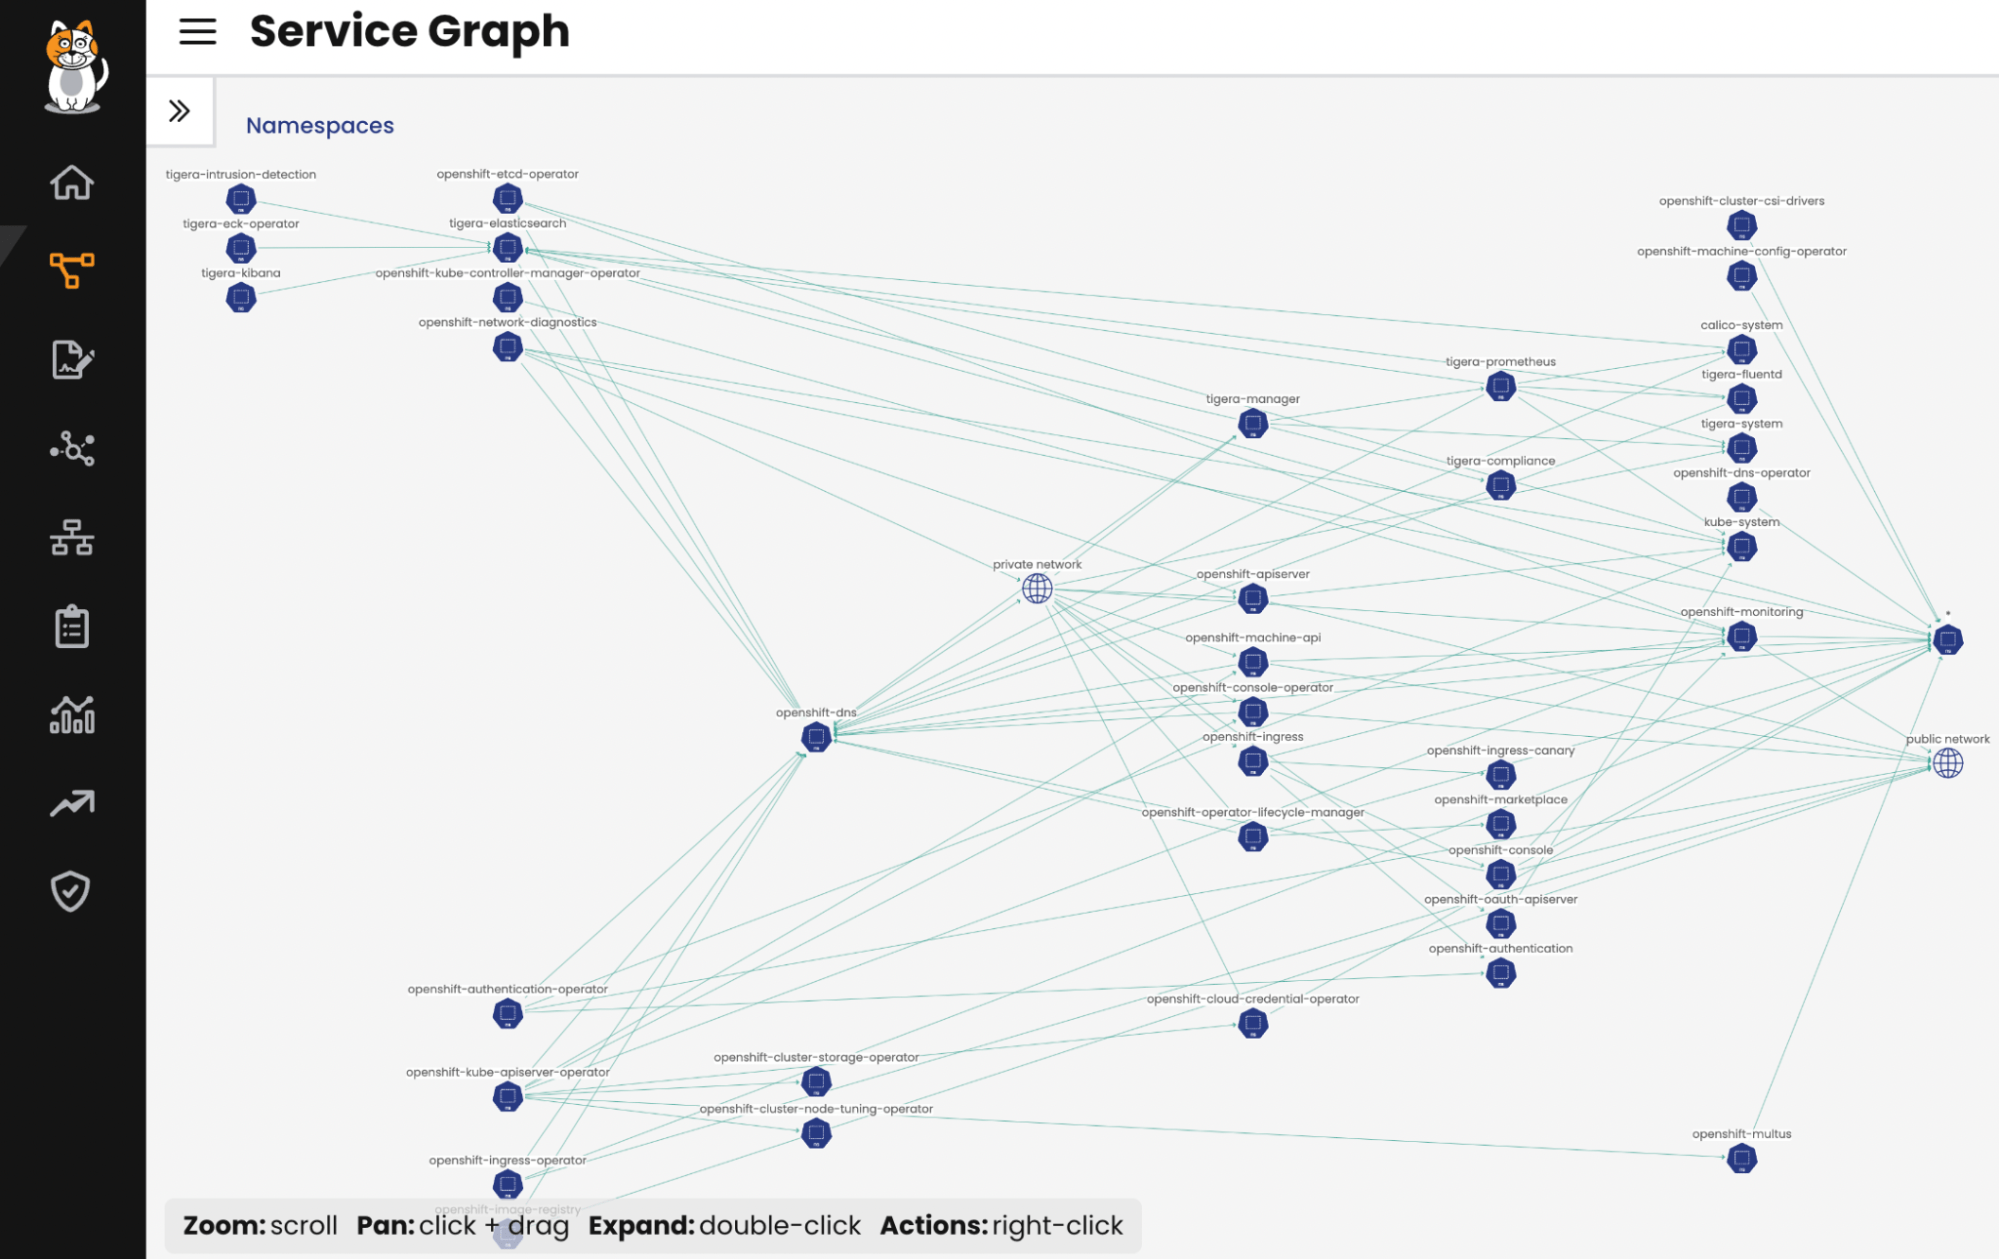
Visualizing Openshift deployment
To embark on your journey with microsegmentation and zero-trust, you need clear answers to several critical questions about your microservices: “Who, What, When, Why, Where, How,” and more. Without this information, deciding what network traffic to permit or block becomes a guessing game, risking either service disruptions or security vulnerabilities.
Ideally, each micro-application would be crafted with a set of policies that embrace the zero-trust model and then deployed into an isolated namespace. But in reality, we know things aren’t that straightforward. The same application might be deployed across various environments, complicating the task of having pre-made policies.
This is where roles like DevSecOps come into play. These professionals understand the environments, know the security needs, and are familiar with the applications. However, without the right tools for observability, they would have to manually go through each YAML manifest, noting down every network interaction involving the containers. They also need to implement and test new policies, verifying them with tools like telnet. And if the application is already live, they must be extra cautious to avoid causing any disruptions.
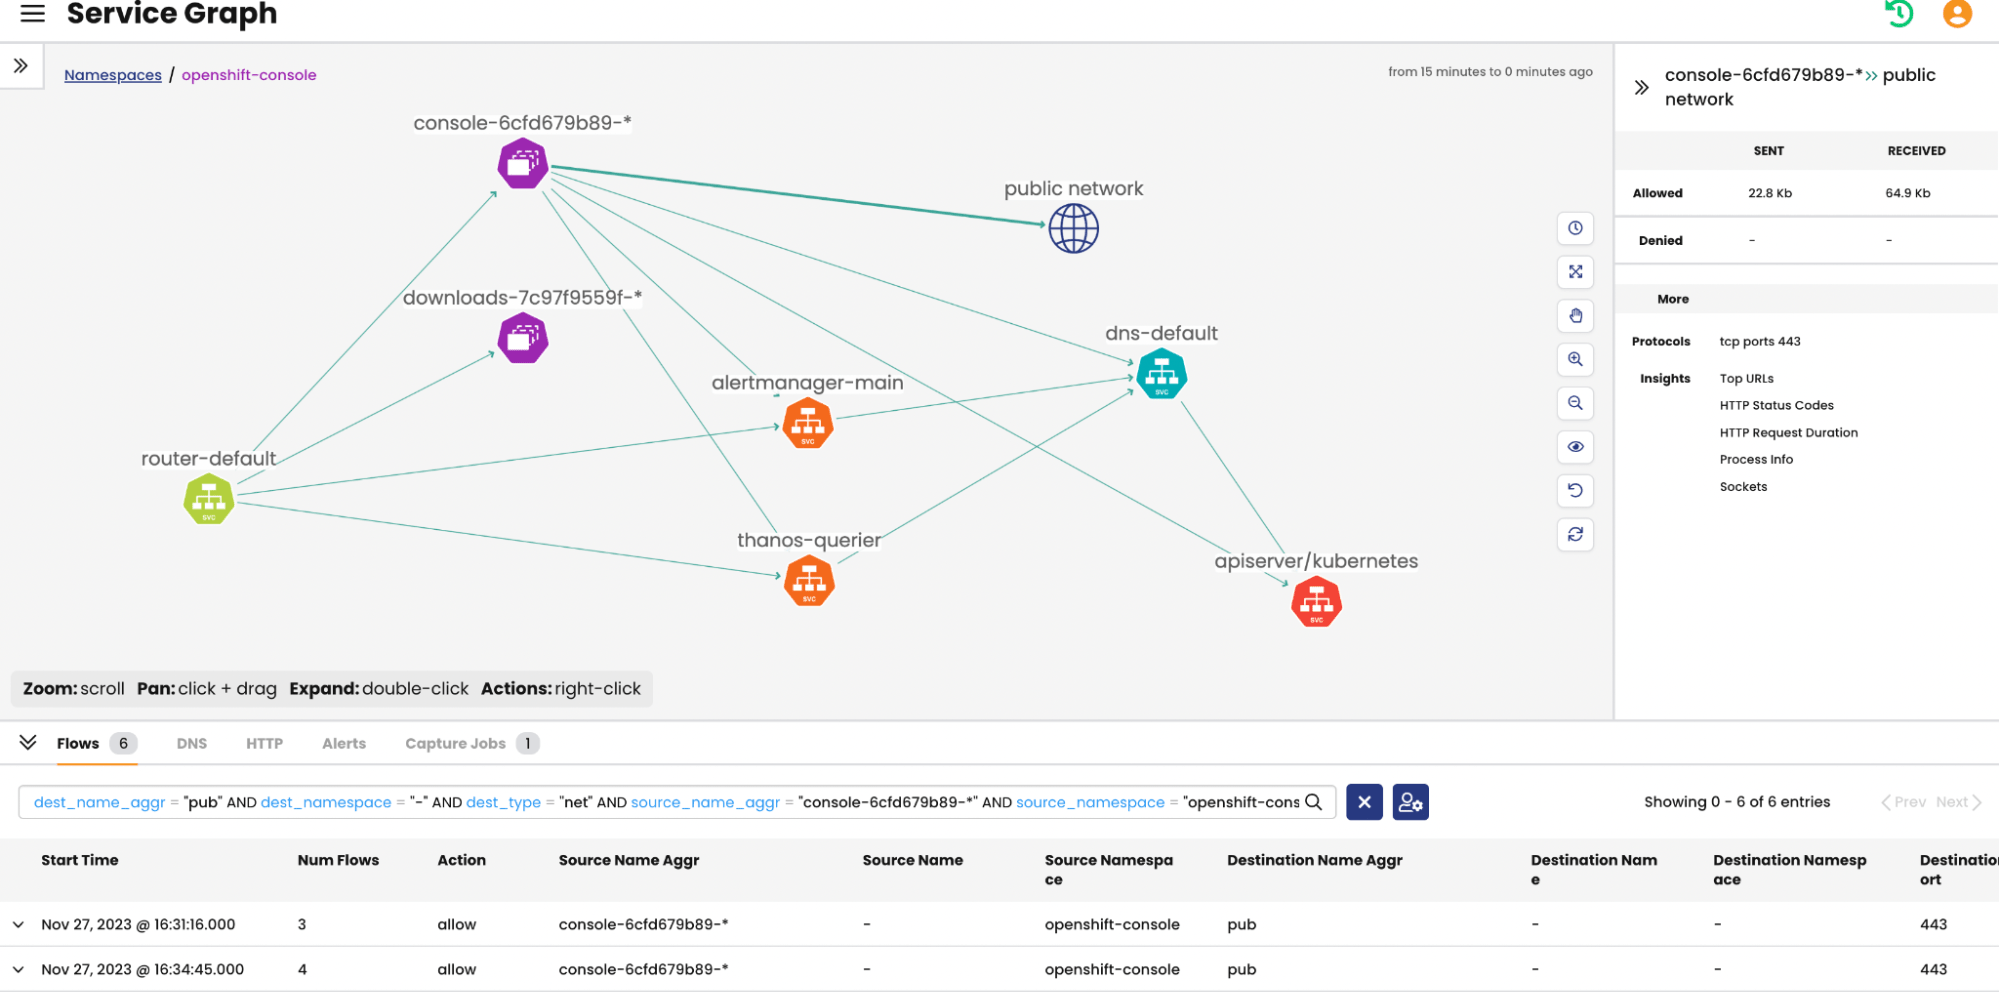
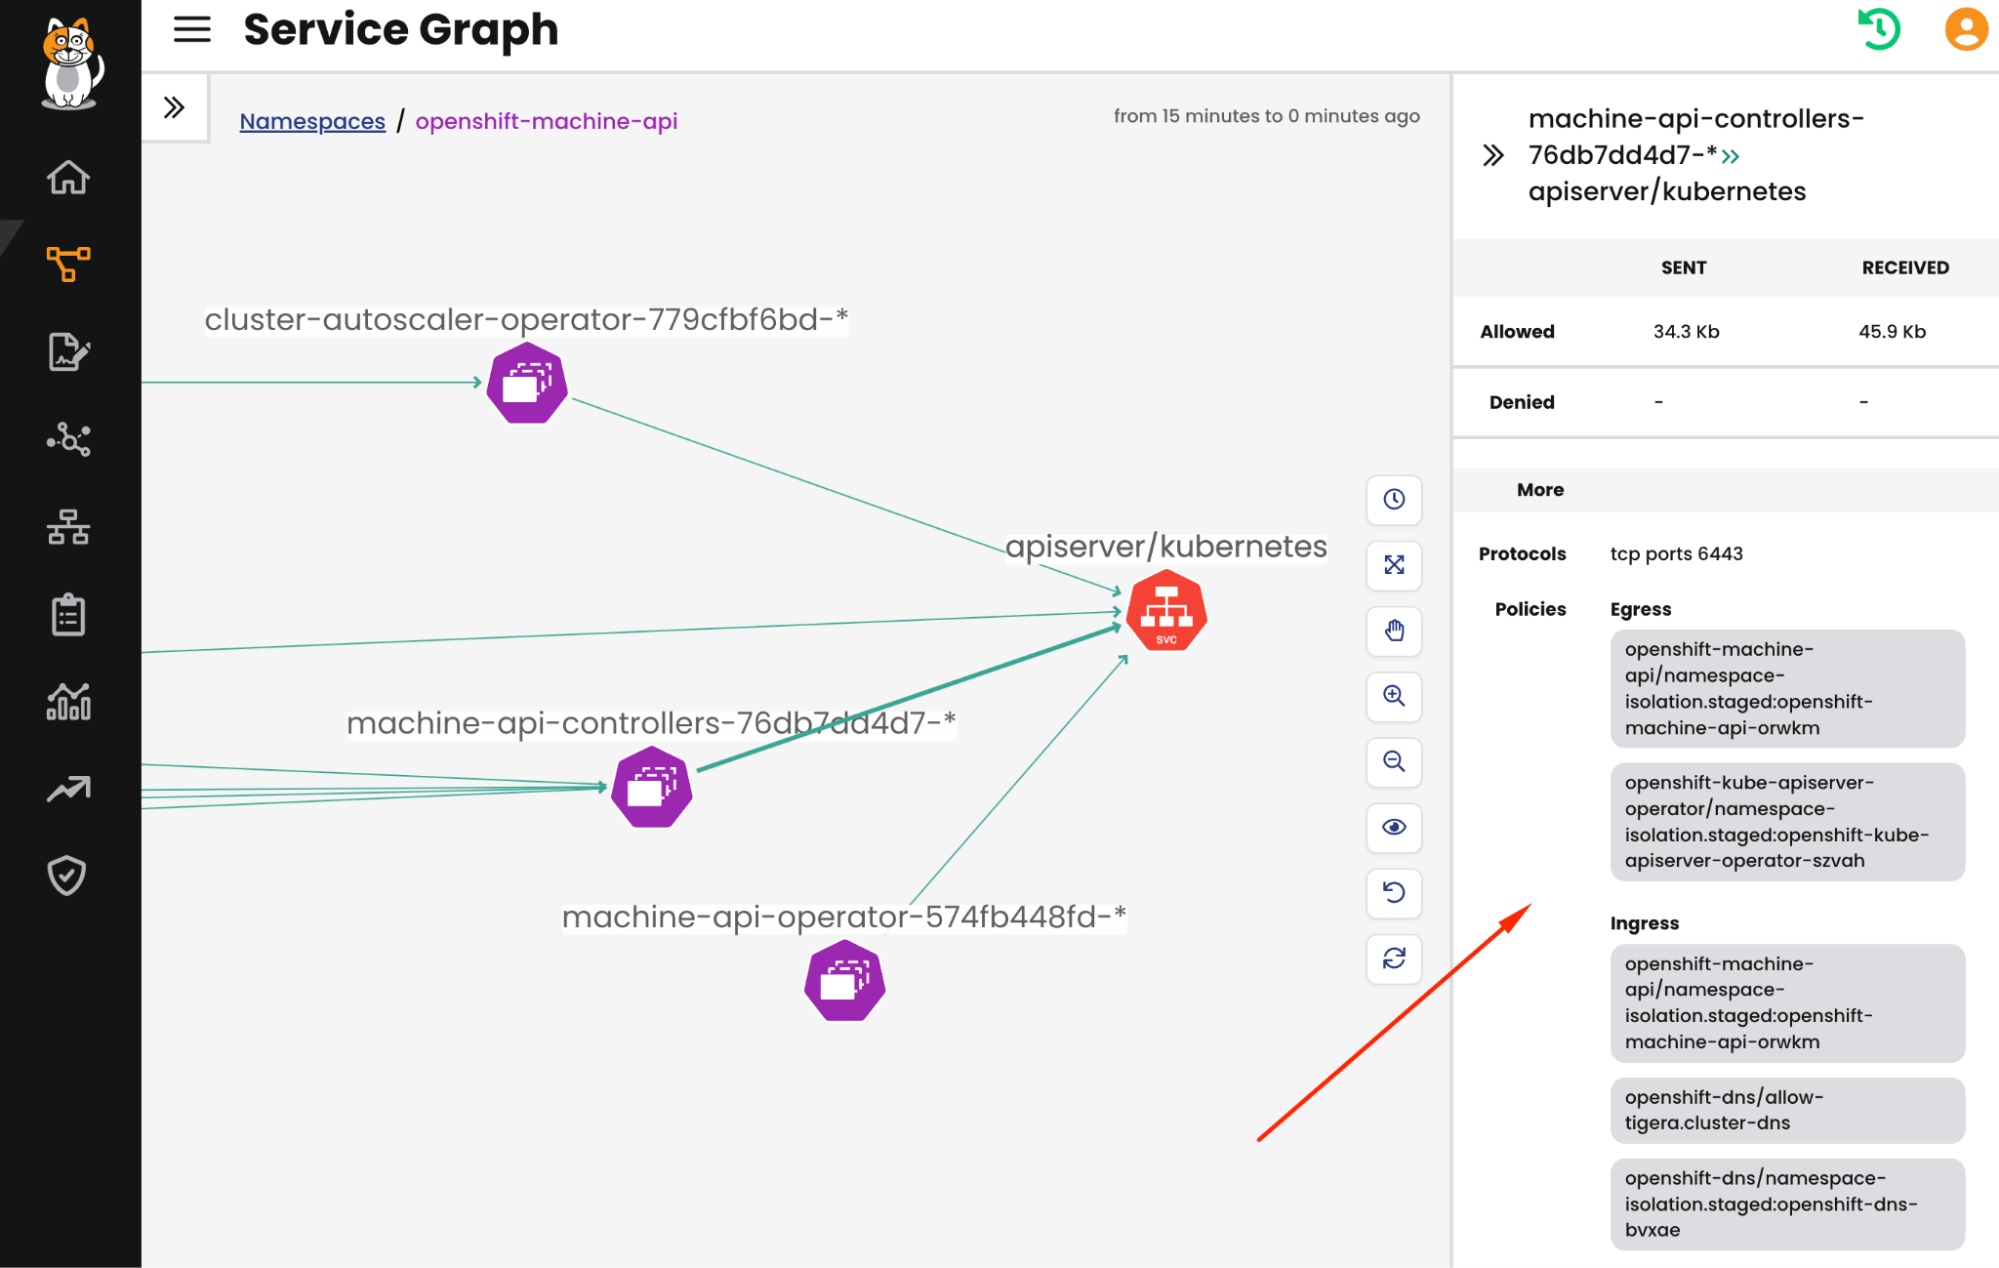
Let’s take a closer look at the Service Graph to understand how it simplifies observability. In the Service Graph, you have the option to select a namespace, service, container, or a connection, known as an edge shown below as an arrow. The screenshot we’re looking at features the ‘openshift-console’ namespace. The purple icons represent workloads within this namespace, while icons in other colors represent external workloads. At the bottom of the screen, you’ll find all the flow logs captured by Calico, and the right panel provides details about a selected edge, including its protocol and policy interactions. Essentially, the Service Graph has already completed all the inventory and observability tasks for you.
Selecting, evaluating and enforcing effective policies
Microsegmentation and zero-trust security rely heavily on policies, which in turn are based on rules. In Calico, there are two main methods for creating these policies: either by writing your YAML manifest in a text editor or using our WebUI.
For this discussion, let’s focus on the WebUI, which offers two distinct approaches. The first one is somewhat similar to the OpenShift UI. Here, you can define a namespace, select specific selectors, set rules, and more. The key difference lies in the use of Calico’s policy engine, which is more versatile, allowing for the creation of DNS-based or global policies, for example. An added feature is the ability to stage a policy. This means you can simulate the policy’s impact as if they were active, allowing you to observe the effects of a new policy in a live environment without the risk of disrupting your cluster.
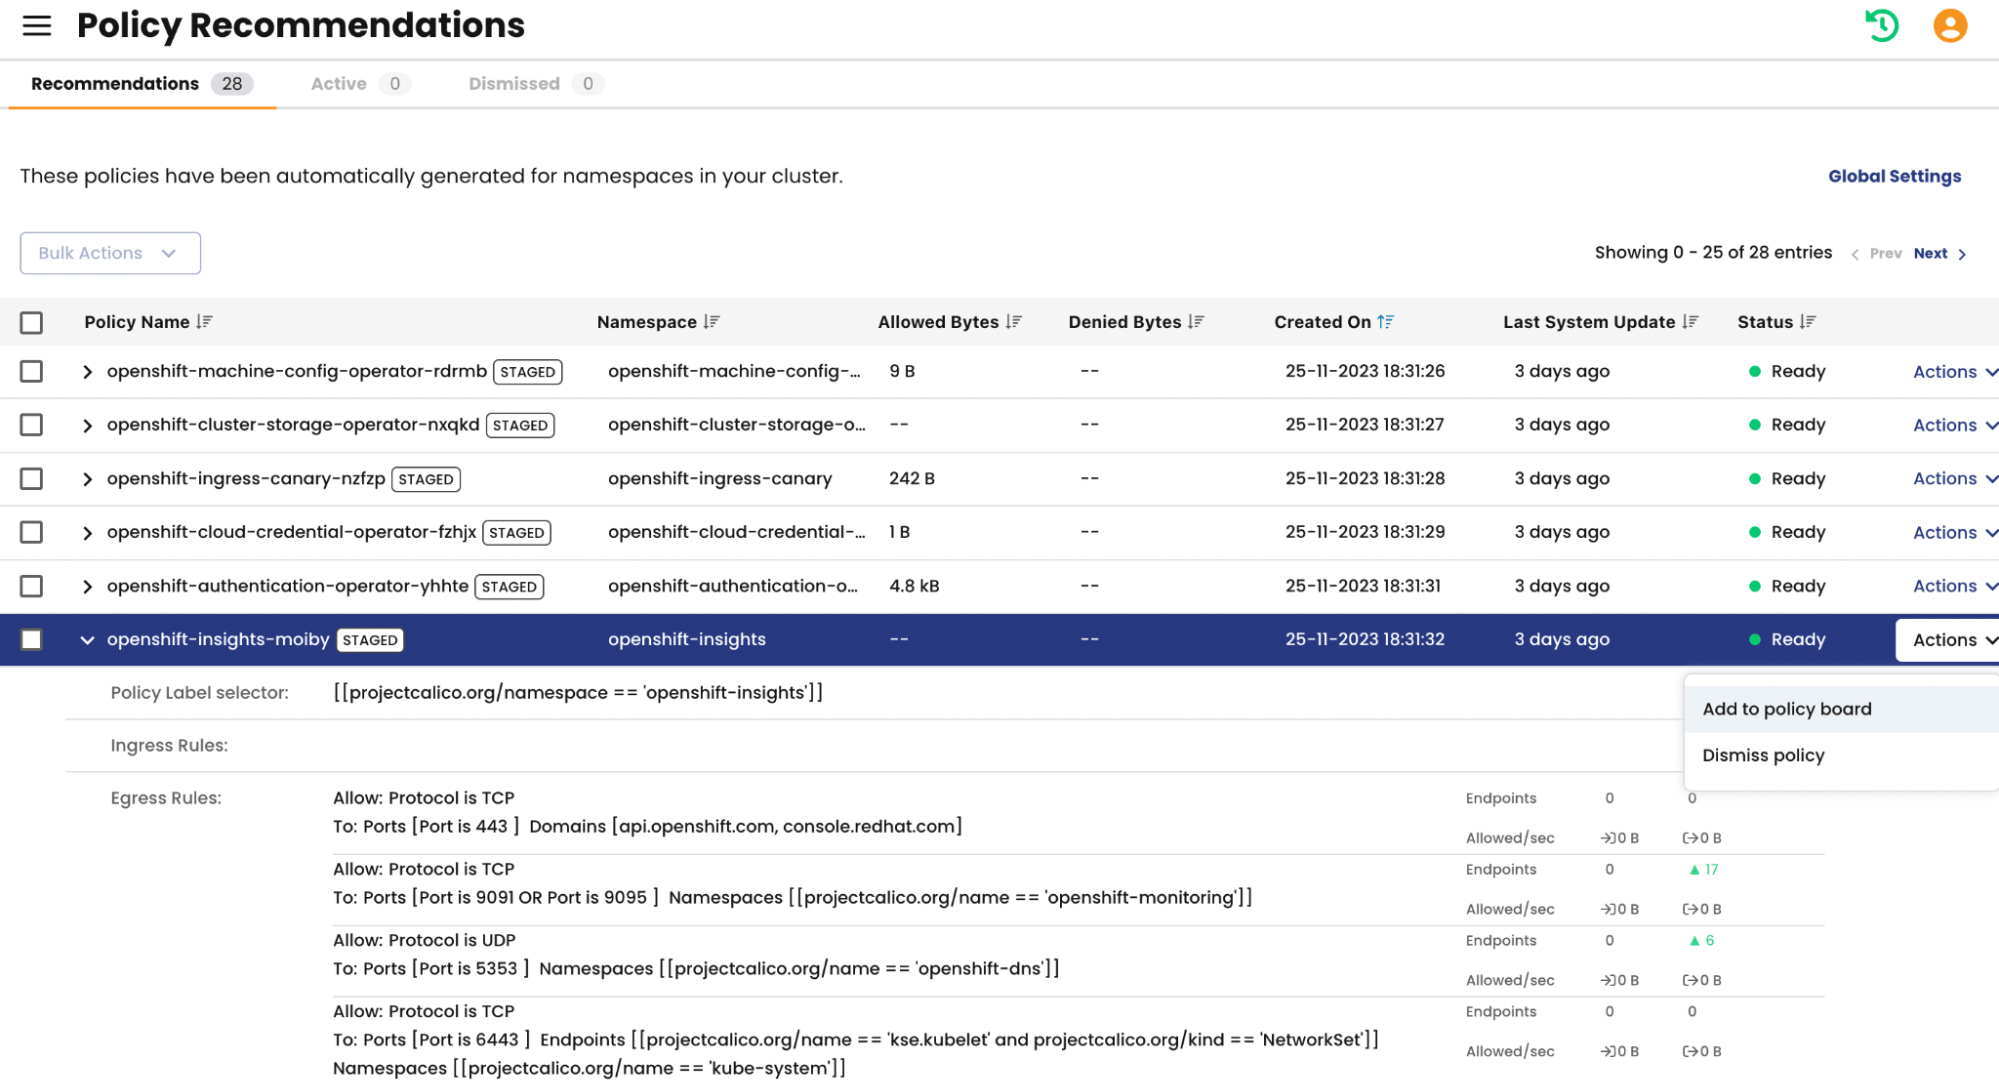
The second approach involves our Policy Recommender Engine. This innovative tool automatically compiles flow logs into policies with suitable rules and presents them to you for review. Your role is to assess these suggestions, ensuring actions like deny, allow, log, or pass are appropriate. These policies are initially in ‘stage’ mode, meaning they start monitoring rule performance as soon as the policy recommender is enabled. If a rule is set to deny traffic, you can verify this and make adjustments as needed. Once you’re satisfied with the outcomes, you can either enforce the policy directly or download the YAML files to integrate them into your deployment pipeline.
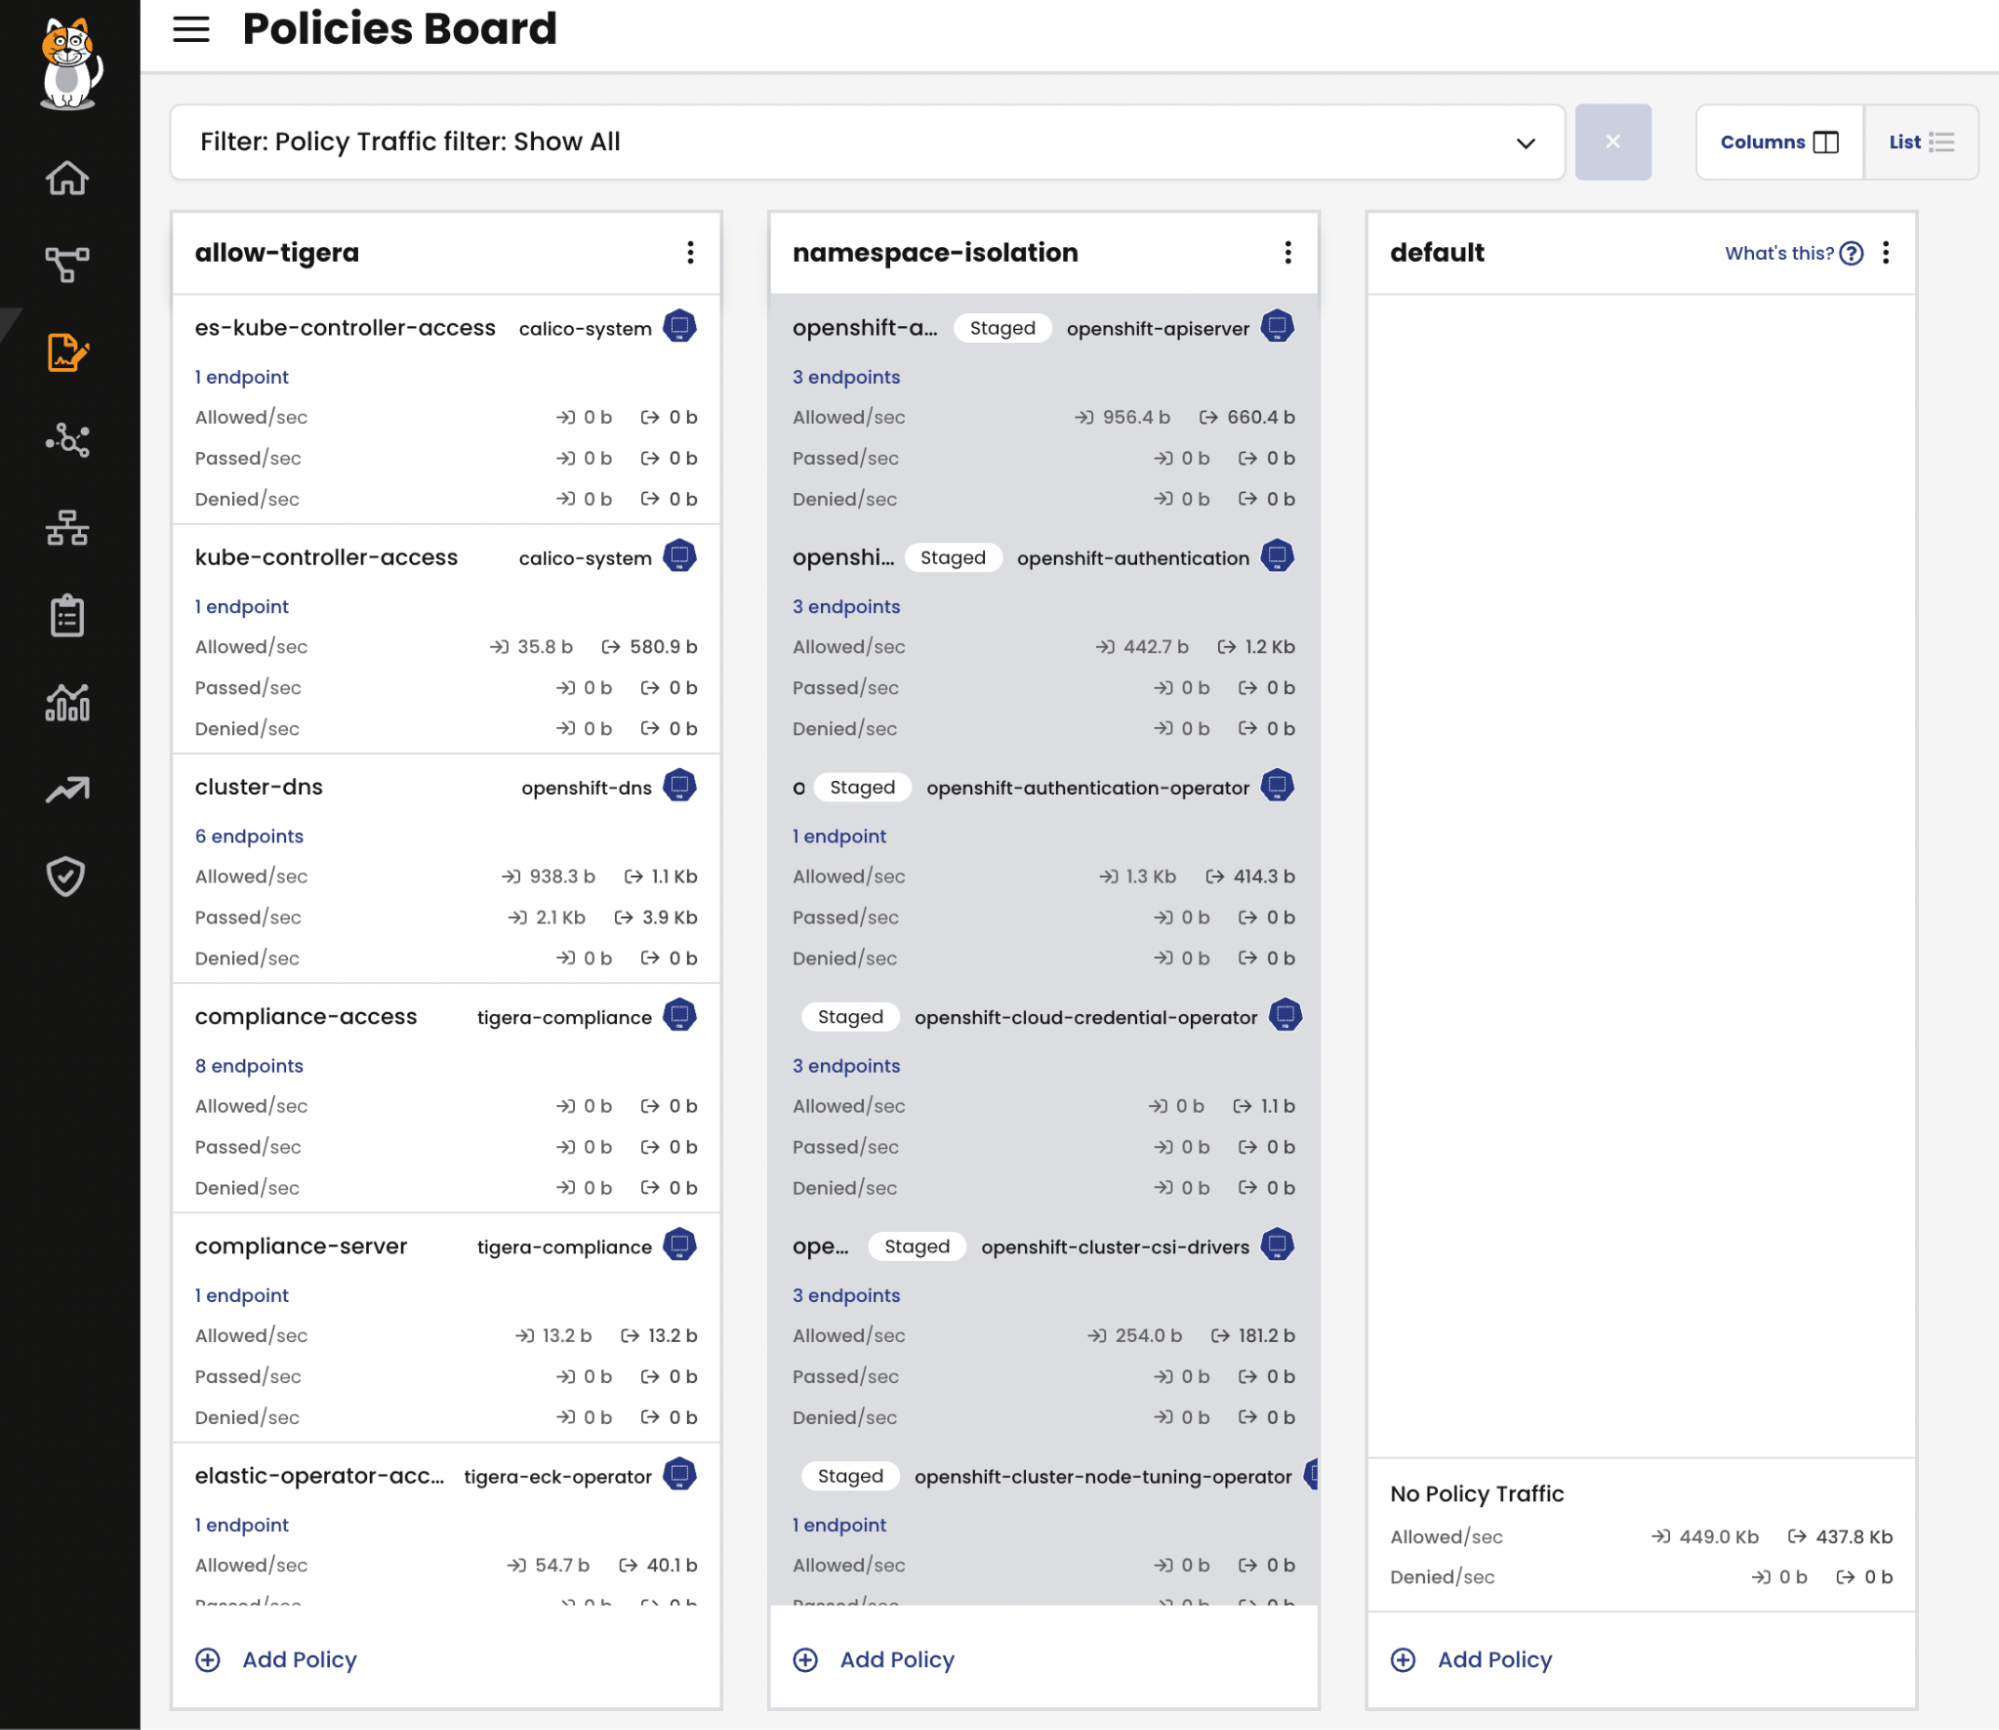
Here below is the view of my policy boards, you can see the newly created “Staged” policies. It is also worth noting that the policy boards display all the policies and their behaviors i.e. Deny, Allow, Pass, Log. We also have the notion of Tier that you can read about here.
Ensuring policy accuracy
Besides the policy boards, the service graph also displays the traffic moving through a policy. Since we track every flow to and from containers, we can identify which policy is being used for protection and compliance hence ensuring that all communications are safeguarded by the appropriate policies.
As we’ve seen, the combination of service graphs and policy boards is a powerful tool in managing and verifying the effectiveness of your network policies. They not only ensure that the right policies are in place but also aid in maintaining compliance with necessary standards. With these tools, you end up with a fully protected and production-ready OpenShift cluster. It’s robust, featuring namespace isolation and a zero-trust environment; the perfect foundation for deploying applications without compromising the health of your cluster. You can apply the same methods to safeguard these applications as well. For a more in-depth exploration of microsegmentation in a Cloud-Native Application Platform (CNAP), feel free to check out this article.
Conclusion
In conclusion, Calico is an invaluable tool for OpenShift users looking to implement robust microsegmentation strategies. By providing advanced network policies, enhanced visibility, and a zero trust approach, Calico not only strengthens security but also aligns with the dynamic and scalable nature of modern containerized environments. As Kubernetes and container technologies continue to evolve, solutions like Calico will be pivotal in ensuring that security remains a top priority.
Ready to try Calico node-specific policies? Sign up for a free trial of Calico Cloud
Join our mailing list
Get updates on blog posts, workshops, certification programs, new releases, and more!