Continuing from my previous blog on the series, What you can’t do with Kubernetes network policies (unless you use Calico), this post will be focusing on use case number five — Default policies which are applied to all namespaces or pods.
Use case: Default policies applied to all namespaces or pods
Problem statement
A significant security pitfall in a cloud-native environment is the lack of network inspection or monitoring for traffic flowing between workloads within a Kubernetes cluster. To enhance the security of your Kubernetes cluster, it’s essential to have control over the traffic flow between your workloads and potentially even on external entities. To achieve this level of control, you should contemplate the adoption of Kubernetes network policies for specific applications within your cluster.
What is available with Kubernetes out-of-the-box?
Network policies in Kubernetes offer a targeted approach to regulating how pods interact with different network elements, with a primary focus on meeting the specific requirements of your applications. It is important to note that the impact of a network policy is limited to the pods it is applied to. In simpler terms, the rules and restrictions you set within a network policy only affect the communication between the specific pods covered by that policy. This ensures that your security measures are narrowly tailored and won’t inadvertently disrupt unrelated connections or workloads in your Kubernetes cluster. This level of control provides a clear and effective way to enhance both the security and efficiency of managing network traffic in your cloud-native environment.
What is needed?
However, when managing a cluster housing hundreds or even thousands of pods, the task of creating and managing individual network policies for each pod can become overwhelming and undesirable. It is crucial to note that Kubernetes network policies are specific to namespaces and rely on the network plugin’s implementation within your cluster. For network policies to take effect, your chosen networking solution must support network policy.
Since network policies operate on a per-namespace basis, you may find yourself in a situation where you need to replicate the same policy across multiple namespaces to regulate communication between pods in each of those namespaces. This is where Calico truly shines and demonstrates its value as a network and security solution. Calico enables you to utilize global network policy resources, allowing you to manage traffic without being restricted by namespaces.
With Calico, you can exert control over all the pods in your cluster, regardless of the namespace to which they belong. You can establish consistent network policies that apply universally throughout your cluster, simplifying network traffic management and enhancing overall security.
Global network policy
A global network policy resource is a set of rules that are applied to a group of endpoints, including workload and host endpoints, that match a label selector. Unlike other policies, it is not limited to a specific namespace and instead applies across all namespaces and host endpoint resources. To apply the policy to a specific namespace, you can use the standard selector with projectcalico.org/namespace as the label name and the namespace’s name as the value. For example, projectcalico.org/namespace == 'default' will apply the policy to the default namespace.
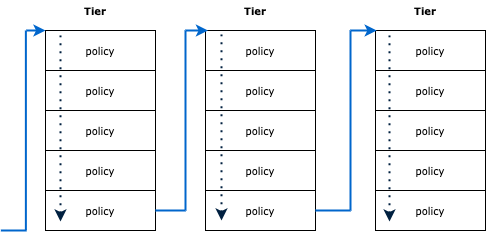
Global network policies are divided into tiers. Tiers add an extra layer of ordering. The Pass action skips to the following tier to allow for hierarchical security policies.
Here is a sample yaml of a global network policy. In this yaml, the policy allows TCP traffic from frontend endpoints to the port 6379 on redis endpoints.
apiVersion: projectcalico.org/v3
kind: GlobalNetworkPolicy
metadata:
  name: internal-access.allow-tcp-6379
spec:
  tier: internal-access
  selector: role == 'database'
  types:
    - Ingress
    - Egress
  ingress:
    - action: Allow
      metadata:
        annotations:
          from: frontend
          to: database
      protocol: TCP
      source:
        selector: role == 'frontend'
      destination:
        ports:
          - 6379
  egress:
    - action: Allow
You can also visualize and edit the police using the Calico GUI, as below:
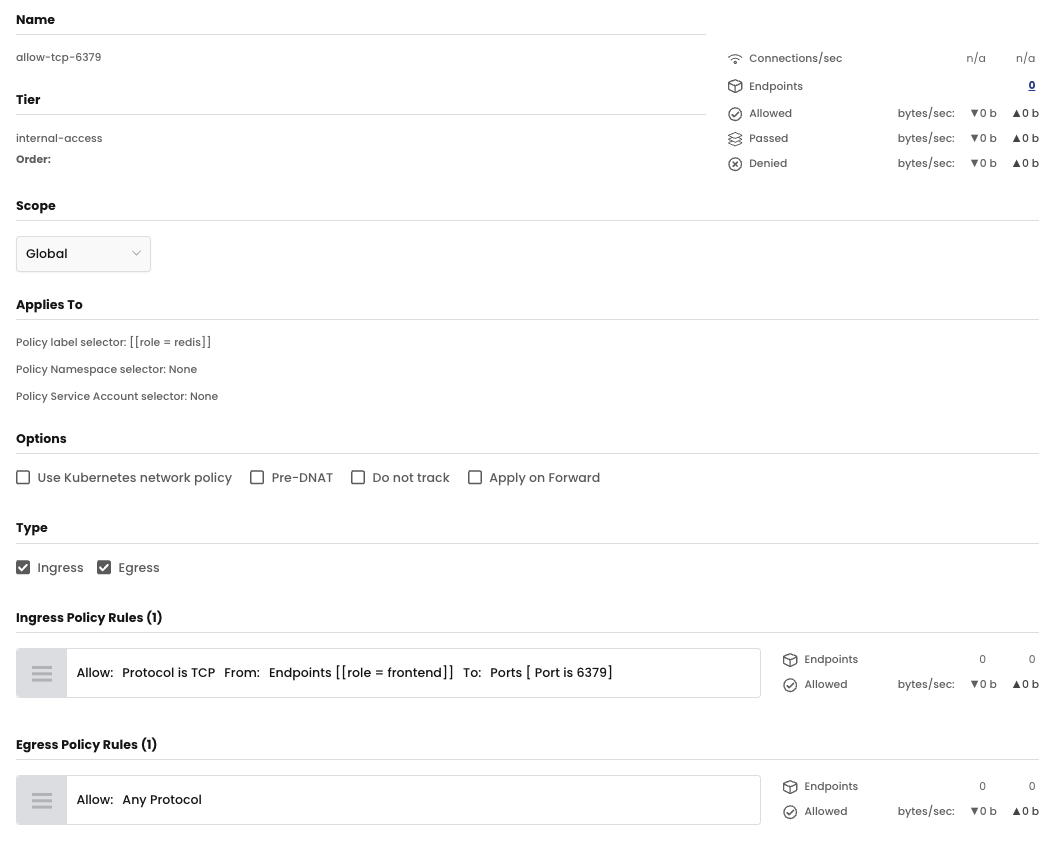
As previously mentioned, Calico organizes its policies into tiers. These tiers are designed to categorize policies based on their priority levels. Within each tier, policies are structured in a particular order. The inclusion of multiple tier levels provides added flexibility, thanks to the pass action within a rule, which allows for movement to the next tier. A common scenario where this is useful is when granting privileged users the ability to establish security policies that take precedence over policies set by other users. To learn more about Tiers, please refer to the documentation: Get started with policy tiers.
Global network policy use case: Allowing access to a specific API
Imagine a situation where multiple applications run in various namespaces, and one specific microservice within your application requires access to an external API to retrieve data. If you cannot use global network policies, your only choice would be to create a separate network policy for each application in different namespaces. Considering that there could be hundreds of applications, this would entail creating and managing hundreds of network policies. Furthermore, if you ever need to grant access to another API in the future, you’d have to edit hundreds of policies to add the new API’s IP address.
On the other hand, if you implement a global network policy, you would only require a single policy, regardless of how many namespaces it needs to impact. Additionally, global network policies enable you to reference your API using its Fully Qualified Domain Name (FQDN) instead of its IP address. This simplifies policy maintenance since IP addresses tend to change more frequently than URLs.
Another useful feature I’ll leverage here is global network sets. With global network sets, you can define a collection of IP subnetworks/CIDRs or domain names, which can then be used in Calico global network policy egress rules. This feature streamlines the management of your domain or IP lists from a single centralized location, making it possible to use them across multiple policies.
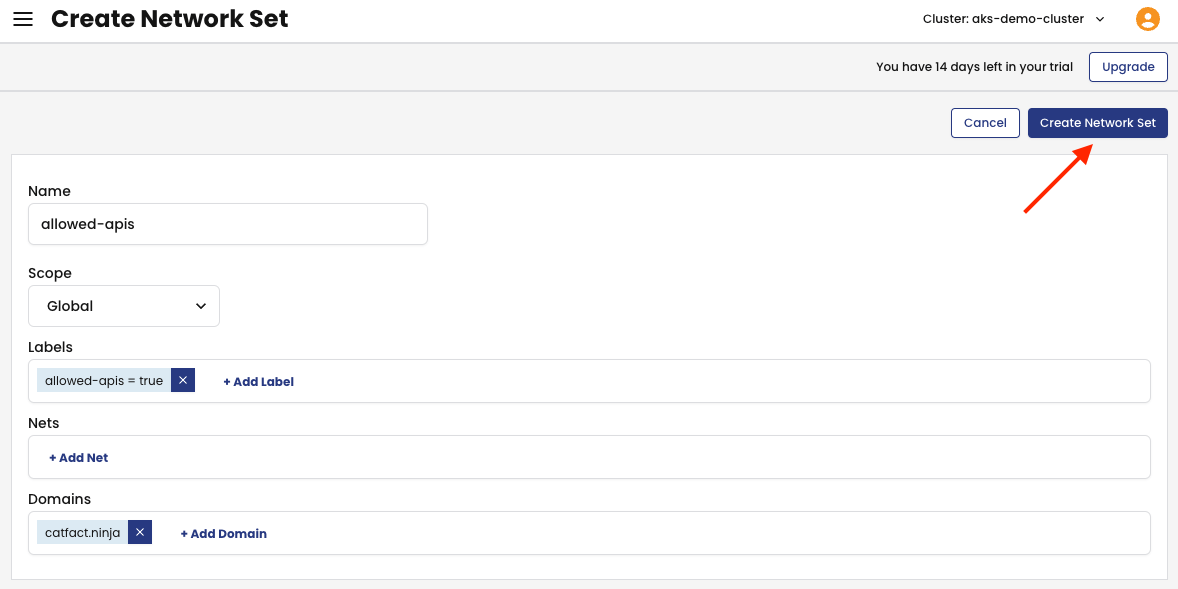
To implement this scenario using Calico, first, let’s create a global network set with the catfact.ninja API (Cat Facts – Get random cat facts via text message every day). URL for testing: ① Go to Network Sets, and ② Add Network Set for this.
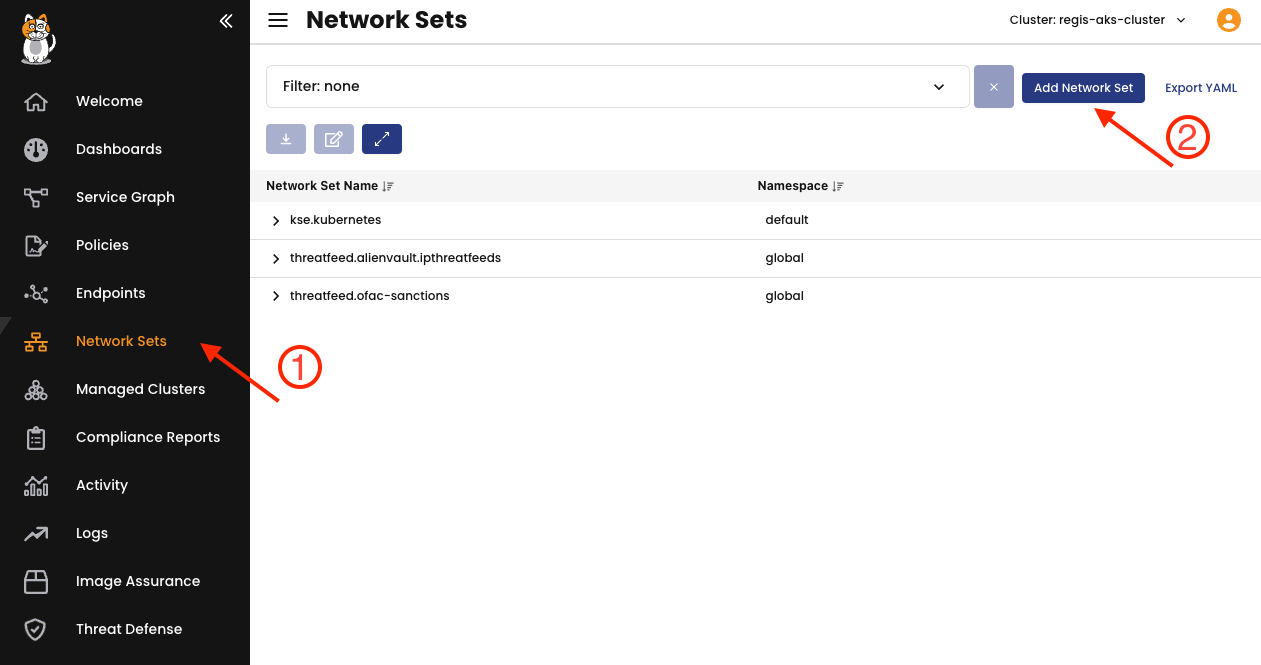
Then, on the Create Network Set page, name this network set as allowed-apis. Keep the Scope as Global, add the label allowed-apis = true on the Labels, and add the domain catfact.ninja under Domains. Once done, click on the Create Network Set button, at the top-right of the page.
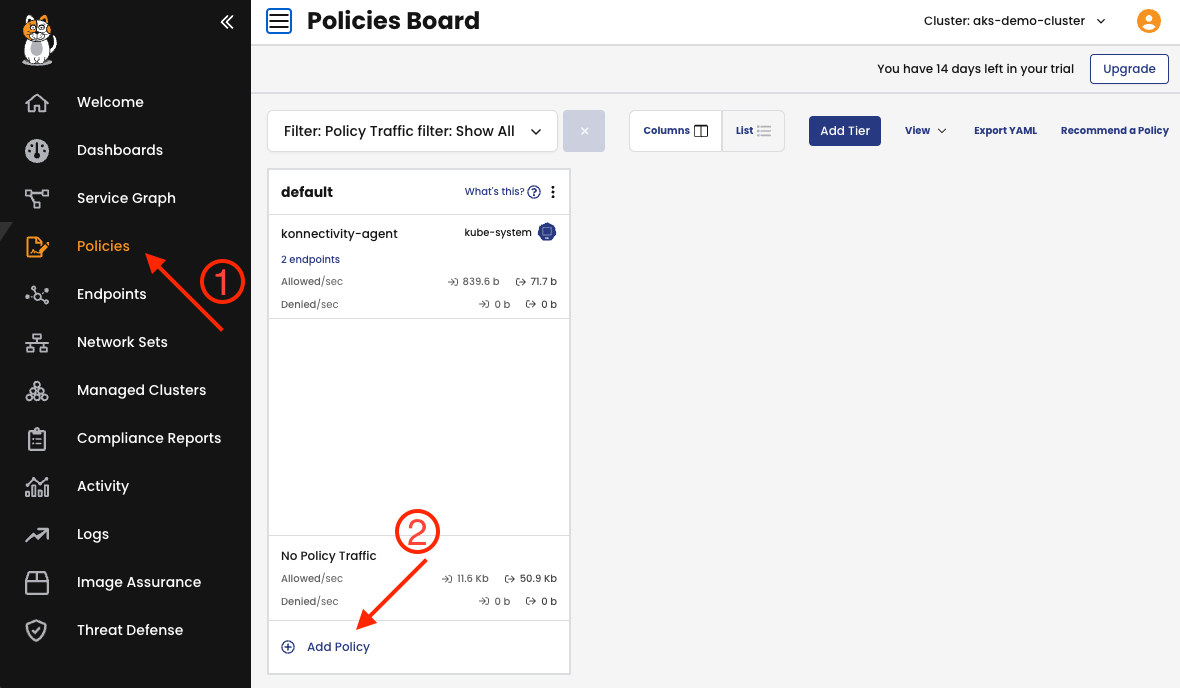
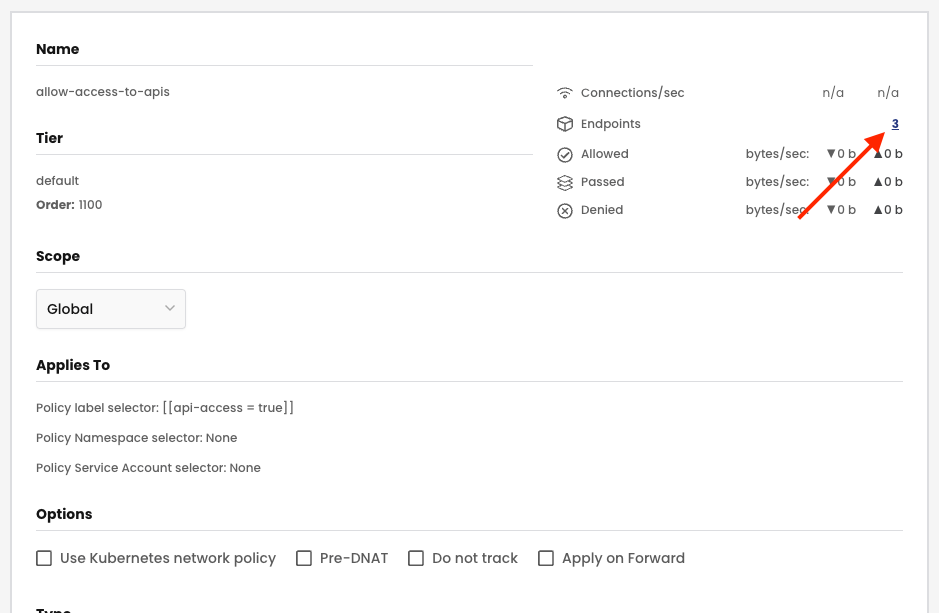
Now, head to the Policies Board under the ① Policies > Policies menu and create a global network policy by clicking on the ② Add Policy at the bottom of the tier default.
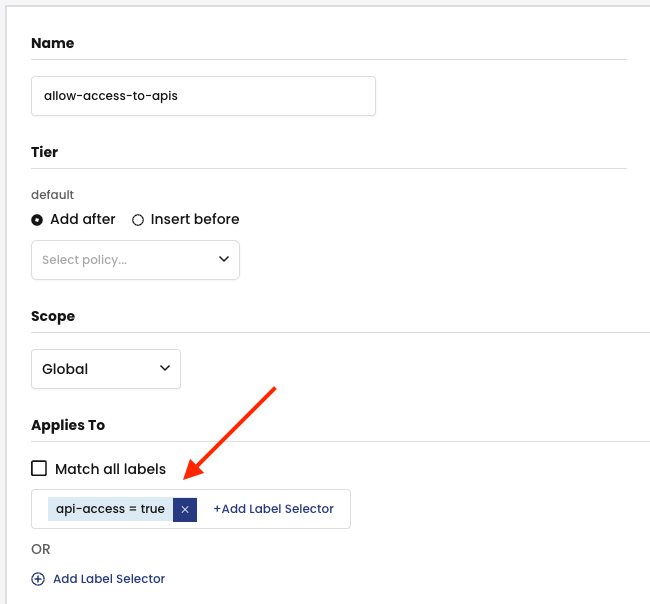
This policy should apply to all workloads that have the label api-access=true in any namespace.
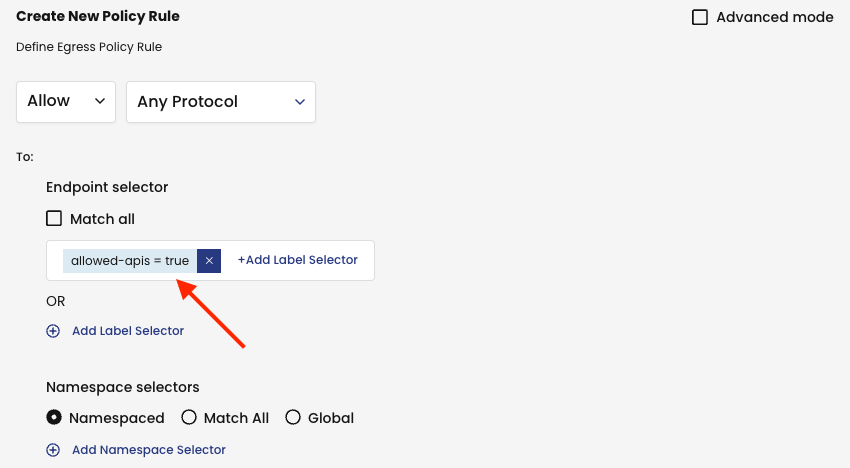
Use the global network set allowed-apis’ label allowed-apis=true as the destination in the egress rule.
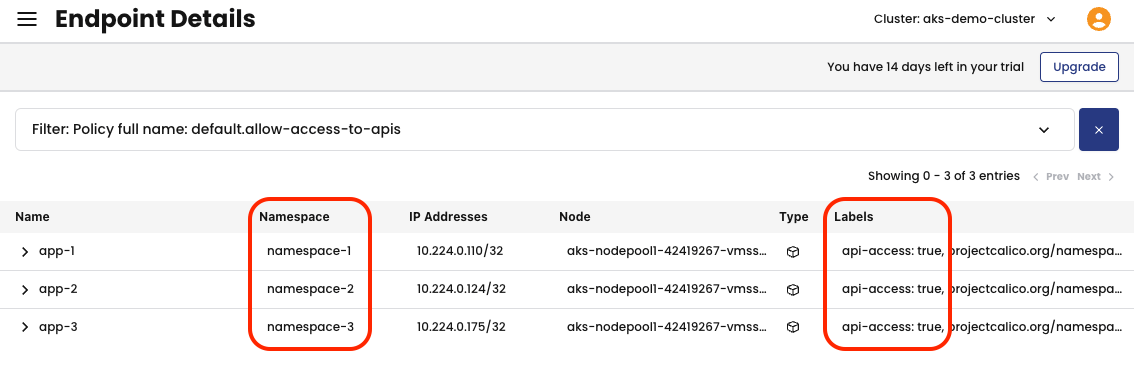
After creating the global network policy, you can verify the endpoints that will be impacted by it, by clicking on the number in front of Endpoints.
You will notice that the endpoints app-1, app-2, and app-3 exist in different namespaces, but all three share a common label used as a selector for the global network policy: api-access=true.
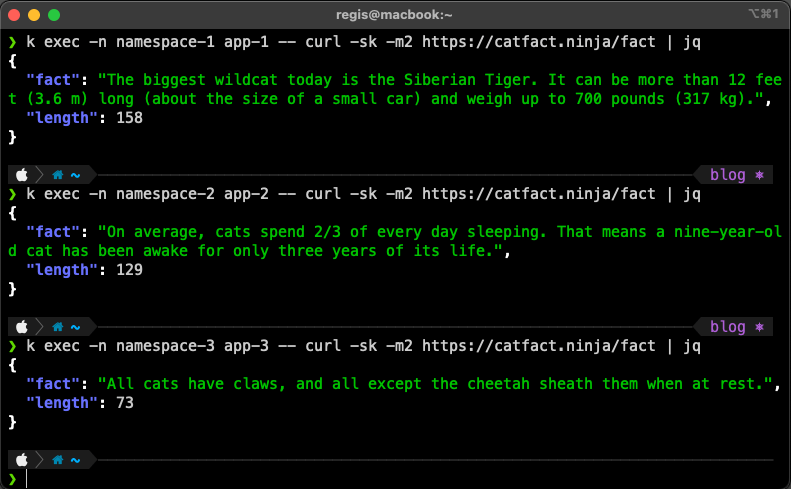
When trying to access the catfact.ninja API, all pods are allowed to access it.
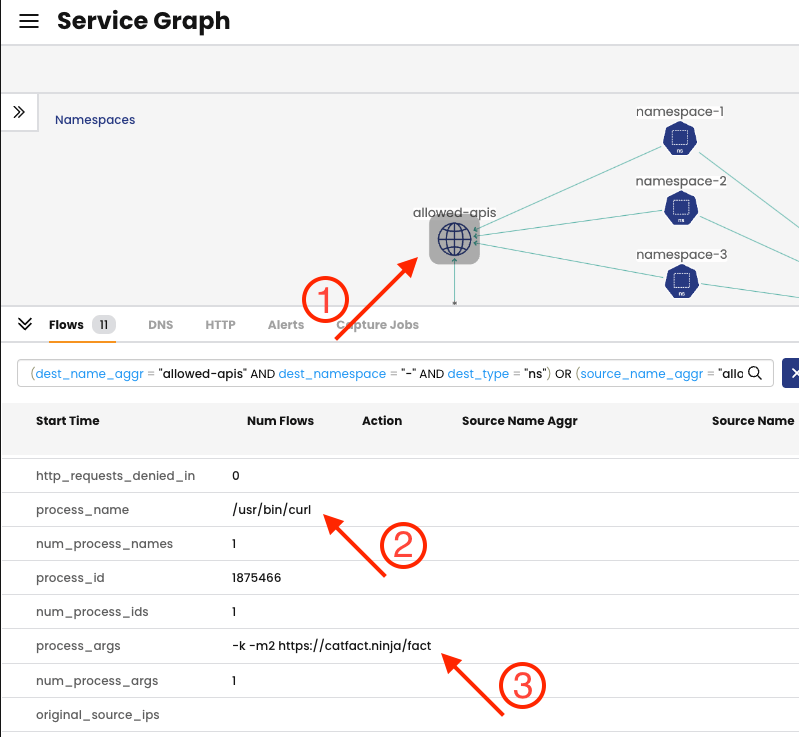
You can also verify this API connection using the Service Graph tool in the Calico interface.
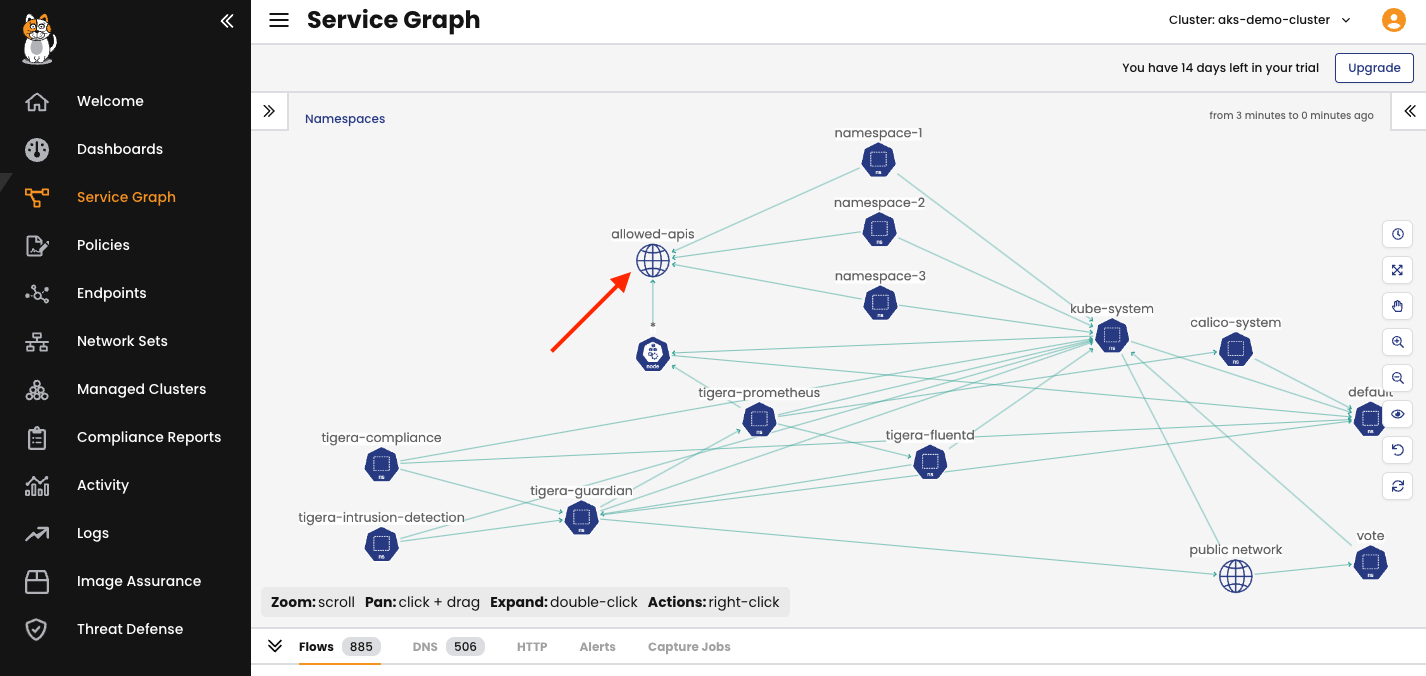
Selecting the ① allowed-apis globe icon and expanding the flow details in the interface, you can see the ② process_name, which is the process that started the flow, and the ③ process_args which are the arguments passed to the process during its execution.
We can showcase the effectiveness of global network policies in conjunction with various other Calico features through numerous examples. Some of these examples include workload micro-segmentation, geofencing, and implementing a zero-trust approach using the default deny rule, just to name a few.
Benefits of Calico Global Network Policy
- Calico’s global network policies extend beyond namespace boundaries, simplifying the management of network policies across your entire cluster.
- This approach, coupled with the use of Fully Qualified Domain Names (FQDN) and global network sets, streamlines policy maintenance and enhances security in your cloud-native environment.
- Calico’s global network policies can streamline access to API services, which is beneficial in larger clusters with numerous pods and namespaces.
Conclusion
In this multi-part blog series, we’re diving into the limitations of Kubernetes network policies and showing how you can overcome them with the help of Calico. Today, we covered a critical use case: default policies that apply to all namespaces or pods.
As this blog series continues, we’ll delve into more examples and practical implementations, highlighting how Calico’s features can address various challenges in Kubernetes networking and security. Don’t miss the next part of our exploration into the impact of Calico on Kubernetes network policies.
In our next blog post, we’ll address the constraints associated with native Kubernetes network policies, focusing on their advanced policy querying and reachability tooling. We’ll show you how Calico can provide you with the ability to assess the consequences of implementing a particular policy while also aiding in the troubleshooting of connectivity issues and policy configurations. Be sure to stay tuned for more insights!
Ready to try Calico’s global network policies? Sign up for a free trial of Calico Cloud.
Join our mailing list
Get updates on blog posts, workshops, certification programs, new releases, and more!


