In my previous blog post, I talked about the eighth use case from the list of nine things you cannot implement using basic Kubernetes network policy — the ability to log network security events. In this final blog post of the series, we’ll be focusing on one last use case: the ability to explicitly deny policies.
Use case: The ability to explicitly deny policies
Kubernetes network policy is your tool for managing network traffic between pods and other endpoints outside the cluster. It permits you to allow traffic at the IP address, port and protocol level. It is enough to provide a rudimentary control of the traffic ingressing or egressing your workload endpoints. However, in many cases, it’s not enough, especially for more complex scenarios requiring granular control.
When a pod is assigned multiple network policies, the rules from all applicable policies are combined to form a union. This union represents the complete set of rules that will be evaluated for the pod. The resulting set of rules will be used to determine whether incoming or outgoing traffic for the pod is allowed. If none of the rules in this set allow a particular traffic, it will be implicitly denied.
Unlike Kubernetes network policies, Calico network policies offer a range of actions beyond just allowing flows that match a network policy selector condition. Calico allows you to choose between actions such as Allow, Deny, Log, or Pass for a policy rule. The Deny action explicitly denies a specific flow that matches the policy condition. Another key distinction is that Calico network policies can be organized into tiers and analyzed in a sequential order, rather than having all policy rules combined in a union boolean operation, as is the case with Kubernetes native policies.
Below, you’ll find a comparison between the NetworkPolicy resource as outlined in the Kubernetes documentation (Kubernetes Native) and Calico.
| Kubernetes Native | Calico | |
| Rule Actions | Allow (implicity to the rule) | Allow, Deny, Log, Pass |
| ApiVersion | networking.k8s.io/v1 | projectcalico.org/v3 |
| Kind | NetworkPolicy | NetworkPolicy |
| Resource Type | namespaced | namespaced |
| Policy rules evaluation | Union of all applying policies’ rules | Tier, Order |
| Selector | podSelector [matchLabels] | selector, serviceAccountSelector [match operators || logical operators] |
| Types | [ Ingress | Egress ] | [ Ingress | Egress ] |
| Performance Hints | — | AssumeNeededOnEveryNode |
Calico provides a comprehensive set of specifications for rules, offering a more granular and precise method to identify traffic. This empowers administrators with increased control over network traffic within the Kubernetes cluster.
In the tables below, you can see the options for matching traffic provided by both Kubernetes and Calico to understand the differences.
Native Kubernetes NetworkPolicy
| Kubernetes Native Ingress Rules | Kubernetes Native Egress Rules | ||
| – from | ipBlock (allow exceptions) | – to | ipBlock (allow exceptions) |
| namespaceSelector [namespaceSelector | matchExpressions] | namespaceSelector [namespaceSelector | matchExpressions] | ||
| podSelector (matching labels) | podSelector (matching labels) | ||
| – ports | – protocols [TCP | UDP | SCTP*] – ports [port | port:endPort] |
– ports | – protocols [TCP | UDP | SCTP*] – ports [port | port:endPort] |
Calico NetworkPolicy
| Calico Ingress Rules | Calico Egress Rules | ||
| – action | Allow, Deny, Log, Pass | – action | Allow, Deny, Log, Pass |
| – metadata | annotations | – metadata | annotations |
| – protocol | [ TCP | UDP | ICMP | ICMPv6 | SCTP | UDPLite | 1-255 ] | – protocol | [ TCP | UDP | ICMP | ICMPv6 | SCTP | UDPLite | 1-255 ] |
| – notProtocol | [ TCP | UDP | ICMP | ICMPv6 | SCTP | UDPLite | 1-255 ] | – notProtocol | [ TCP | UDP | ICMP | ICMPv6 | SCTP | UDPLite | 1-255 ] |
| – icmp | – type [0-254] – code [0-255] |
– icmp | – type [0-254] – code [0-255] |
| – notIcmp | – type [0-254] – code [0-255] |
– notIcmp | – type [0-254] – code [0-255] |
| – ipVersion | [ 4 | 6 ] | – ipVersion | [ 4 | 6 ] |
| – source | – nets [IPv4 / IPV6 list of CIDRs] – noNets [IPv4 / IPV6 list of CIDRs] – selector [match operators || logical operators] – notSelector [match operators || logical operators] – namespaceSelector [match operators || logical operators] – ports [ port | start:end | named-port (string) ] – notPorts [ port | start:end | named-port (string) ] – serviceAccounts [ name(s) (list) | match operators || logical operators] – services [ name:namespace] |
– source | – nets [IPv4 / IPV6 list of CIDRs] – noNets [IPv4 / IPV6 list of CIDRs] – selector [match operators || logical operators] – notSelector [match operators || logical operators] – namespaceSelector [match operators || logical operators] – ports [ port | start:end | named-port (string) ] – notPorts [ port | start:end | named-port (string) ] – serviceAccounts [ name(s) (list) | match operators || logical operators] – services [ name:namespace] |
| – destination | – nets [IPv4 / IPV6 list of CIDRs] – noNets [IPv4 / IPV6 list of CIDRs] – selector [match operators || logical operators] – notSelector [match operators || logical operators] – namespaceSelector [match operators || logical operators] – ports [ port | start:end | named-port (string) ] – notPorts [ port | start:end | named-port (string) ] – serviceAccounts [ name(s) (list) | match operators || logical operators] – services [ name:namespace] |
– destination | – nets [IPv4 / IPV6 list of CIDRs] – noNets [IPv4 / IPV6 list of CIDRs] – selector [match operators || logical operators] – notSelector [match operators || logical operators] – namespaceSelector [match operators || logical operators] – ports [ port | start:end | named-port (string) ] – domains [ exact | wildcards ] – notPorts [ port | start:end | named-port (string) ] – serviceAccounts [ name(s) (list) | match operators || logical operators] – services [ name:namespace] |
| – http | – methods [https://www.rfc-editor.org/rfc/rfc9110.html] – paths [HTTPPathMatch [ exact | prefix ] |
— | — |
Let’s explore some examples of Calico network policy to improve our grasp of the subject.
Deny traffic for a specific workload endpoint
Imagine a scenario where a pod seeks to connect to the catfact API to fetch crucial information about cats. The designated URL for this interaction is https://catfact.ninja/fact, and this occurs within a microsegmented environment.
In our microsegmentation setup, let’s assume we’ve established two network policies. The first policy permits the pod to establish connections to both the API and the DNS server for name resolution. Meanwhile, the second policy is configured to disallow any other form of traffic originating from the pod.
The first policy, named cat is formulated as follows:
apiVersion: projectcalico.org/v3
kind: NetworkPolicy
metadata:
  name: platform.cat
  namespace: default
spec:
  tier: platform
  order: 0
  selector: app == "cat"
  serviceAccountSelector: ''
  egress:
    - action: Allow
      protocol: UDP
      source: {}
      destination:
        selector: k8s-app == "kube-dns"
        namespaceSelector: all()
        ports:
          - '53'
    - action: Allow
      protocol: TCP
      source: {}
      destination:
        selector: k8s-app == "kube-dns"
        namespaceSelector: all()
        ports:
          - '53'
    - action: Allow
      protocol: TCP
      source: {}
      destination:
        ports:
          - '443'
        domains:
          - catfact.ninja
  types:
    - Egress
The second policy, default-deny, is structured as follows:
apiVersion: projectcalico.org/v3
kind: GlobalNetworkPolicy
metadata:
  name: default.default-deny
spec:
  tier: default
  order: 1100
  selector: run == "cat"
  namespaceSelector: kubernetes.io/metadata.name == "default"
  serviceAccountSelector: ''
  doNotTrack: false
  applyOnForward: false
  preDNAT: false
  types:
    - Ingress
    - Egress
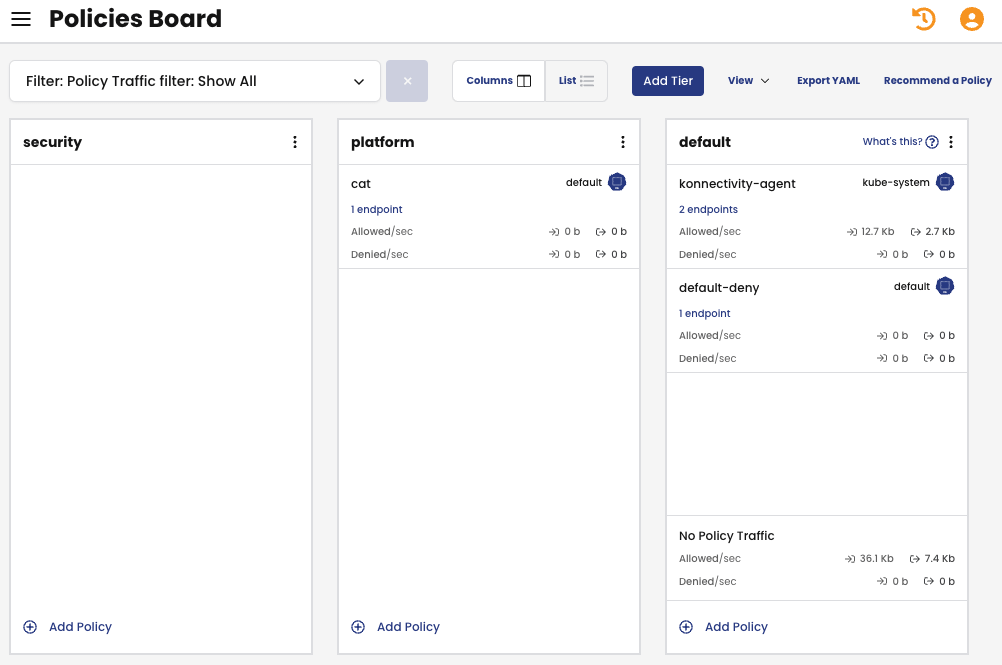
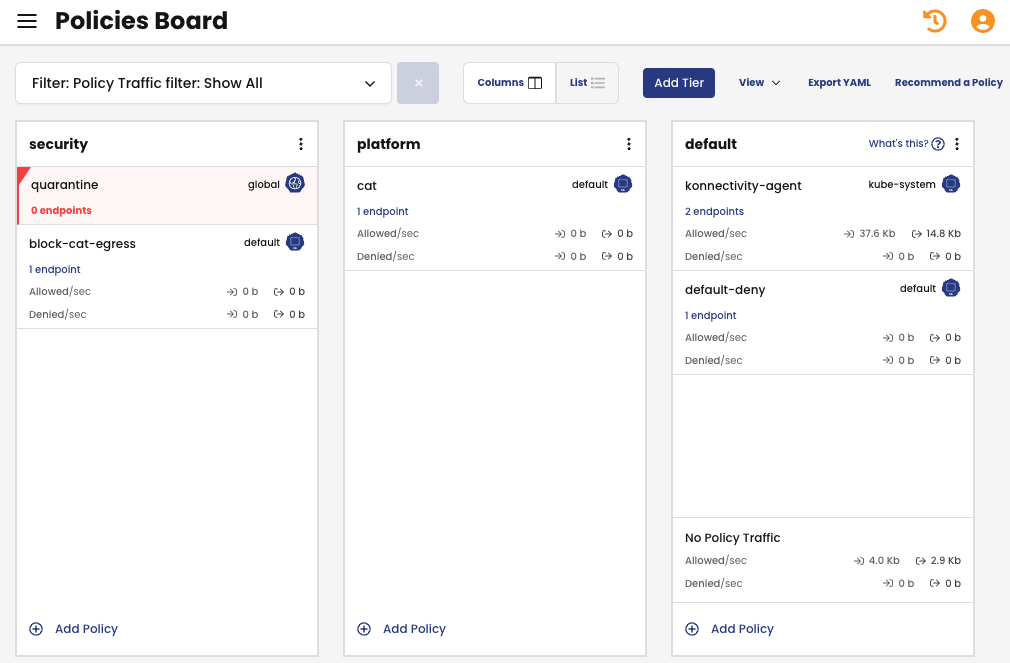
Calico’s Policies Board displays two policies: cat and default-deny. The cat policy resides in the tier platform, while the default-deny policy is in the tier default. Following the tier and policies hierarchy, Calico will assess the cat policy before moving on to the default-deny policy.
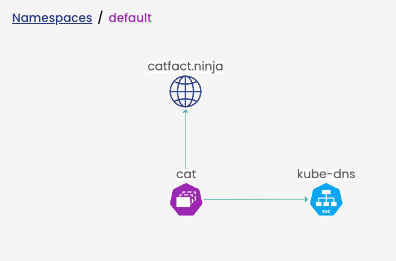
You have the option to confirm the connections originating from the pod cat by checking the Service Graph.
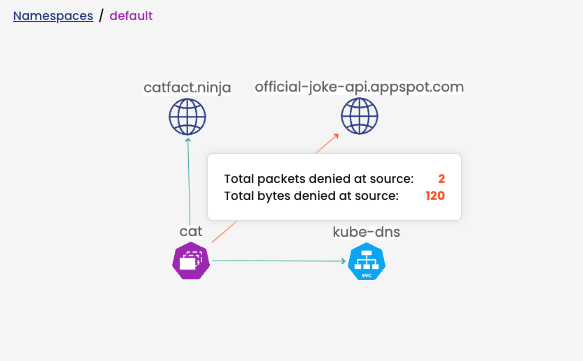
Attempting to access another API, official-joke-api.appspot.com, from the cat pod results in traffic being blocked by the first policy.
If I wish to restrict all egress traffic from the cat pod, there’s no need to modify the existing cat policy. Instead, I can create a new policy named block-cat-egress in the security tier. This placement ensures that the block-cat-egress policy takes precedence and is evaluated before the cat and default-deny policies.
apiVersion: projectcalico.org/v3
kind: NetworkPolicy
metadata:
  name: security.block-cat-egress
  namespace: default
spec:
  tier: security
  order: 0
  selector: app == "cat"
  serviceAccountSelector: ''
  egress:
    - action: Deny
      source: {}
      destination: {}
    - action: Pass
      source: {}
      destination: {}
  types:
    - Egress
You can view the policies in the Policies Board:

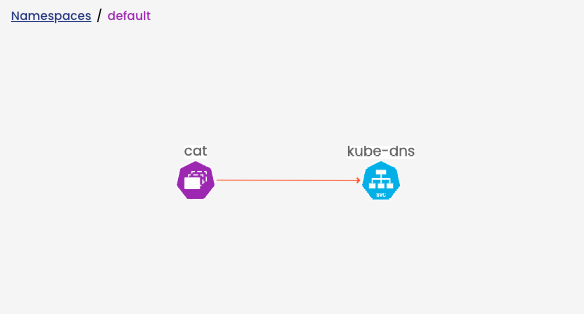
Consequently, with all egress traffic blocked, you won’t observe any denied traffic to the API catfact.ninja. This is because the cat pod loses access to DNS, preventing it from even resolving the name.
Quarantine a workload endpoint
The idea of blocking traffic in a lower-ordered tier (towards the left), as discussed in the previous scenario, can also be applied to establish a quarantine policy. This policy would effectively prohibit all incoming and outgoing traffic for a pod engaged in attacks or exhibiting suspicious activities within your environment.
Calico facilitates the identification of such activities through Container Threat Detection. Once a malicious pod is labeled accordingly, a quarantine policy can be applied. This effectively denies all communication to and from the specified pod, overriding any policies in higher tiers (towards the right) that might otherwise allow its traffic.
Let’s employ the cat pod once more for this test.
Enabling Container Threat Detection on the cluster, let’s utilize nmap to conduct an IP enumeration and determine the IP addresses of other pods within the cluster.
To connect to the “cat” pod and execute the nmap command for IP enumeration, use the following command:
kubectl exec cat -it -- /bin/bash
nmap -sn $(hostname -i)/24
The outcome will provide the IP addresses of pods in the cluster. With this information, there’s the potential to proceed with a port scan attack or target a specific pod for a different attack.
Starting Nmap 7.93 ( https://nmap.org ) at 2023-12-20 02:35 UTC
Nmap scan report for 10-224-0-4.calico-node-metrics.calico-system.svc.cluster.local (10.224.0.4)
Host is up (0.0020s latency).
Nmap scan report for 10-224-0-30.tigera-api.tigera-system.svc.cluster.local (10.224.0.30)
Host is up (0.0015s latency).
Nmap scan report for 10-224-0-31.facts.catfacts.svc.cluster.local (10.224.0.31)
Host is up (0.00087s latency).
Nmap scan report for 10-224-0-43.kube-dns.kube-system.svc.cluster.local (10.224.0.43)
Host is up (0.0011s latency).
Nmap scan report for 10-224-0-48.metrics-server.kube-system.svc.cluster.local (10.224.0.48)
Host is up (0.0010s latency).
Nmap scan report for 10-224-0-78.metrics-server.kube-system.svc.cluster.local (10.224.0.78)
Host is up (0.0017s latency).
Nmap scan report for 10.224.0.94
Host is up (0.0029s latency).
Nmap scan report for 10-224-0-100.kube-dns.kube-system.svc.cluster.local (10.224.0.100)
Host is up (0.0012s latency).
Nmap scan report for 10.224.0.103
Host is up (0.00086s latency).
Nmap scan report for 10.224.0.105
Host is up (0.00068s latency).
Nmap scan report for 10-224-0-123.calico-node-metrics.calico-system.svc.cluster.local (10.224.0.123)
Host is up (0.000057s latency).
Nmap scan report for 10.224.0.156
Host is up (0.00010s latency).
Nmap scan report for 10.224.0.177
Host is up (0.000089s latency).
Nmap scan report for 10-224-0-194.tigera-api.tigera-system.svc.cluster.local (10.224.0.194)
Host is up (0.00011s latency).
Nmap scan report for 10-224-0-233.db.catfacts.svc.cluster.local (10.224.0.233)
Host is up (0.000095s latency).
Nmap scan report for cat (10.224.0.128)
Host is up.
Nmap done: 256 IP addresses (16 hosts up) scanned in 3.41 seconds
cat:~#
Let’s examine Calico Security Events under Threat Defense > Security Events in Calico UI to observe what Calico has detected regarding this malicious activity.
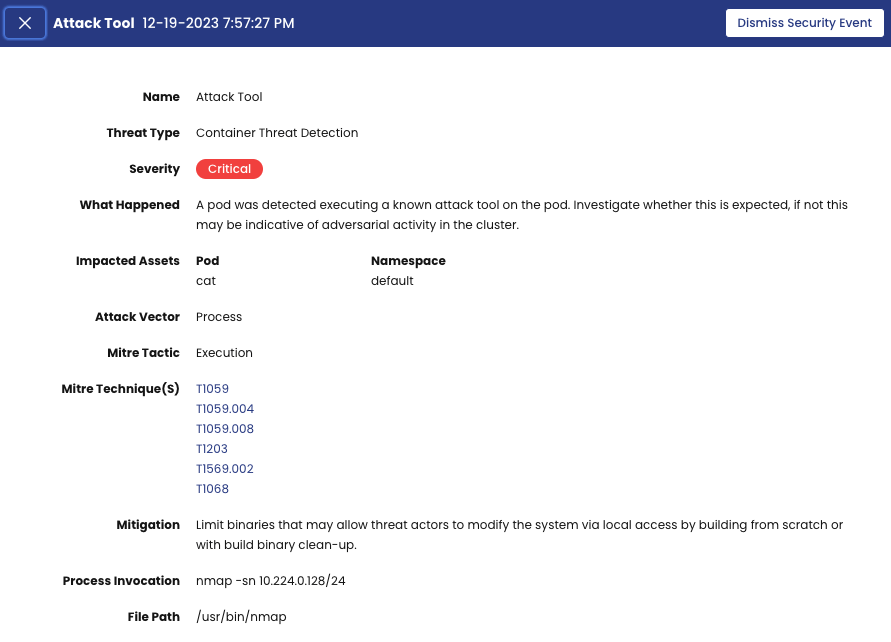
Calico Container Threat Detection has identified the execution of nmap, classified as an attack tool, within the cat pod. Assuming this is a security incident that needs intervention, we can establish a network policy to quarantine any pod in our cluster labeled with quarantine=true.
apiVersion: projectcalico.org/v3
kind: GlobalNetworkPolicy
metadata:
  name: security.quarantine
spec:
  tier: security
  order: 100
  selector: quarantine == "true"
  ingress:
  - action: Deny
    source: {}
    destination: {}
  egress:
  - action: Deny
    source: {}
    destination: {}
  types:
  - Ingress
  - Egress
This policy is placed in the security tier. See below in the Policies Board on Calico UI.
Now, simply assign the label quarantine=true to the compromised pod, and all communication for that pod will be blocked.
kubectl label pod cat quarantine=true --overwrite
Next, let’s test the IP sweep command once more:
kubectl exec cat -it -- /bin/bash
nmap -sn $(hostname -i)/24
This time, no servers were detected. The only responsive entity to the nmap scan is the cat pod itself.
cat:~# nmap -sn $(hostname -i)/24
Starting Nmap 7.93 ( https://nmap.org ) at 2023-12-20 03:05 UTC
Nmap scan report for cat (10.224.0.128)
Host is up.
Nmap done: 256 IP addresses (1 host up) scanned in 205.30 seconds
cat:~#
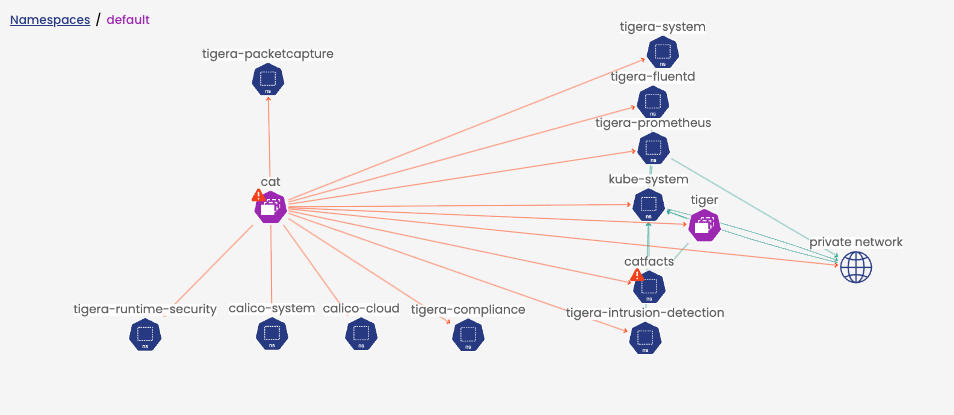
Upon inspecting the Service Graph in the Calico UI, it becomes evident that all traffic for the cat pod is now blocked. The red line visually represents the denied traffic.
Numerous other use cases exist where you can leverage the additional fields within the Calico network policy for a more fine-grained selection of traffic. For more information, please refer to the Calico documentation on network policy.
Benefits of using Calico’s Network Policy
The benefits of using Calico’s Network Policy over Kubernetes Native network policies are notable, particularly in scenarios requiring granular control. Here are some key advantages:
Explicit Deny Policies
Kubernetes network policies provide basic traffic control at the IP address, port, and protocol level. However, the rules from multiple policies are combined into a union, and if none allow specific traffic, it’s implicitly denied. Calico network policies, on the other hand, offer explicit actions beyond just allowing flows. The Deny action explicitly denies a specific flow that matches the policy condition.
Tiered Organization and Hierarchical Evaluation
Calico network policies can be organized into tiers, allowing for a sequential evaluation of policies. This contrasts with Kubernetes native policies, where rules from all applicable policies are combined in a union boolean operation. This tiered approach in Calico allows for a more ordered and structured evaluation of policies, providing better control over traffic flow.
Additional Fields for Granular Traffic Selection
Calico network policies provide a comprehensive set of specifications for rules, allowing for a more granular and precise method to identify traffic. The additional fields in Calico’s network policy offer a wide range of options for specifying conditions, including protocol types, ports, IP versions, source and destination selectors, and more.
Diverse Rule Actions
While Kubernetes native policies have an implicit “Allow” action, Calico network policies offer a range of actions, including Allow, Deny, Log, or Pass for each policy rule. This flexibility enhances the control administrators have over traffic flow.
Calico’s Network Policy provides administrators with enhanced control and flexibility in managing network traffic within a Kubernetes cluster, offering explicit deny policies, tiered organization, and a more extensive set of specifications for fine-grained traffic selection.
Conclusion
In this comprehensive blog series, we explored the intricacies of Kubernetes network policies and uncovered their limitations, showing how Calico can address those gaps. This final installment focused on a critical aspect: the capability to explicitly deny policies. Through practical examples, we explored how Calico’s advanced network policy features empower administrators, providing them with the tools for nuanced control over traffic flow in complex scenarios.
As we bring this series to a close, the far-reaching significance of Calico in fortifying the security posture of Kubernetes clusters becomes evident. Its features not only enhance traditional network policies but also introduce a new echelon of flexibility and control. This empowers administrators to confidently navigate the dynamic landscape of containerized applications.
The knowledge acquired during this series equips administrators with the essential tools to navigate the intricacies of network policy management in Kubernetes adeptly. This ensures a secure and resilient deployment of containerized workloads in an ever-evolving ecosystem. For those eager to dive further into this realm, the Calico documentation stands as a valuable repository, offering profound insights and practical guidance.
Ready to try Calico network policies? Sign up for a free trial of Calico Cloud
Join our mailing list
Get updates on blog posts, workshops, certification programs, new releases, and more!