In my previous blog post, What you can’t do with Kubernetes network policies (unless you use Calico): Advanced policy querying & reachability tooling, I talked about this use case from the list of nine things you cannot implement using basic Kubernetes network policy — advanced policy querying and reachability tooling. In this blog post, we’ll focus on the use case — the ability to log and analyze network security events.
Use case: The ability to log and analyze network security events
In Kubernetes, network security events are incidents or occurrences that can harm the network’s security inside a Kubernetes cluster. Kubernetes is a platform for container orchestration, and securing the network within a Kubernetes environment is essential to safeguard applications, data, and the infrastructure itself as Kubernetes follows open communication within the cluster. Below are some of the critical network security events that can occur in the Kubernetes context:
- Pod Communication Anomalies: Unusual communication patterns between pods within the cluster that may indicate malicious activity or misconfigurations. Examples include unexpected traffic between pods, communication with unauthorized external entities, or unusual pod-to-pod interactions.
- Denial of Service (DoS) Attacks: Events where an attacker tries to disrupt the normal operation of the Kubernetes cluster by overwhelming the network resources. Common techniques used in this type of attack include excessive traffic, resource exhaustion, or intentional network flooding, all of which can severely affect the availability of services.
- Ingress/Egress Traffic Anomalies: Unusual patterns or volumes of incoming or outgoing network traffic that may indicate a security threat. Sudden spikes in traffic, unexpected data transfers, or communication with known malicious IP addresses.
- Security Policy Violations: Events, where defined security policies for network access, pod-to-pod communication, or external access, are violated. Pods attempting to communicate with restricted resources, violating network policies, or attempting to bypass network segmentation.
Ensuring network security in a Kubernetes environment is a complex task that requires a comprehensive approach. This can be achieved using network monitoring tools, logging solutions, and security information and event management (SIEM) systems to capture and analyze network activity, logs, and events from security point of view. By employing a comprehensive approach, you can effectively monitor and respond to network security events in your Kubernetes environment.
Calico is a widely used networking and network security platform that is ideal for Kubernetes and other container orchestration platforms. It offers a variety of features that can greatly enhance the security of a Kubernetes environment.
Here is how Calico helps address different aspects of network security in a Kubernetes cluster:
- Calico Security Policies are crafted to enhance the security of Kubernetes clusters. By leveraging Calico, you can activate Kubernetes Network Security Policies. These policies empower you to define and enforce communication rules between pods precisely. This implementation facilitates microsegmentation, enabling you to control traffic flow based on pod labels and selectors, ultimately fortifying the overall security stance of the cluster.
- Calico is equipped to generate flow logs and audit logs, offering in-depth insights into network traffic within the cluster. Analyzing these logs aids in detecting anomalies and potential security threats, supporting tasks such as intrusion detection and post-incident analysis. The extended Berkeley Packet Filter (eBPF) technology is harnessed by Calico to enforce security policies at the Linux kernel level efficiently. This approach ensures a lightweight and high-performance application of network policies, minimizing any adverse impact on the cluster’s overall performance.
- Calico seamlessly integrates threat intelligence. By tapping into external threat feeds, Calico can dynamically update security policies in real-time, proactively blocking communication with recognized malicious IP addresses. This functionality significantly strengthens the cluster’s resilience against external threats.
- Calico provides dedicated capabilities for auditing and ensuring compliance with established security policies and industry regulations. This comprehensive set of tools encompasses reporting and monitoring features, empowering organizations to thoroughly evaluate and uphold the security posture of their Kubernetes clusters.
Calico contributes to a robust and well-maintained security framework for containerized workloads in Kubernetes through these capabilities. Calico is a crucial component in strengthening the security of a Kubernetes environment by offering robust network policies, intrusion detection, visibility, encryption, threat intelligence integration, and automation. It provides features that align with the best practices for logging network security events in Kubernetes. Let’s explore some of Calico’s features that are used to implement a defense-in-depth strategy for Kubernetes clusters, addressing various aspects of network security and logging network security events.
Network Policies Logging and Alerts
Calico enables the use of Kubernetes Network Policies, allowing you to define and enforce rules for communication between pods. This helps in implementing microsegmentation and restricting the flow of traffic based on pod labels and selectors, enhancing the overall security posture of the cluster. I explored the network policies logs in another blog post, What you can’t do with Kubernetes network policies (unless you use Calico): Advanced policy querying and reachability tooling, and, in this blog, I will guide you on creating alerts that notify any unusual or unexpected behaviour in the communication of your workloads.
Let’s consider a scenario with a WordPress application deployed in the WordPress namespace. This application consists of two pods: one with the WordPress application itself and another one with the database for the WordPress application, which is, in this case, a MySQL database. Additionally, one client pod deployed in the same namespace that will connect to the WordPress. Moreover, connections from the internet are allowed to the WordPress application.
Here is a diagram illustrating the WordPress application environment:

To ensure microsegmentation, the following policies are in place:
default-deny: for denying all the traffic not previously allowed for the pod in the namespace wordpress.
apiVersion: projectcalico.org/v3
kind: GlobalNetworkPolicy
metadata:
  name: default.default-deny
spec:
  tier: default
  order: 1100
  selector: ''
  namespaceSelector: kubernetes.io/metadata.name == "wordpress"
  serviceAccountSelector: ''
  doNotTrack: false
  applyOnForward: false
  preDNAT: false
  types:
    - Ingress
    - Egress
wordpress: for the wordpress workload endpoint, with the following rules:
- Ingress
- Allow the workload client to connect on port 80
- Allow any workload not in the subnet 10.224.0.0/16 to connect on port 80. This means any workload outside the cluster will be allowed to connect.
- Egress
- Allow connection to the db-mysql on port 3306
- Allow connection to itself on port 80
- Allow connection to any server in the domain wordpress.org on ports 80 and 443
apiVersion: projectcalico.org/v3
kind: NetworkPolicy
metadata:
  name: platform.wordpress
  namespace: wordpress
spec:
  tier: platform
  order: 0
  selector: app == "wordpress"
  serviceAccountSelector: ''
  ingress:
    - action: Allow
      protocol: TCP
      source:
        selector: app == "client"
      destination:
        ports:
          - '80'
    - action: Allow
      protocol: TCP
      source:
        notNets:
          - 10.224.0.0/16
      destination:
        ports:
          - '80'
  egress:
    - action: Allow
      protocol: TCP
      source: {}
      destination:
        selector: app == "db"
        ports:
          - '3306'
    - action: Allow
      protocol: TCP
      source: {}
      destination:
        selector: app == "wordpress"
        ports:
          - '80'
    - action: Allow
      protocol: TCP
      source: {}
      destination:
        ports:
          - '80'
          - '443'
        domains:
          - wordpress.org
          - '*.wordpress.org'
  types:
    - Ingress
    - Egress
db-mysql: allow traffic only from the WordPress application on port 3306
apiVersion: projectcalico.org/v3
kind: NetworkPolicy
metadata:
  name: platform.db-mysql
  namespace: wordpress
spec:
  tier: platform
  order: 100
  selector: app == "db"
  serviceAccountSelector: ''
  ingress:
    - action: Allow
      protocol: TCP
      source:
        selector: app == "wordpress"
      destination:
        ports:
          - '3306'
  types:
    - Ingress
client: allow the workload client to connect to the WordPress application on port 80
apiVersion: projectcalico.org/v3
kind: NetworkPolicy
metadata:
  name: platform.client
  namespace: wordpress
spec:
  tier: platform
  order: 200
  selector: app == "client"
  serviceAccountSelector: ''
  egress:
    - action: Allow
      protocol: TCP
      source: {}
      destination:
        selector: app == "wordpress"
        ports:
          - '80'
  types:
    - Egress
Calico allows you to create alerts that will appear anytime a network policy violation occurs. These alerts can be exported to an external entity as an SIEM or a SOAR platform for further action using Syslog, AWS S3 bucket or Splunk. The following alert will notify you every time a workload from another namespace tries to connect to any of the WordPress application workloads in the wordpress namespace.
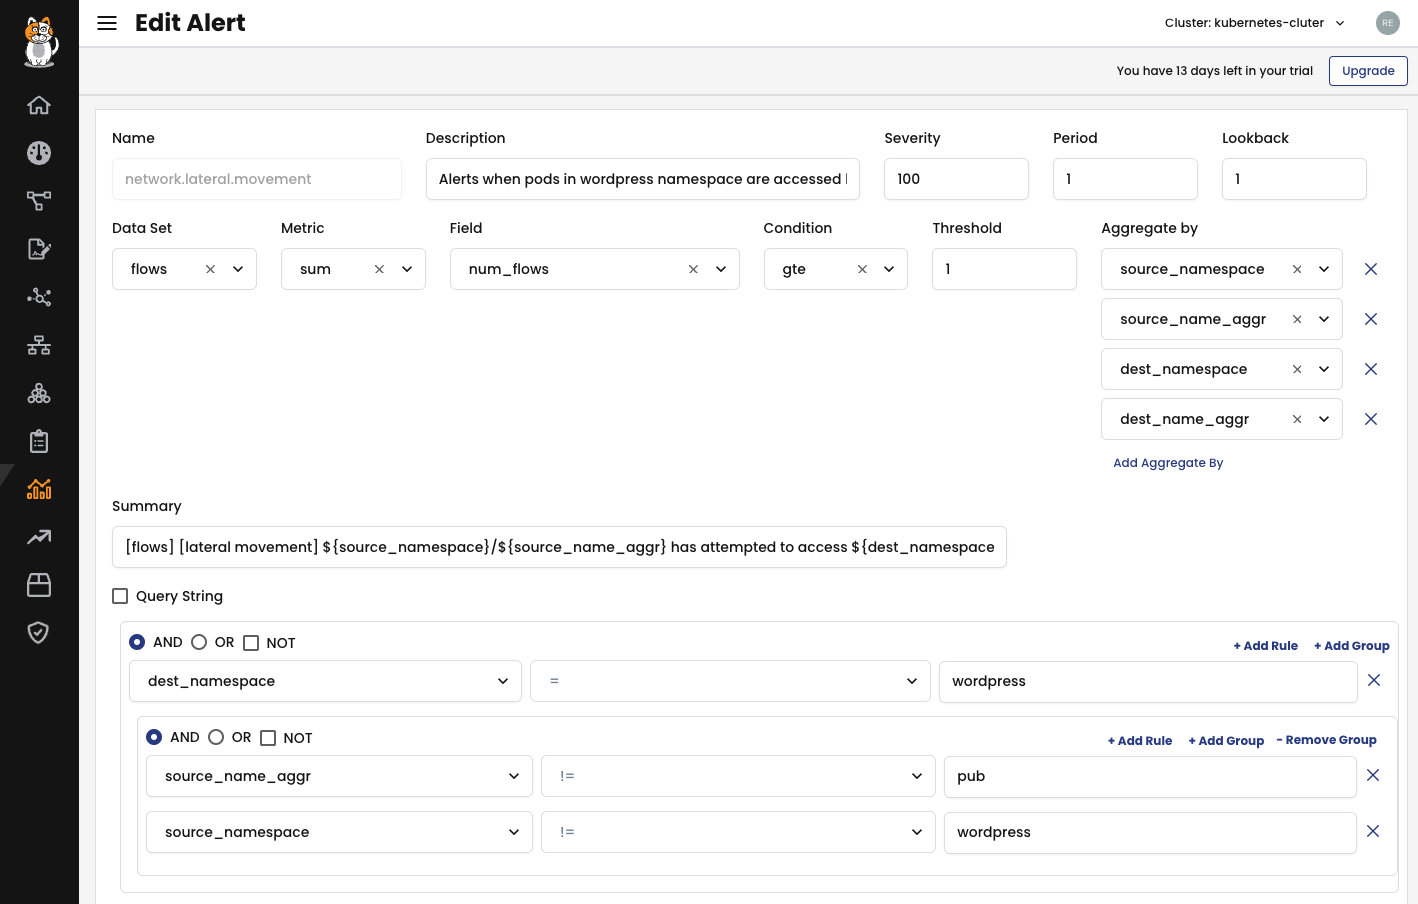
You can use any logic over several fields available in the Audit logs, DNS logs, Flow logs and L7 logs to create a notification condition. Let’s make an abnormal behaviour and observe the Global Alert in action. From the pod attacker, in the namespace default, I will try to connect to the MySQL database and to the WordPress front end.
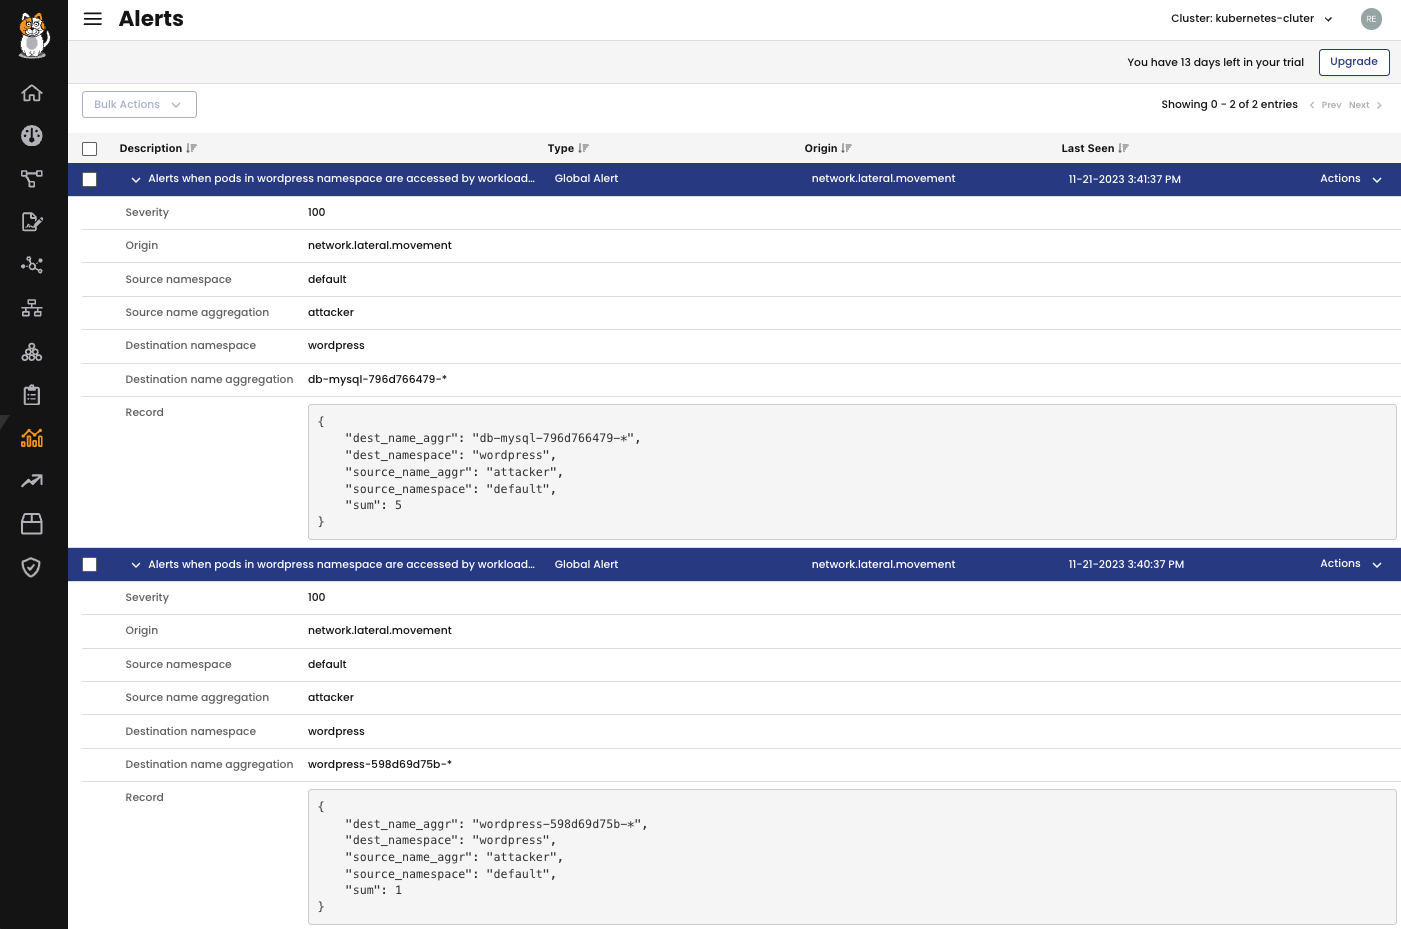
$ kubectl exec attacker -- nc -zv db-mysql.wordpress 3306
$ kubectl exec  attacker -- curl http://wordpress.wordpress
As a result, we can observe the following alerts in the Activity > Alerts on Calico UI:
Looking at the Service Graph in the Calico UI, it is possible to visualize the alerts as well. You can select the Alerts tab and expand the Alerts messages for details.
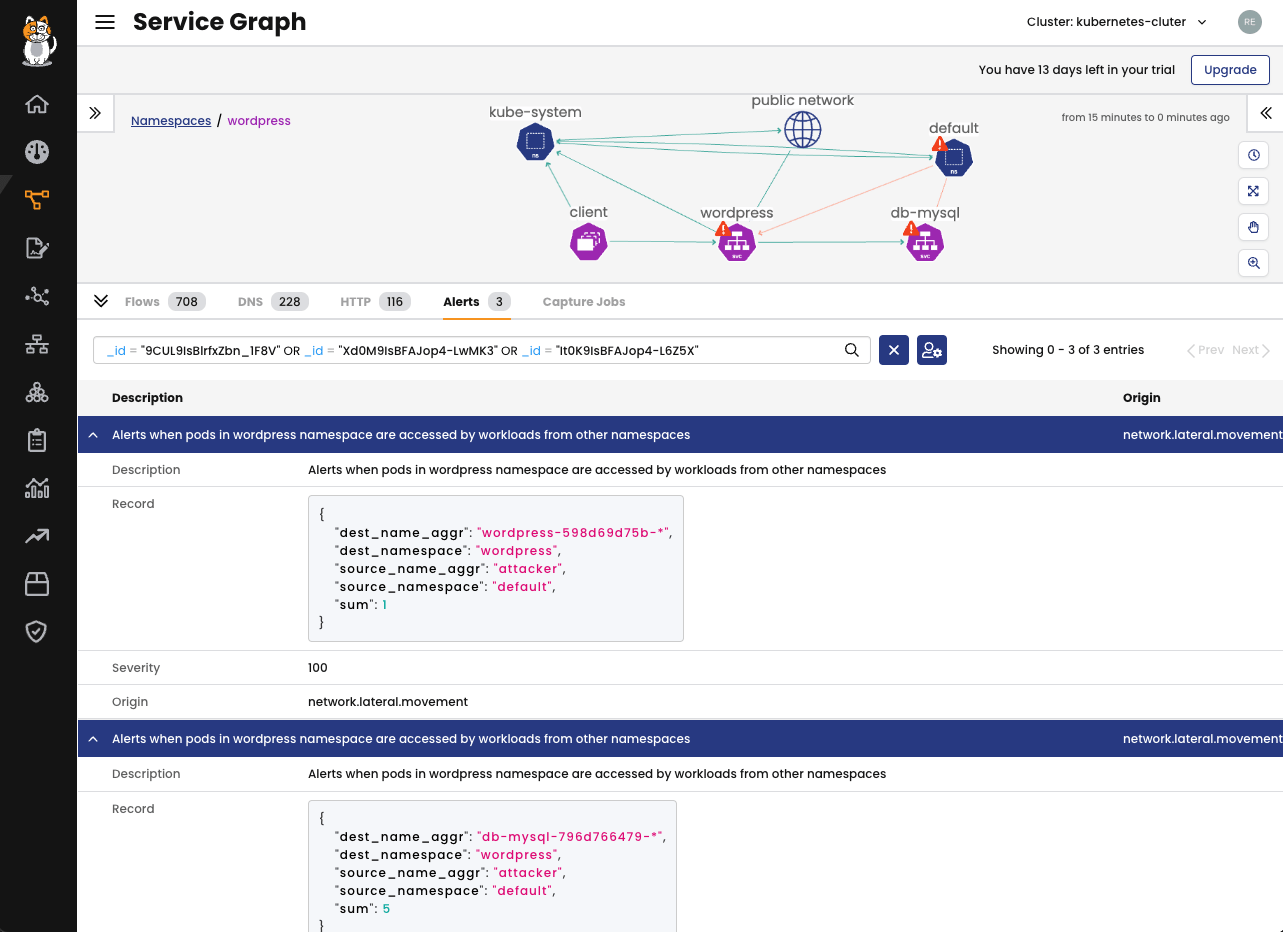
Many fields can be used to create conditions that will trigger an alarm. For more information, please refer to the Calico global alert documentation.
Threat Intelligence Integration
Calico has the ability to seamlessly include threat intelligence feeds, which helps identify potential risks when your Kubernetes clusters interact with suspicious IP addresses or URLs. If such communications are detected, the Calico UI shows an alert that provides detailed context, including information on the specific pod(s) involved. This helps you to analyze the situation and take necessary remedial actions thoroughly. Furthermore, you can use a threat intelligence feed to create a dynamic deny list, which can be applied to either a designated set of sensitive pods or your entire cluster.
To automatically update Calico with threat feeds, the feed(s) must be accessed via HTTP(S) and return a list of newline-separated IP addresses or prefixes in CIDR notation or domains. You can create a new threat feed using either the UI or the CLI. Here’s an example of creating a new threat feed from the UI.
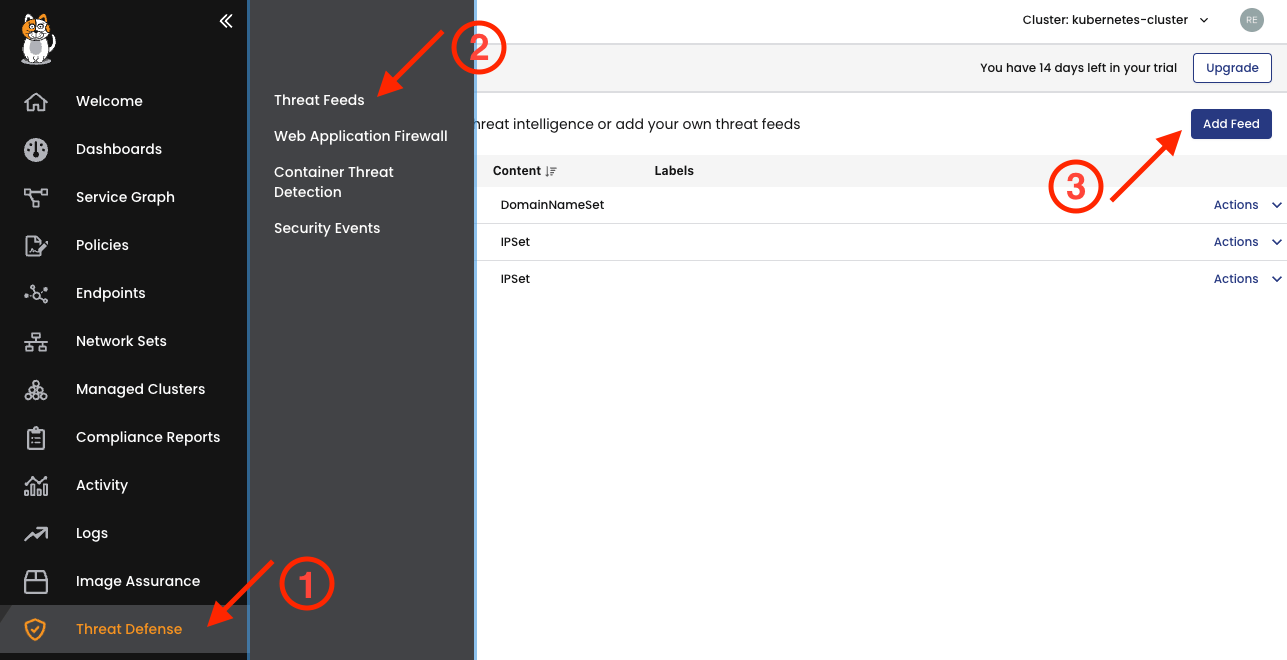
In the Calico UI, go to Threat Defense ① and select Threat Feeds ②, then click Add Feed ③.
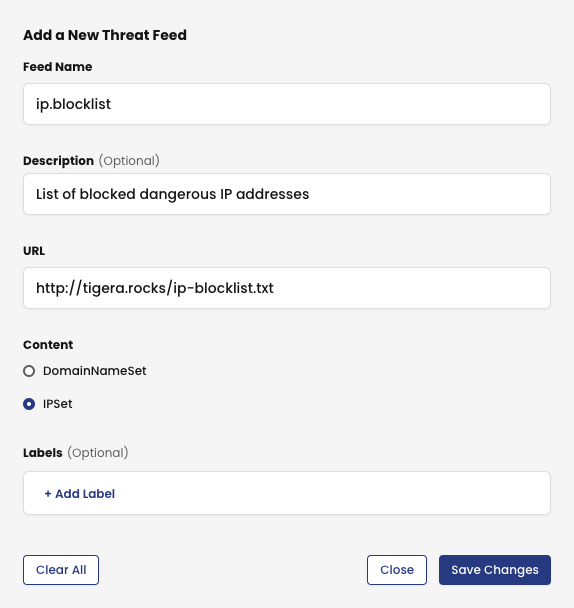
To add a new Threat Feed, create a Feed Name and Description, inform the URL from where the list of IP addresses, CIDRs or URLs will be fetched, specify the corresponding Content and optionally, add Labels. Save Changes.
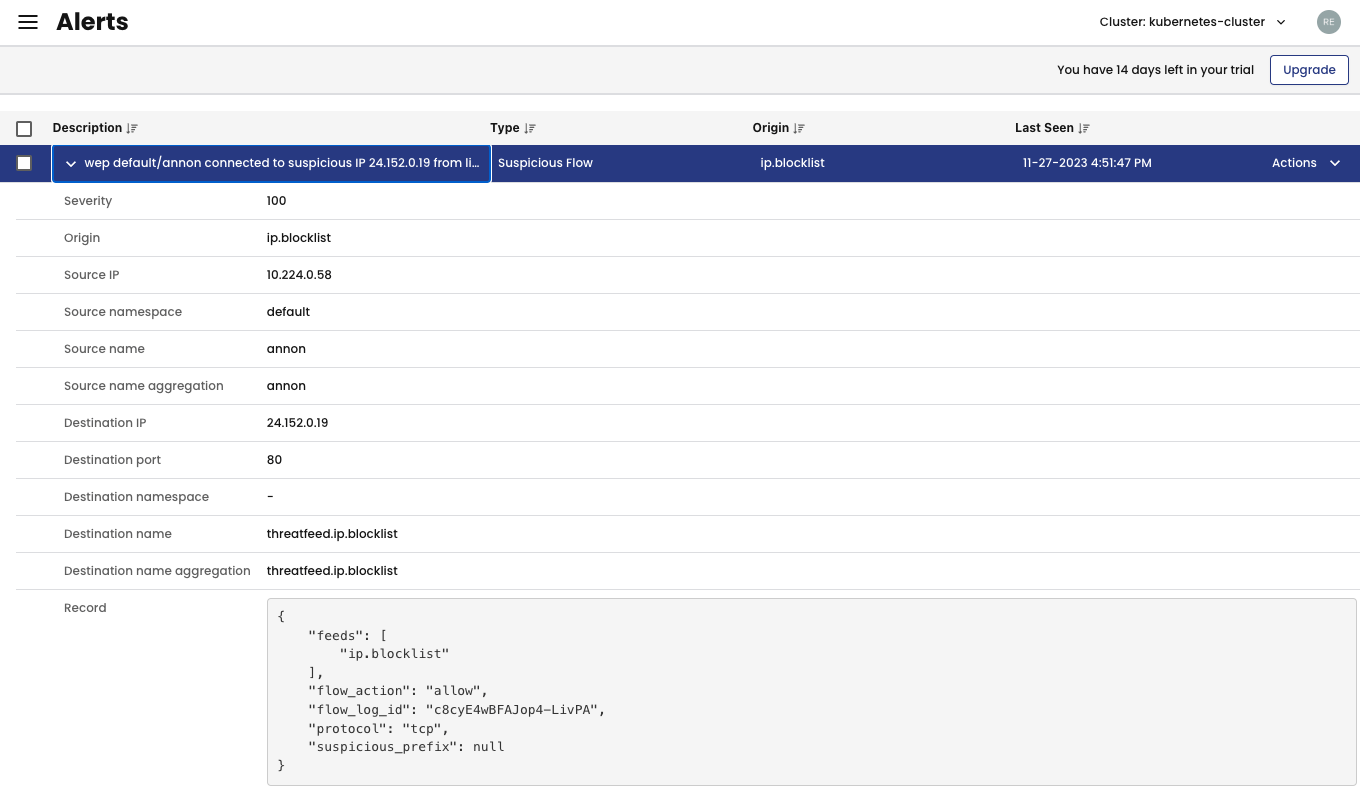
To test it, I will try to reach one of the IP addresses in the Threat Feed ip.blocklist list from the pod annon.
kubectl exec annon -- curl -m2 24.152.0.19
Wait a few minutes and check the notification on the Activity > Alerts page in the Calico UI:
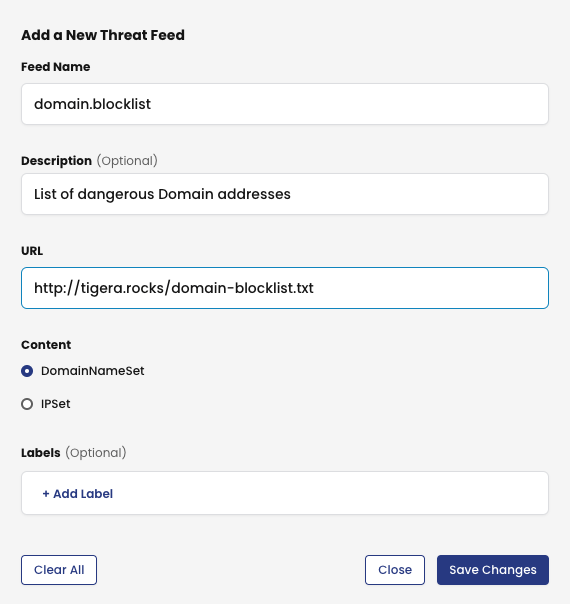
Similarly, let’s create a threat feed for a URL list. Return to Threat Defense > Threat Feeds in Calico UI and click Add Feed again. Create the domain.blocklist threat feed as follows:
To test it, I will try to reach one of the URL’s in the Threat Feed domain.blocklist list from the pod annon.
kubectl exec annon -- curl -m2 http://pushpointdelivery.com
Please wait a few minutes and check the notification on the Activity > Alerts page in the Calico UI:
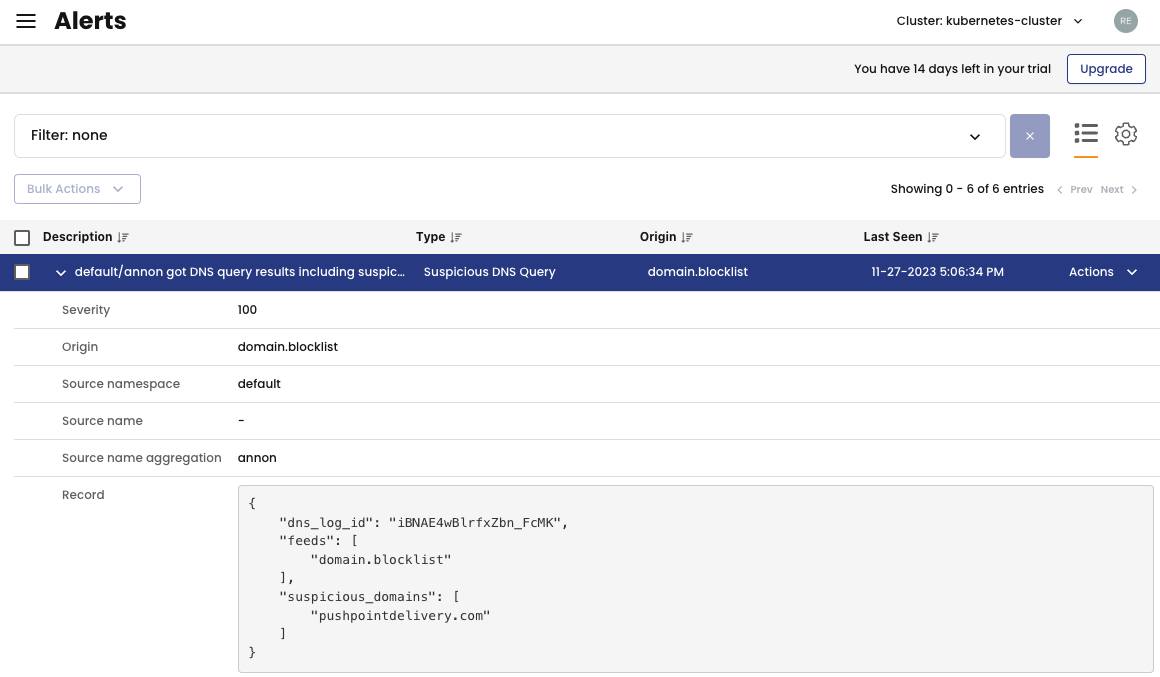
The Alerts page displays events triggered when an IP address or URL is identified on the threat feed list. Creating a Threat Feed in the Manager UI doesn’t automatically block network traffic. If you encounter suspicious IPs on the Alerts page, you must establish a network policy to block the corresponding traffic.
Intrusion Detection and Common Web Attacks Protection
Security teams must promptly conduct deep packet inspections when encountering unusual network traffic within clusters to identify potential threats. It’s crucial to selectively inspect specific workloads to optimize cluster resources and reduce the impact of false positives. Calico offers a straightforward method for packet inspection using Snort community rules. You can disable it at any time, selectively configure it for namespaces and endpoints. Alerts are generated in the Alerts dashboard in Calico Manager UI.
Security teams also require protection for cloud-native applications against application layer attacks. Calico’s workload-centric Web Application Firewall (WAF) serves as a defense, safeguarding your workloads from various application layer attacks originating within your cluster, including threats like SQL injection. Since attacks on applications are a primary cause of breaches, securing HTTP traffic within your cluster is essential. Traditionally, WAFs were deployed at the edge of clusters to filter incoming traffic. Calico’s workload-based WAF solution introduces a distinctive, cloud-native approach to web security, allowing you to implement zero-trust rules specifically for workloads inside your cluster.
Configuring Intrusion Detection
To begin, let us create a DeepPacketInspection resource and apply it to your cluster.
apiVersion: projectcalico.org/v3
kind: DeepPacketInspection
metadata:
  name: dpi-wordpress
  namespace: wordpress
spec:
  selector: app == "wordpress"
The dpi-wordpress DeepPacketInspection resource is a namespaced resource and will be created on the wordpress namespace. It will inspect all the workloads with the label app=wordpress, and in our case, only the wordpress endpoint.
Subsequently, adjust the CPU and RAM allocation for deep packet inspection by modifying the component resource in IntrusionDetection. For an effective data transfer rate of 1GB/sec on the monitored workload endpoints, it is advisable to allocate a minimum of 1 CPU and 1GB RAM. The provided example configures deep packet inspection to utilize a maximum of 1 CPU and 1GB RAM.
apiVersion: operator.tigera.io/v1
kind: IntrusionDetection
metadata:
  name: tigera-secure
spec:
  componentResources:
    - componentName: DeepPacketInspection
      resourceRequirements:
        limits:
          cpu: '1'
          memory: 1Gi
        requests:
          cpu: 100m
          memory: 100Mi
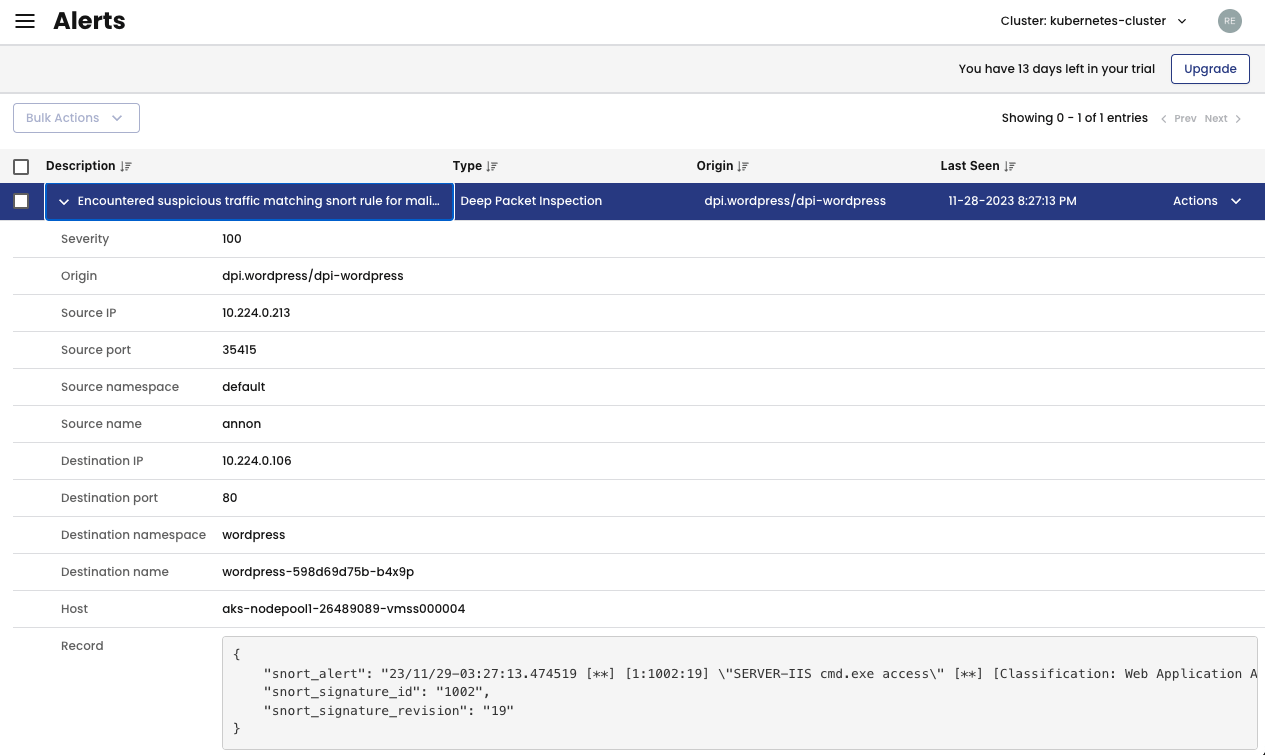
That’s it! The intrusion detection is configured for the wordpress workload. For testing purposes, I will simulate an attack from the annon pod.
kubectl exec annon -- curl -m2 http://wordpress.wordpress/cmd.exe
As a result of this attack simulation, an alert will be triggered in Calico. To view the alert, navigate to Activity > Alerts in the Calico UI.
Configuring Web Attack Protection with Calico Workload-based Web Application Firewall
The Calico Web Application Firewall is deployed in your cluster alongside the Envoy DaemonSet. Calico directs specific service traffic through Envoy, which checks HTTP requests using the industry-standard ModSecurity with OWASP CoreRuleSet, adapted for Kubernetes.
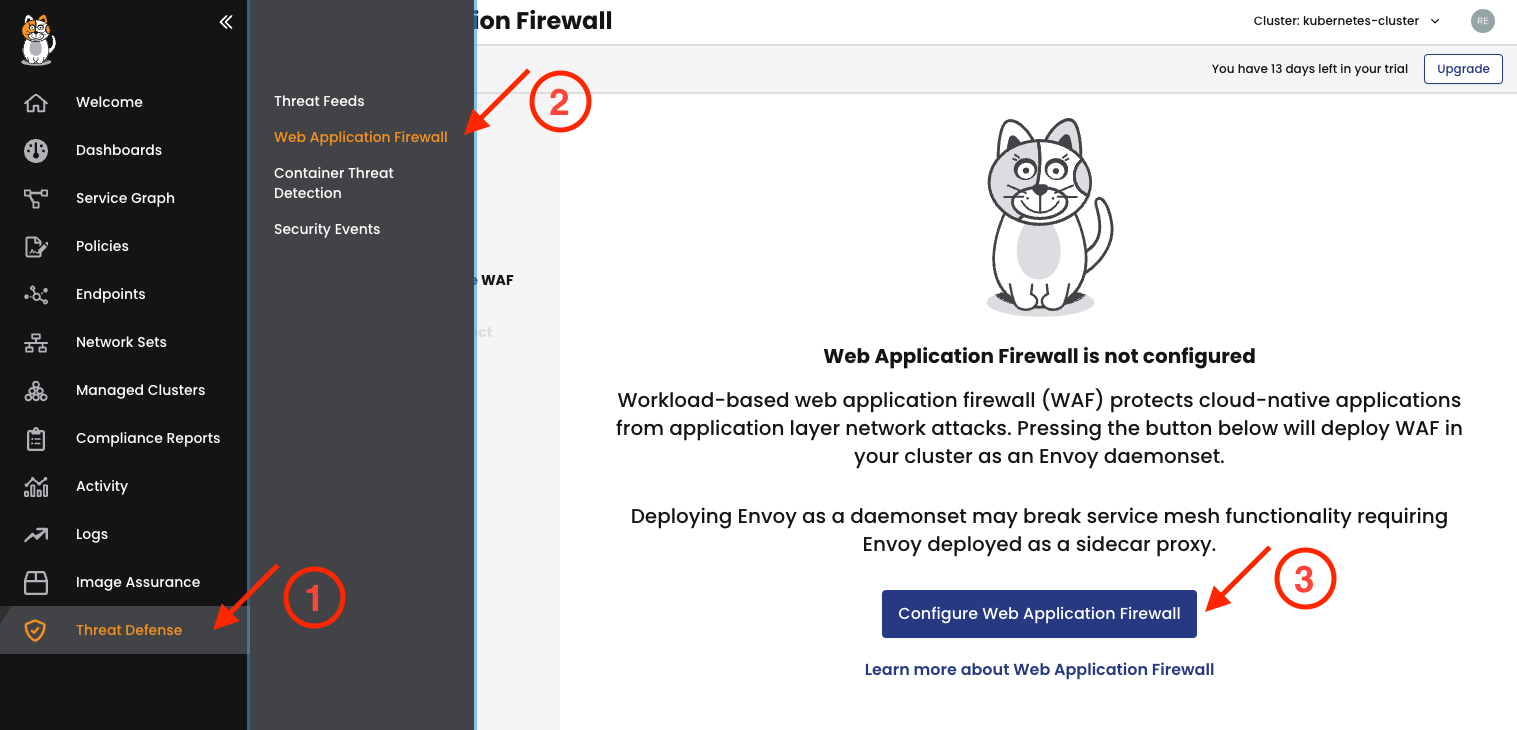
To activate the Web Application Firewall, you can use the Manager UI and pick which services you want to protect. By default, the firewall won’t block any traffic.
Let’s enable the Calico Web Application Firewall in the cluster for the wordpress service. For this, go to Threat Defense ① and select Web Application Firewall ②, then click Configure Web Application Firewall ③.
Then, select the service(s) you want to protect with the Web Application Firewall and click Confirm Selection.
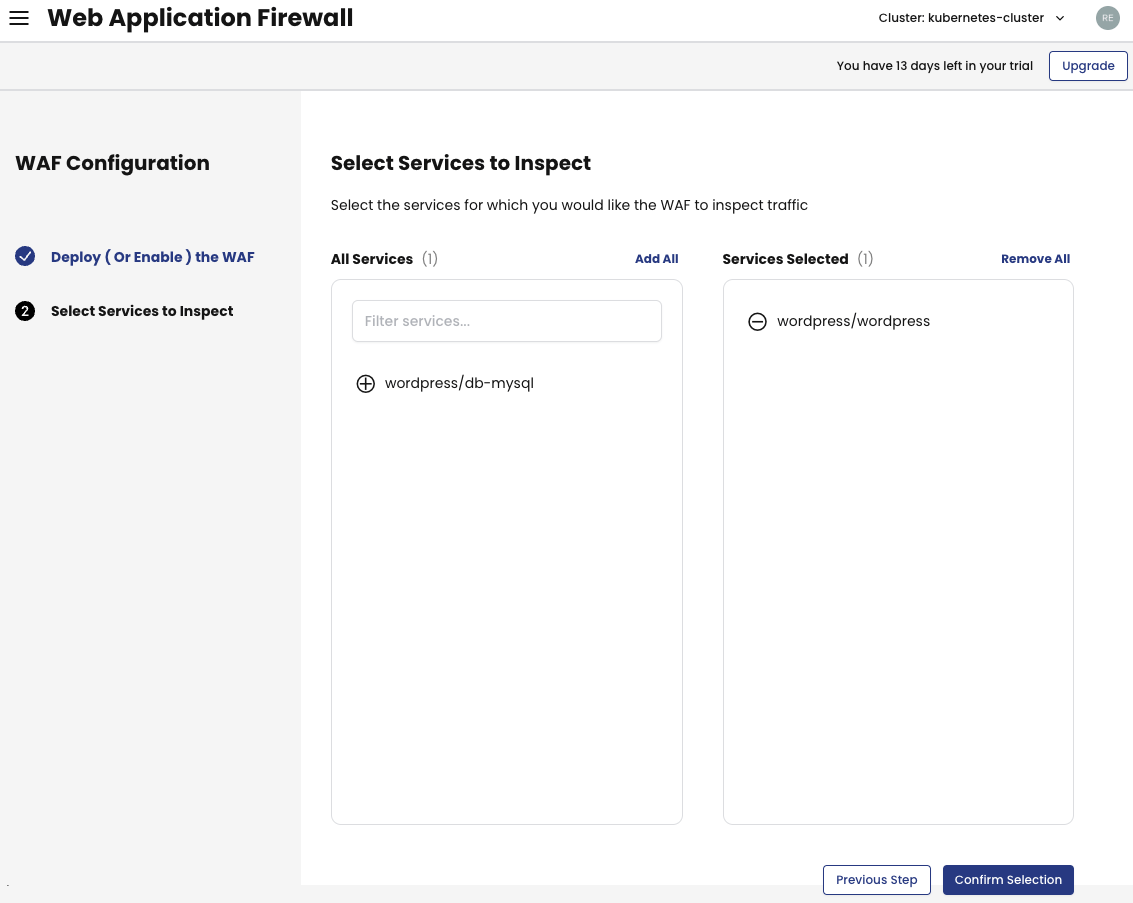
From now on, every request that goes to the wordpress service will be inspected. However, the traffic is not blocked because the WAF rule is set to DetectionOnly by default. You can adjust rules and start blocking traffic by fine-tuning your WAF.
Whenever the firewall spots a problem with a request, it creates a Security Event for you to check in the UI. This happens whether the traffic is allowed or blocked, and it helps you adjust the firewall settings later.
Let’s test it by running a simple curl command from the annon pod inside the cluster targeting the wordpress service, which you have selected for WAF protection.
kubectl exec annon -- curl -m2 http://wordpress.wordpress/cart?artist=0+div+1+union%23foo*%2F*bar%0D%0Aselect%23foo%0D%0A1%2C2%2Ccurrent_user
This HTTP request is designed to simulate an SQL injection attack within the cluster. The query string used in this example contains SQL syntax embedded in the text. It’s important to note that this is done for demonstration purposes, and the embedded SQL syntax is harmless. However, the Web Application Firewall (WAF) is configured to detect this specific pattern, and as a result, it will generate an event in response to this HTTP request.
When the WAF detects this “attack” a Security Event will be created. You can visualize the Security Event in the Calico UI on Threat Defense > Security Events.
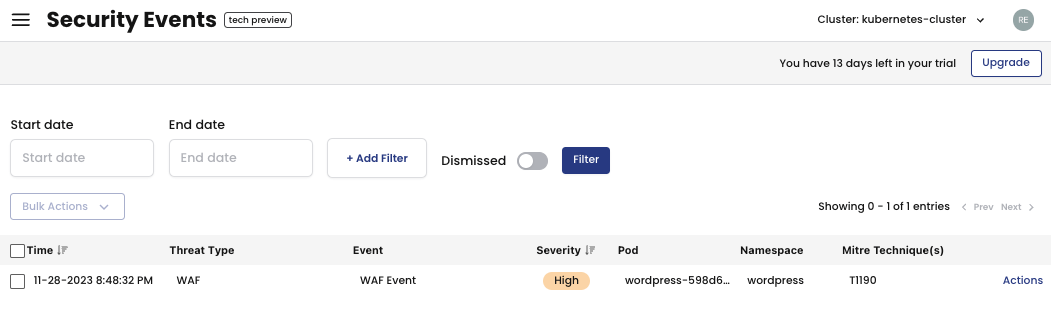
You can see the details for the WAF Security Event by clicking on it. The WAF Event window will open, showing all the details about the attack.
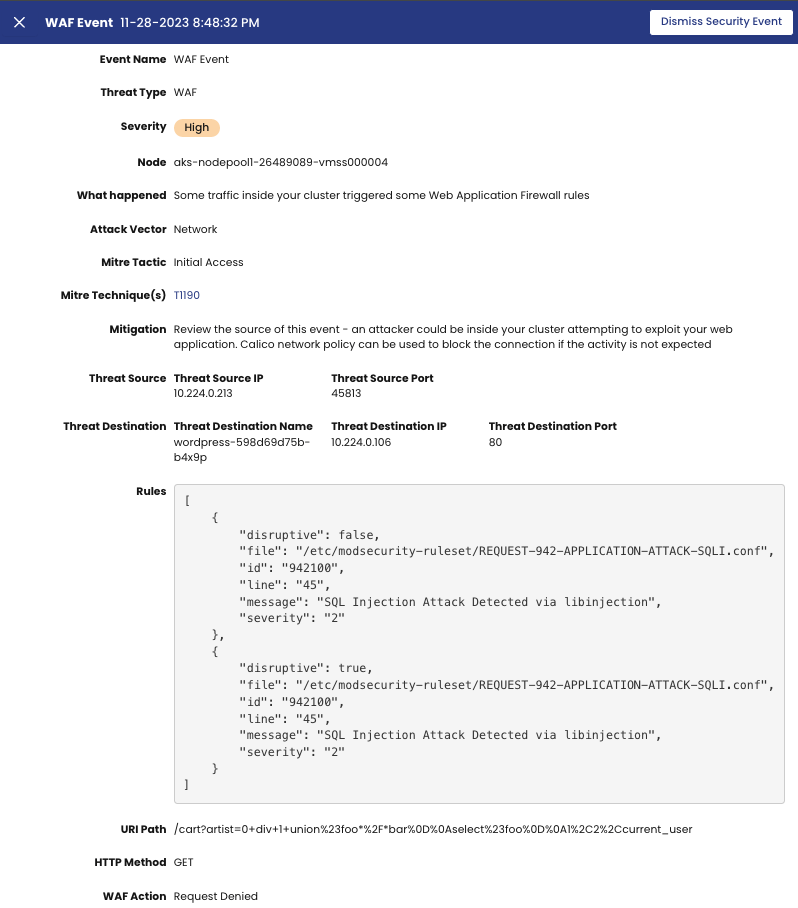
The rules for the ModSecurity can be customized according to your needs. If you plan to modify the rules significantly, it is advisable to download the files locally and make the necessary changes before replacing the configmap. In OWASP, it is recommended that you disable rules or modify configuration by editing specific metadata files and exclusion files rather than modifying any of the main rule files directly. However, you can replace the entire ruleset with your custom set of rules as long as they are written in the same SecRule syntax that ModSecurity understands. We suggest keeping a safe version of your rule files in version control, such as git.
Benefits of using Calico for logging network security events
Calico provides a comprehensive set of features that contribute to a robust network security framework for containerized workloads within Kubernetes. Its capabilities for logging, alerting, and threat intelligence integration aid organizations in maintaining a secure and well-monitored Kubernetes environment, with the following benefits to be highlighted:
Visibility into Network Security Events
Calico allows for the generation of flow logs and audit logs, providing detailed insights into network traffic within the Kubernetes cluster. These logs enable administrators to monitor and analyze network security events, helping to identify anomalies, potential security threats, and unauthorized activities.
Real-time Threat Intelligence Integration
Calico seamlessly integrates with external threat intelligence feeds, allowing for the dynamic updating of security policies in real-time. By tapping into Threat Feeds, Calico proactively blocks communication with recognized malicious IP addresses and URLs. This feature significantly strengthens the cluster’s resilience against external threats.
Comprehensive Auditing and Compliance Tools
Calico offers a suite of tools dedicated to auditing and ensuring compliance with established security policies and industry regulations. Reporting and monitoring features empower organizations to thoroughly evaluate and uphold the security posture of their Kubernetes clusters.
Intrusion Detection and Web Application Firewall
Calico provides intrusion detection capabilities through deep packet inspection using Snort community rules. This allows security teams to selectively inspect specific workloads, optimizing cluster resources and reducing false positives. The workload-centric WAF protects against application layer attacks, enhancing security for cloud-native applications within the Kubernetes cluster.
Alerting Mechanisms for Policy Violations
Calico allows the creation of alerts that notify administrators of network policy violations. These alerts can be exported to external entities such as Security Information and Event Management (SIEM) or Security Orchestration, Automation, and Response (SOAR) platforms for further analysis and action.
Alerts provide real-time notifications of unusual or unexpected behaviour in the communication of workloads, allowing for prompt responses to potential security incidents.
Conclusion
In this multi-part blog series, we are exploring some of the limitations of Kubernetes network policies and how you can overcome them using Calico. In this post, we delved into a crucial use case: the ability to log network security events.
In the upcoming blog post, we will discuss the limitations of native Kubernetes network policies, specifically the ability to explicitly deny policies. We’ll showcase how Calico addresses this issue by employing advanced capabilities of its security policies and its ability to take many other actions in a rule other than Allow. Stay tuned!
Ready to try Calico network security events logging and alerting? Sign up for a free trial of Calico Cloud
Join our mailing list
Get updates on blog posts, workshops, certification programs, new releases, and more!