The concern about securing the clusters has grown exponentially and one of the ways to secure it is by isolating the cluster from the Internet to lower the risk of eventual attack. Enterprises that deal with confidential customer data and work with regulatory agencies, such as financial and insurance institutions, require air gap environments for their clusters to create highly secure environments.
What’s an air gap?
The air gap is a security configuration in which the cluster, network, or workload will not have access to the Internet, unless it is explicitly authorized to do so. It is a highly controlled environment and prevents the cluster from establishing external connections without prior authorizations.
The diagram below shows an air gap network:
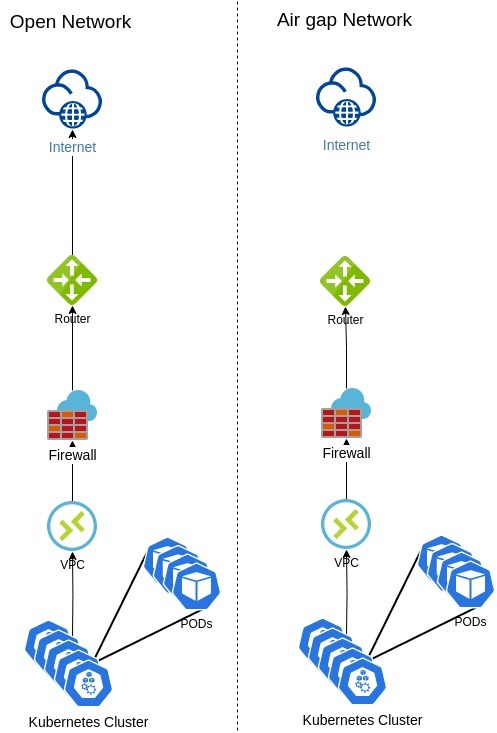
In a containerized environment, the cluster needs to pull the images for spinning up containers and it is usually done by pulling the images from a repository located on the cloud or Internet. However, as the air gap network doesn’t have access to the Internet, pulling images from the Internet is not possible. To address this situation, it is necessary to create a private registry/repository in the air gap network and pull all required images for the cluster into this private registry, rather than pulling the image from the Internet, the cluster will pull them from a local repository placed on the air gap network.
Calico Cloud supports the air gap installation, which we will go into more detail in this blog.
Setting up the prerequisites
In order to install Calico Cloud from a private registry, some prerequisites need to be met as below:
- Helm charts installation is the only way to install Calico Cloud from a private registry, therefore, helm must be installed in the machine from where the installation will be triggered.
- The cluster must have the CNI installed and if you want to install the Calico CNI, follow this documentation: Install Calico.
Setting up a private registry
One of the most well-known private registry is by deploying the Docker registry container. Let’s look at an example based on the Docker registry.
The prerequisites for installing the Docker private registry:
- On the Linux server in which the private registry will be configured, install docker as per this documentation.
- Deploy the Docker registry container in the private registry server as per the documentation.
- The Docker registry container will only accept access from the localhost IP address. In order to make it accessible from the cluster, the TLS certificate needs to be configured to encrypt the traffic between the cluster and the private registry container. Follow the documentation to configure the certificate in the docker registry container.
You can also add the following:
- Authentication on the Docker registry container as per the documentation.
- Self-signed certificates are only recommended for non-production clusters. You can generate the certificate and configure it in the Docker registry container and in the Kubernetes cluster as per this documentation.
Pull images to the private registry
After finishing the configuration for the Docker registry container, the Calico Cloud images need to be pulled into the private registry container and this way the cluster will be able to pull the image from it.
1. To pull the images from Calico Cloud, log into Docker with a user that has permission to pull out the private registry. Go to Calico Cloud UI > Managed Clusters and click on the ![]() icon to obtain the user and password needed to pull the Calico Cloud Images.
icon to obtain the user and password needed to pull the Calico Cloud Images.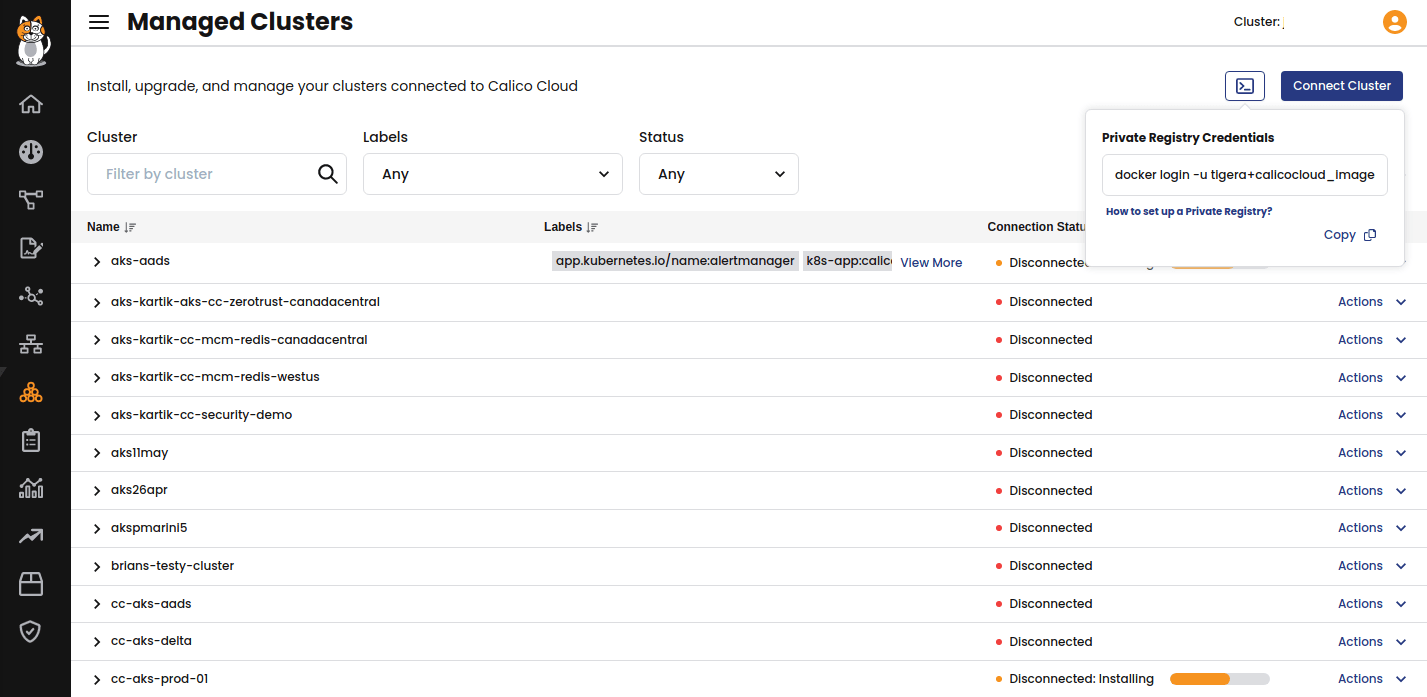
Copy the following command and paste it into the Linux server that is running the private registry container:
docker login -u tigera+calicocloud_images -p <PASSWORD> quay.io
2. As the helm is required, first add the calico-cloud charts to the helm repo:
helm repo add calico-cloud https://installer.calicocloud.io/charts
3. Export the installer image to the variable INSTALLER_IMAGE:
INSTALLER_IMAGE="us-docker.pkg.dev/tigera-prod-01/calico-cloud-public/cc-operator:$(helm show chart calico-cloud/calico-cloud | grep version: | sed -e 's/version: *//' -e 's/+/-g/')"
4. Create an array containing all images required to install Calico Cloud plus the Installer image:
IMAGES=(
$INSTALLER_IMAGE
quay.io/tigera/operator:v1.29.4
quay.io/tigera/cnx-apiserver:v3.16.1
quay.io/tigera/compliance-benchmarker:v3.16.1
quay.io/tigera/compliance-controller:v3.16.1
quay.io/tigera/compliance-reporter:v3.16.1
quay.io/tigera/compliance-snapshotter:v3.16.1
quay.io/tigera/deep-packet-inspection:v3.16.1
quay.io/tigera/fluentd:v3.16.1
quay.io/tigera/fluentd-windows:v3.16.1
quay.io/tigera/guardian:v3.16.1
quay.io/tigera/intrusion-detection-controller:v3.16.1
quay.io/tigera/packetcapture:v3.16.1
quay.io/tigera/egress-gateway:v3.16.1
quay.io/tigera/l7-collector:v3.16.1
quay.io/tigera/envoy:v3.16.1
quay.io/tigera/prometheus:v3.16.1
quay.io/tigera/prometheus-service:v3.16.1
quay.io/tigera/alertmanager:v3.16.1
quay.io/tigera/cnx-queryserver:v3.16.1
quay.io/tigera/kube-controllers:v3.16.1
quay.io/tigera/cnx-node:v3.16.1
quay.io/tigera/typha:v3.16.1
quay.io/tigera/cni:v3.16.1
quay.io/tigera/cloud-controllers:v3.16.1
quay.io/tigera/es-gateway:v3.16.1
quay.io/tigera/calico-windows-upgrade:v3.16.1
quay.io/tigera/dikastes:v3.16.1
quay.io/tigera/pod2daemon-flexvol:v3.16.1
quay.io/tigera/csi:v3.16.1
quay.io/tigera/node-driver-registrar:v3.16.1
quay.io/tigera/key-cert-provisioner:v1.1.7
quay.io/tigera/image-assurance-admission-controller:v1.6.2
quay.io/tigera/image-assurance-operator:v1.6.2
quay.io/tigera/image-assurance-container-runtime-adaptor:v1.6.2
quay.io/tigera/runtime-security-operator:v1.6.0
quay.io/tigera/skimble:v1.6.0
quay.io/tigera/cc-core:v0.1.5
quay.io/tigera/prometheus-operator:v3.16.1
quay.io/tigera/prometheus-config-reloader:v3.16.1
alpine:3.12.1
)
Please note that the images will vary depending on the Calico Cloud version, so getting the latest version from the documentation is highly recommended.
To verify if the array contains all images, run a look in the IMAGES array to print them:
for image in ${IMAGES[@]}; do echo $image; done
5. Export the variables below to the registry and image path:
REGISTRY=<replace with your registry and include a trailing slash>
IMAGEPATH=""
If all images come from the same path in the registry, set it as blank “”, otherwise, insert the custom path.
6. To upload the images into the private registry, you can use `crane` as per the loop below or customize another loop or way to upload the images.
for image in ${IMAGES[@]}; do
 img_base=$(echo ${image} | sed "s#^.*/\([^/]*/[^/]*$\)#\1#")
 crane cp ${image} ${REGISTRY}${img_base} || break
done
Install Calico Cloud through the private registry
After uploading the images to the private registry, open Calico Cloud UI > Managed Clusters and click Connect Cluster.
Provide the name and type of the cluster. Click on Advanced Options and select Install via helm and Private registry. Type the Image Registry and optionally, the Image Path and Registry Secret Name if needed.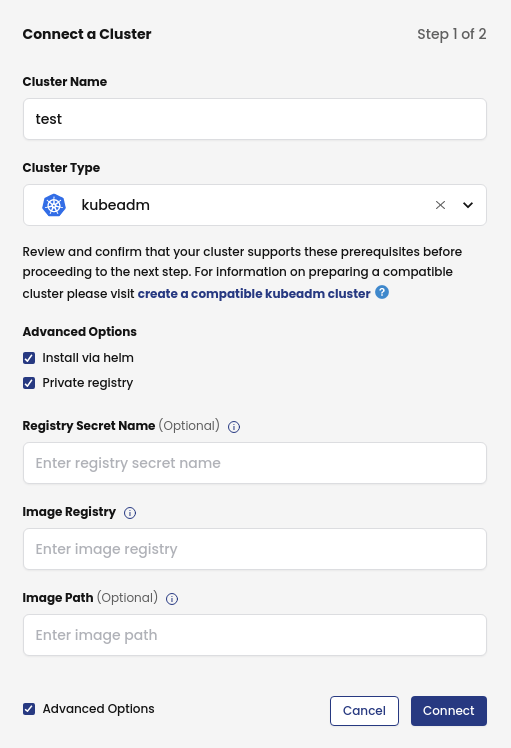
Click on Connect and the next screen will provide the command to run in the cluster to install Calico Cloud from the defined private registry.
Conclusion
The Calico Cloud installation will be done without accessing the Internet and the cluster will be isolated and secured from external/public attacks and threats. With Calico Cloud, you can secure your Kubernetes and containerized workload environment, effectively reduce the attack surface using zero-trust security, monitor for both known and zero-day threats on an ongoing basis, and mitigate breaches by dynamically responding to threats.
Want to learn more? Get started with a free Calico Cloud trial.
Join our mailing list
Get updates on blog posts, workshops, certification programs, new releases, and more!