FortiGate firewalls
FortiGate firewalls are highly popular and extensively utilized for perimeter-based security in a wide range of applications, including monolithic applications developed and deployed using the traditional waterfall model. These firewalls establish a secure perimeter around applications, effectively managing inbound and outbound traffic for the organization. FortiGate relies on IP addresses for implementing “allow/deny” policies.
The use of IP addresses is effective for non-cloud native applications, where static IP addresses serve as definitive network identifiers. However, in a Kubernetes environment, workloads have dynamic IP addresses that change whenever they are restarted or scaled out to different nodes. This dynamic nature poses challenges when utilizing FortiGate with Kubernetes workloads, requiring continuous updates to firewall rules and the opening of large CIDR ranges for node-based access. This introduces security and compliance risks, as workloads running on these CIDR ranges gain unrestricted access to external or public services.
To facilitate the usage of FortiGate firewalls with Kubernetes workloads, it becomes crucial to identify workloads that necessitate access to external resources and assign them fixed IP addresses for utilization in FortiGate firewall rules. The integration of Calico with FortiGate firewalls and FortiManager offers an elegant solution, enabling the use of FortiGate firewalls while retaining existing controls and adapting current tools to the Kubernetes environment. This integration provides two options for seamless operation:
- Calico integration with FortiGate firewalls.
- Calico integration with FortiManager.
The subsequent sections will delve into these integrations in detail.
Calico integration with FortiGate devices:
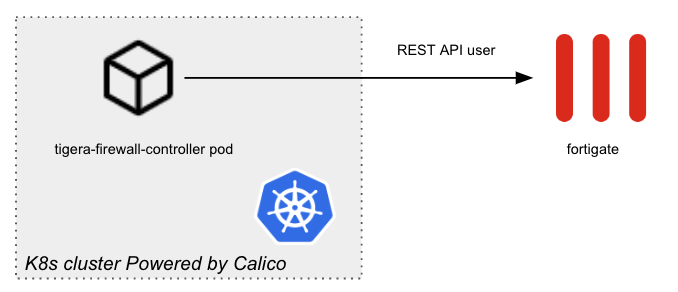
Calico allows you to maintain the same workload access controls in place by using the IP address of the microservices at a particular moment in time. These IPs are pushed to the FortiGate devices, which are then updated to ensure that the firewall rules stay valid. Below we depict how this integration would work:
A summarized sequence of steps to enable this integration is as follows:
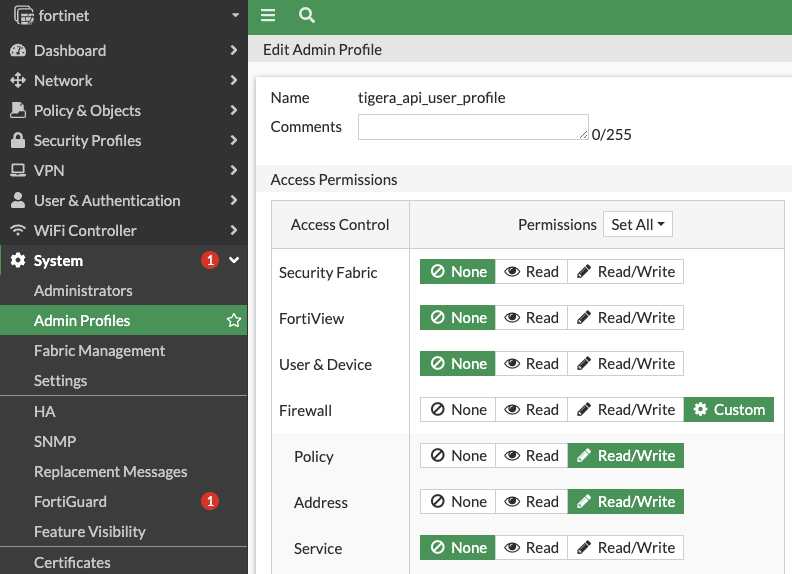
- A REST API administrator must be created in the FortiGate device. This is the user the Tigera firewall controller will leverage to make CRUD (Create, Read, Update and Delete) operations for the address groups in the firewall. We should associate a profile to this user that only can access Policy & Objects resources:

- We must capture this information in a kubernetes secret.
- Additionally, we must create a configmap where we specify the details on how to connect to the FortiGate firewall (there could be multiple devices listed there). Such configmap will make reference to the secret we previously configured:
$ kubectl get cm -n tigera-firewall-controller tigera-firewall-controller-configs -oyaml
apiVersion: v1
kind: ConfigMap
metadata:
  name: tigera-firewall-controller-configs
  namespace: tigera-firewall-controller
data:
  tigera.firewall.fortigate: "- name: fortinetn  ip: 172.16.1.160n  apikey: n    secretKeyRef:n
         name: fortigaten      key: apikey-fortigaten"
  tigera.firewall.fortimgr: |
First configmap manifest used by Tigera Firewall Controller
- As part of the configuration, we must create a second config map which will determine how these addresses will be advertised to the FortiGate device, as we can decide to use the node IP to advertise those (likely if we are using an overlay), or actually advertise the current pod addresses if we are using a flat network (as we can advertise these addresses to the FortiGate device from Calico by means of BGP, if required). In our case we will advertise the current pod addresses to FortiGate:
$ kubectl get cm -n tigera-firewall-controller tigera-firewall-controller -oyaml
apiVersion: v1
kind: ConfigMap
metadata:
  name: tigera-firewall-controller
  namespace: tigera-firewall-controller
data:
  tigera.firewall.addressSelection: pod
  tigera.firewall.policy.selector: projectcalico.org/tier == 'fortinet'
Second Configmap manifest used by Tigera Firewall Controller
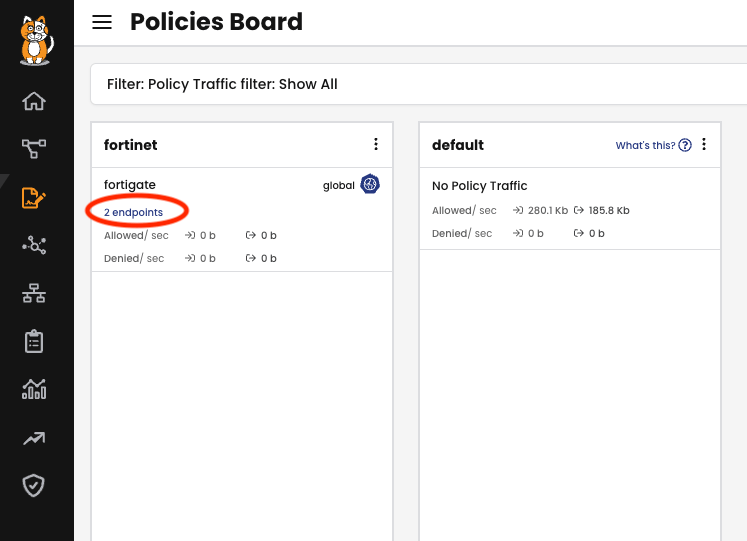
This same config map will determine which Calico Tier resource will be used to control the pods we want to include in these address groups at Fortinet side. In our case, this Tier is called “fortinet”, and it is matching two endpoints:
Calico lets you create policy tiers for such situations. For more information on policy tiers in Calico, please check this link.
The policy that matches these endpoints is a Global Policy, which allows all traffic coming from them (the enforcement would be done in the FortiGate firewall). The Calico policy’s purpose is to select the endpoints from which we will advertise the address to the Fortinet firewall.
$ kubectl get globalnetworkpolicies.crd fortinet.fortigate -oyaml
apiVersion: crd.projectcalico.org/v1
kind: GlobalNetworkPolicy
metadata:
  labels:
    projectcalico.org/tier: fortinet
  name: fortinet.fortigate
spec:
  egress:
  - action: Allow
    destination: {}
    source: {}
  order: 0
  selector: app == "app2"
  tier: fortinet
  types:
  - Egress
Global Network Policy manifest
- Then, we must apply some standard manifests to deploy the Tigera firewall controller deployment as part of the procedure. This controller uses the configmap mentioned earlier to communicate with the FortiGate firewall.
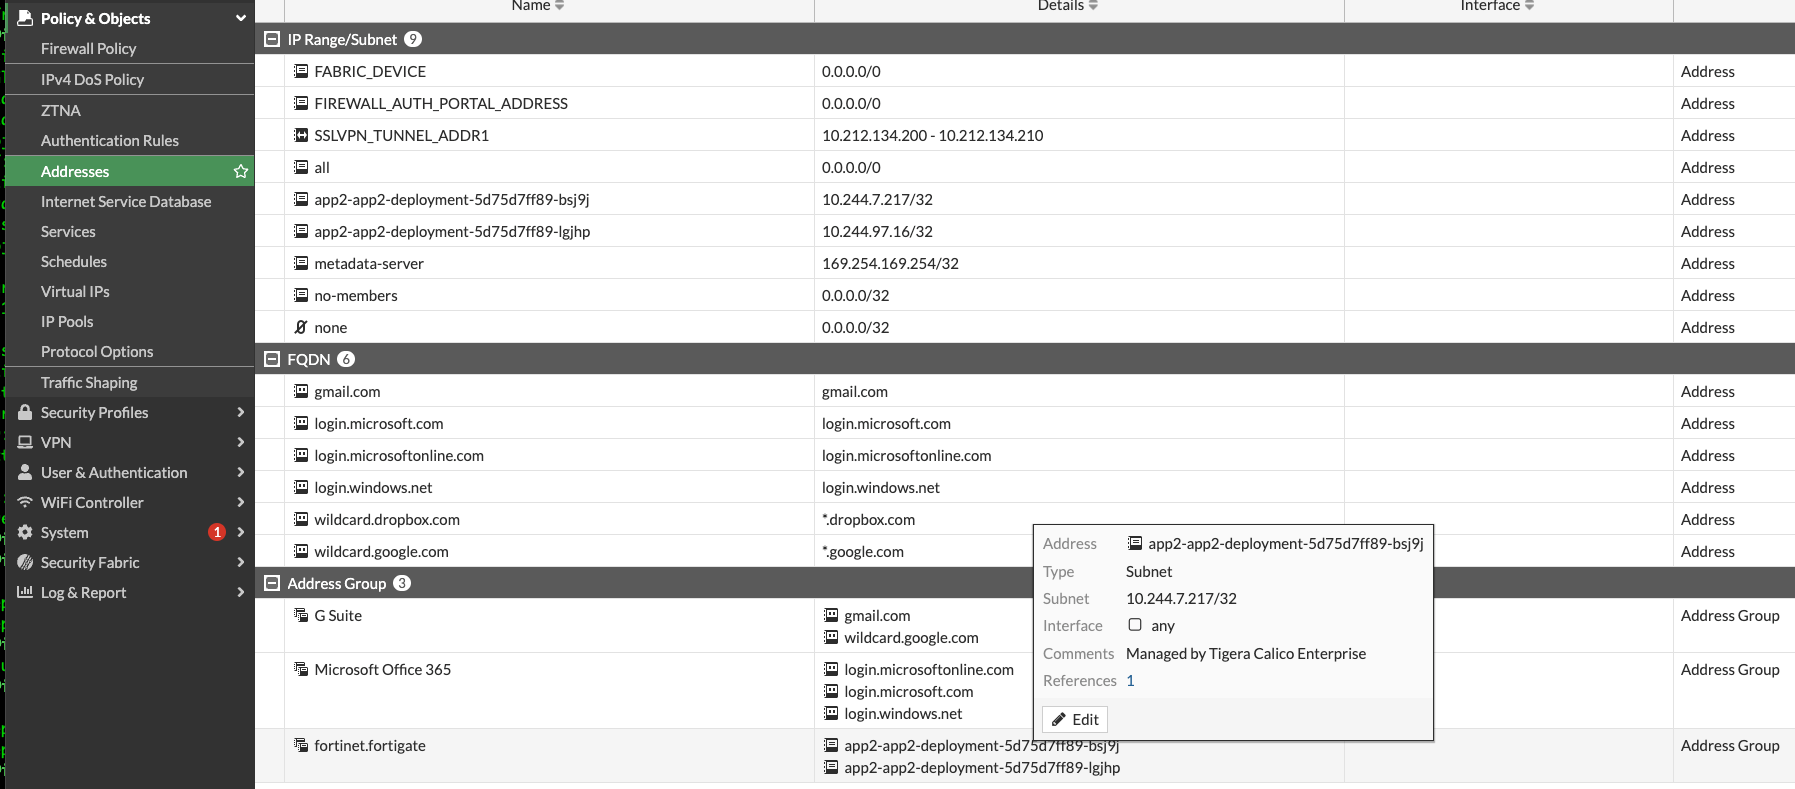
As a result of this process, the IP address of the pods will be available in the FortiGate device as an address group that we can use in the firewall rules. This effectively maintains the same paradigm where an application can be associated with a particular IP when traversing the firewall:
$ kubectl get pod -n app2 -ocustom-columns="NAME":.metadata.name,"IP":.status.podIP
NAME                               IP
app2-deployment-5d75d7ff89-bsj9j   10.244.7.217
app2-deployment-5d75d7ff89-lgjhp   10.244.97.16
Pod output from kubectl command
For a detailed step-by-step configuration, please go to this link.
Calico integration with FortiManager:
An alternative to pushing the IP address of selected pods to our firewall devices is to use our existing tools to implement microsegmentation at the pod level within our kubernetes environment. This is achieved by creating rules in FortiManager, which are then implemented as Calico security policies in kubernetes.
A summarized sequence of steps to enable this integration is as follows:
- A REST API administrator must be created in FortiManager. We will associate a profile to this user with read/write access to Policy & Objects only:

- This same configuration must be captured in a kubernetes secret.
- Then we will have a configmap where we specify the details on how to connect to FortiManager, and we will make reference to the secret we previously configured:
$ kubectl get cm -n tigera-firewall-controller tigera-fortimanager-controller-configs -oyaml
apiVersion: v1
kind: ConfigMap
metadata:
  name: tigera-fortimanager-controller-configs
  namespace: tigera-firewall-controller
data:
  tigera.firewall.fortimanager-policies: |
    - name: fortimgr
      ip: 172.16.1.149
      username: tigera_ew_fortimanager_admin
      adom: root
      packagename: calico-ew
      tier: fortimanager
      password:
        secretKeyRef:
          name: fortimgr
          key: pwd-fortimgr
Configmap manifest used by Tigera Firewall Controller in this integration
Part of the configuration is specifying the ADOM, and Packagename we are using in FortiManager. Similarly to the previous integration, we need to specify a Calico Tier resource, but this time it will be used as the destination Tier for all Calico policies we create based on the configuration done on FortiManager.
- Once this is done, we must apply some standard manifests to deploy the Tigera firewall controller deployment as part of the procedure. This controller uses the configmap mentioned above to communicate with the FortiManager device.
How are firewall rules created in FortiManager mapped to Calico policies?
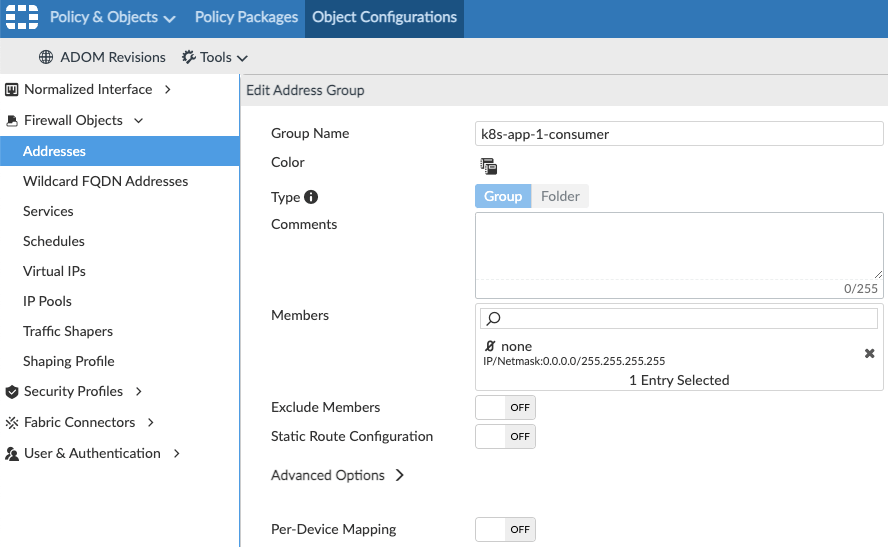
With Calico, we use native Kubernetes mechanisms such as labels to select the pods we want to secure, or to match the traffic. Therefore, the first step is to define the address groups in FortiManager. These address groups must be empty because those endpoints exist as pods in our Kubernetes cluster. Let’s take the following diagram as an example:
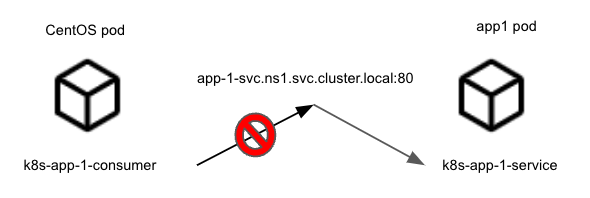
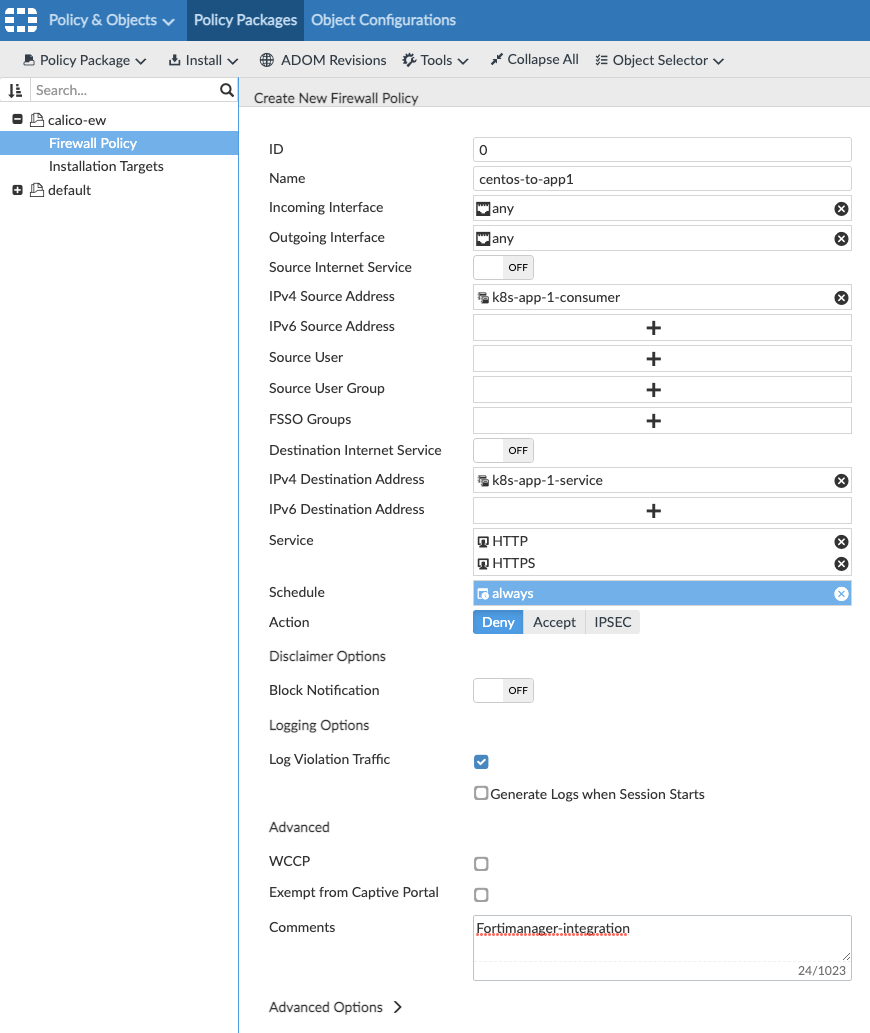
In the example above, we want to restrict the traffic from the CentOS pod to the app1 pod, which is exposed through the app-1-svc.ns1.svc.cluster.local kubernetes service. We must create two corresponding address groups in FortiManager. Those are called k8s-app-1-consumer, and k8s-app-1-service:


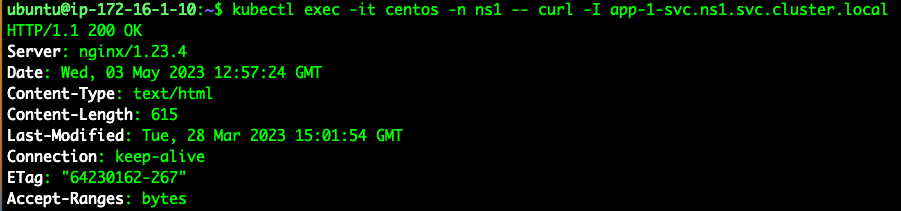
Before configuring anything else, we can see the CentOS pod can reach the app-1 service:
Now let’s create a rule to restrict this traffic. We use the address groups as source and destinations for this flow:
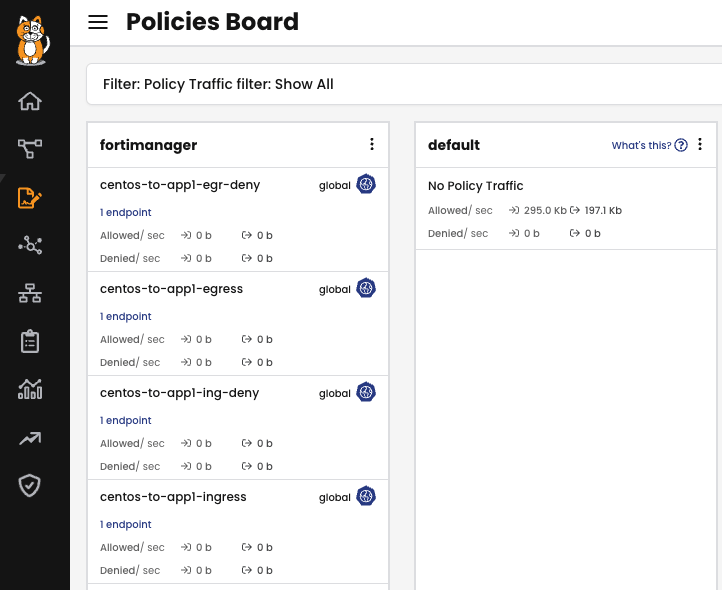
If we follow the logs in the Tigera firewall controller pod, four policies are being created:

Two policies are being implemented for ingress and two for egress. For each direction, one policy will represent the traffic we configure in FortiManager, and the second policy will deny all other traffic (so this second policy will cover any case where an allow rule is created):
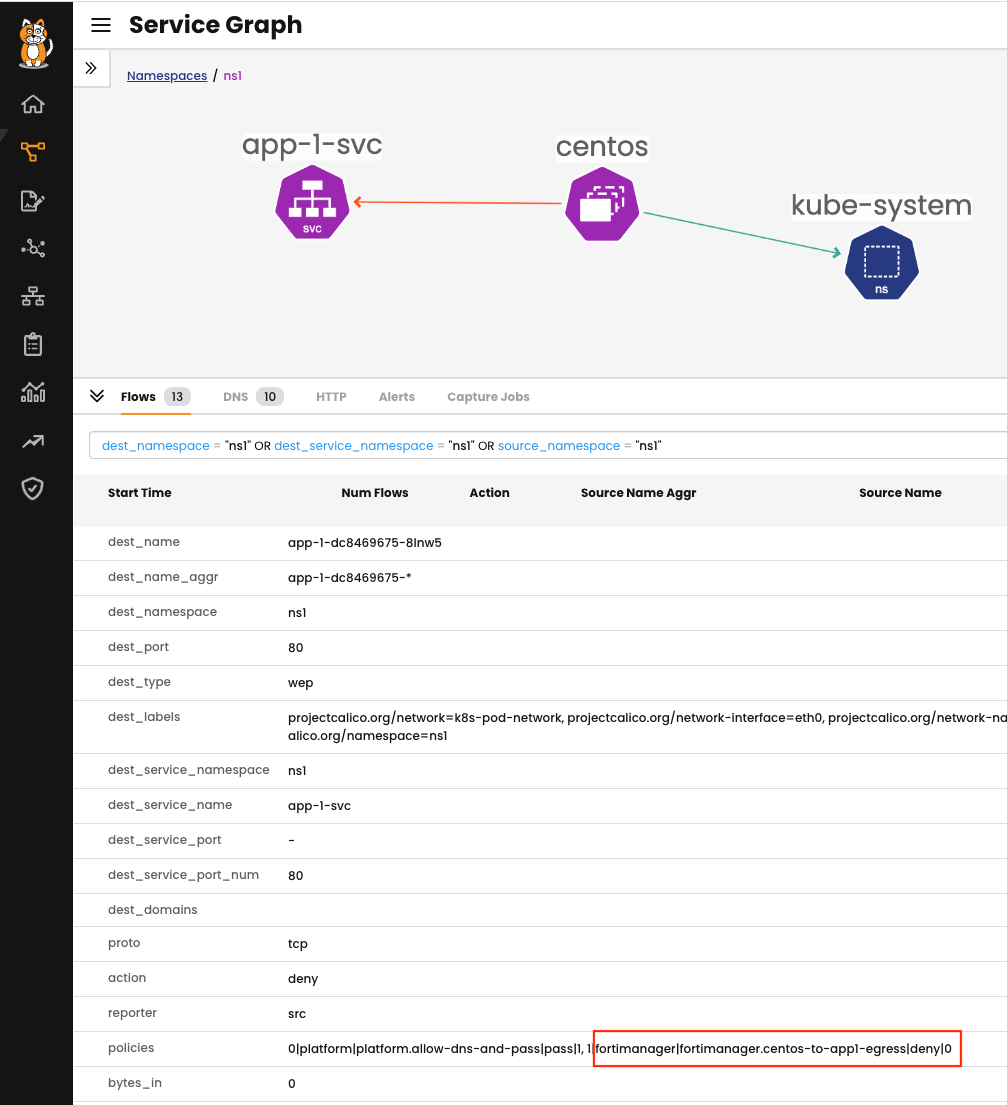
If we attempt to connect again, the CentOS pod will be unable to reach the app-1 service. By checking Calico Service Graph, we can see that the request went through two policies. The first policy “allow-dns-and-pass” allows the CenTOS pod to reach coredns server, but the second policy highlighted in the output below (“centos-to-app1-egress”) which belongs to the “fortimanager” Tier, denies the connectivity, as expected:
For a detailed step-by-step configuration for this integration, head to our documentation page here.
Conclusion
This blog describes Calico’s integration with Fortinet’s FortiGate and FortiManager solutions to extend the firewall capability to Kubernetes. This integration will benefit teams that are migrating their legacy applications to cloud-native in a secure manner and protect non-Kubernetes workloads outside the cluster with familiar workflows and less firewall rules.
Ready to get started? Try Calico Cloud for free.