Serverless computing is all the rage at the moment, and why wouldn’t it be? The idea of deploying code without having to worry about anything like servers, or that pesky infrastructure everyone complains about seems pretty appealing. If you’ve ever used AWS lamdba or one of its related cousins, you’ll be able to see the freedom that triggering functions on events brings you.
The increase in excitement around serverless frameworks means that naturally, there’s been an increase in providers in the Kubernetes world. A quick look at the CNCF Landscape page shows just how many options there are to Kubernetes cluster operators.
In this post I wanted to look at Kubeless, a serverless framework written by the awesome people at Bitnami.
Kubeless appealed to me specifically for a few reasons:
- Native Kubernetes resources (CRDs) for functions, meaning that standard Kubernetes deployment constructs can be used
- No external dependencies to get started
- Support for PubSub functions without having to manually bind to messages queues etc
- Lots of language support with the runtimes
Before you get started with this, you’ll probably want to follow the Quick Start as well as get an understanding of how the PubSub functions work.
To follow along here you’ll need:
- A working kubeless deployment, including the kubeless cli
- A working NATS cluster, perhaps using the NATS Operator.
- You’ll also need the as the Kubeless NATS Trigger installed in your cluster.
In this walkthrough, I wanted to show you how easy it is to get Kubernetes events (in this case, pod creations) and then use kubeless to perform actions on them (like post to a slack channel).
I’m aware there are tools out there that already fulfill this function (ie events to slack) but I figured it was a good showcase of what can be done!
Publishing Kubernetes Events
Before you can trigger kubeless functions, you first need to have events from Kubernetes published to your NATS cluster.
To do this, I used the excellent kubernetes python library
An easy way to do this is simply connect to the API using the in_cluster capabilities and then list all the pods, like so:
from kubernetes import client, config, watch
def main():
# use your machines kubeconfig
config.load_kube_config()v1 = client.CoreV1Api()w = watch.Watch()
for event in w.stream(v1.list_pod_for_all_namespaces):
print(“Event: %s %s %s” % (event[‘type’], event[‘object’].kind, event[‘object’].metadata.name))main()
This simple script will log all the information for pods in all namespaces to stdout. It can be run on your local machine, give it a try!
The problem with this is that it’s just spitting information to stdout to test locally, so we need to publish this events to NATS. In order to do this, we’ll use the python aysncio-nats libarary
Now, your script has gotten much more complicated:
import asyncio
import json
import osfrom kubernetes import client, config, watchfrom nats.aio.client import Client as NATS
from nats.aio.errors import ErrConnectionClosed, ErrTimeout, ErrNoServers# connect to the cluster defined in $KUBECONFIG
config.load_kube_config()# set up the kubernetes core API
v1 = client.CoreV1Api()

# created a method that runs async
async def run(loop):
# set up NATS connection
nc = NATS()
try:
# connect to a NATS cluster on localhost
await nc.connect(‘localhost:4222’, loop=loop)
except Exception as e:
exit(e)

# method to get pod events async
async def get_pod_events():
w = watch.Watch()
for event in w.stream(v1.list_pod_for_all_namespaces):
print(“Event: %s %s %s” % (event[‘type’], event[‘object’].kind, event[‘object’].metadata.name))
msg = {‘type’:event[‘type’],’object’:event[‘raw_object’]}

# publish the events to a NATS topic k8s_events
await nc.publish(“k8s_events”, json.dumps(msg).encode(‘utf-8’))
await asyncio.sleep(0.1)

# run the method
await get_pod_events()
await nc.close()

if __name__ == ‘__main__’:

# set up the async loop
loop = asyncio.get_event_loop()
loop.create_task(run(loop))
try:
# run until killed
loop.run_forever()
print(“Event: %s %s %s” % (event[‘type’], event[‘object’].kind, event[‘object’].metadata.name))
# if killed by keyboard shutdown, clean up nicely
except KeyboardInterrupt:
print(‘keyboard shutdown’)
tasks = asyncio.gather(*asyncio.Task.all_tasks(loop=loop), loop=loop, return_exceptions=True)
tasks.add_done_callback(lambda t: loop.stop())
tasks.cancel()

# Keep the event loop running until it is either destroyed or all
# tasks have really terminated
while not tasks.done() and not loop.is_closed():
loop.run_forever()
finally:
print(‘closing event loop’)
loop.close()
Okay, so now we have events being pushed to NATS. We need to fancy this up a bit, to allow for running in and out of cluster, as well as building a Docker image. The final script can be found here. The changes are to include a logger module, as well as argparse to allow for running in and out of the cluster, as well as make some options configurable.
You should now deploy this to your cluster using the provided deployment manifests, which also include the (rather permissive!) RBAC configuration needed for the deployment to be able to read pod information from the API.
kubectl apply -f http://raw.githubusercontent.com/jaxxstorm/kubeless-events-example/master/manifests/events.yaml
This will install the built docker container to publish events to the NATS cluster configured earlier. If you need to, modify the environment variable NATS_CLUSTER if you deployed your NATS cluster to another address.
Consuming Events with Kubeless functions
So now the events are being published, we need to actually do something with them. Let’s first make sure the events are coming in.
You should have the kubeless cli downloaded by now, so let’s create a quick example function to make sure the events are being posted.
def dump(event, context):
print(event)
return(event)
As you can probably tell, this function just dumps any event sent to it and returns. So let’s try it out. With kubeless, let’s deploy it:
kubeless function deploy test –runtime python3.6 –handler test.dump –from-file functions/test.py -n kubeless
What’s happening here, exactly?
- runtime: specify a runtime for the function, in this case, python 3.6
- from-file: path to your file containing your function
- handler: this is the important part. A handler is the kubeless function to call when an event is received. It’s in the format
<filename>.<functionname>. So in our case, our file was calledtest.pyand our function was calleddump, so we specifytest.dump. - namespace: make sure you specify the namespace you deployed kubeless to!
So you should now have a function deployed:
kubeless function ls -n kubeless
NAME	NAMESPACE	HANDLER		RUNTIME		DEPENDENCIES		STATUS
test	kubeless	test.dump	python3.6
So now, we need to have this function be triggered by the NATS messages. To do that, we add a trigger:
kubeless trigger nats create test –function-selector created-by=kubeless,function=test –trigger-topic k8s_events -n kubeless
What’s going on here?
- We create a trigger with
nametest function-selector: use labels created by kubeless function to select the function to runtrigger-topic: specify a trigger topic of k8s_events (which is specified in the event publisher from earlier)- Same namespace!
Okay, so now, let’s cycle the event publisher and test things out!
# delete the current nats event pods
# this will readd all the pods and republish them
kubectl delete po -l app=kubeless-nats-events -n kubeless# read the pod logs from the kubeless function we created
k logs -l function=test -n kubeless
You should see something like this as an output log:
{‘data’: {‘type’: ‘MODIFIED’, ‘object’: {‘kind’: ‘Pod’, ‘apiVersion’: ‘v1’, ‘metadata’: {‘name’: ‘nats-trigger-controller-66df75894b-mxppc’, ‘generateName’: ‘nats-trigger-controller-66df75894b-‘, ‘namespace’: ‘kubeless’, ‘selfLink’: ‘/api/v1/namespaces/kubeless/pods/nats-trigger-controller-66df75894b-mxppc’, ‘uid’: ’01ead80a-d0ef-11e8-8e5f-42010aa80fc2′, ‘resourceVersion’: ‘16046597’, ‘creationTimestamp’: ‘2018-10-16T02:55:58Z’, ‘labels’: {‘kubeless’: ‘nats-trigger-controller’, ‘pod-template-hash’: ‘2289314506’}, ‘ownerReferences’: [{‘apiVersion’: ‘extensions/v1beta1’, ‘kind’: ‘ReplicaSet’, ‘name’: ‘nats-trigger-controller-66df75894b’, ‘uid’: ’01e65ec2-d0ef-11e8-8e5f-42010aa80fc2′, ‘controller’: True, ‘blockOwnerDeletion’: True}]}, ‘spec’: {‘volumes’: [{‘name’: ‘controller-acct-token-dwfj5’, ‘secret’: {‘secretName’: ‘controller-acct-token-dwfj5’, ‘defaultMode’: 420}}], ‘containers’: [{‘name’: ‘nats-trigger-controller’, ‘image’: ‘bitnami/nats-trigger-controller:v1.0.0-alpha.9’, ‘env’: [{‘name’: ‘KUBELESS_NAMESPACE’, ‘valueFrom’: {‘fieldRef’: {‘apiVersion’: ‘v1’, ‘fieldPath’: ‘metadata.namespace’}}}, {‘name’: ‘KUBELESS_CONFIG’, ‘value’: ‘kubeless-config’}, {‘name’: ‘NATS_URL’, ‘value’: ‘nats://nats-cluster.nats-io.svc.cluster.local:4222’}], ‘resources’: {}, ‘volumeMounts’: [{‘name’: ‘controller-acct-token-dwfj5’, ‘readOnly’: True, ‘mountPath’: ‘/var/run/secrets/kubernetes.io/serviceaccount’}], ‘terminationMessagePath’: ‘/dev/termination-log’, ‘terminationMessagePolicy’: ‘File’, ‘imagePullPolicy’: ‘IfNotPresent’}], ‘restartPolicy’: ‘Always’, ‘terminationGracePeriodSeconds’: 30, ‘dnsPolicy’: ‘ClusterFirst’, ‘serviceAccountName’: ‘controller-acct’, ‘serviceAccount’: ‘controller-acct’, ‘nodeName’: ‘gke-lbr-default-pool-3071fe55-kfm6’, ‘securityContext’: {}, ‘schedulerName’: ‘default-scheduler’, ‘tolerations’: [{‘key’: ‘node.kubernetes.io/not-ready’, ‘operator’: ‘Exists’, ‘effect’: ‘NoExecute’, ‘tolerationSeconds’: 300}, {‘key’: ‘node.kubernetes.io/unreachable’, ‘operator’: ‘Exists’, ‘effect’: ‘NoExecute’, ‘tolerationSeconds’: 300}]}, ‘status’: {‘phase’: ‘Running’, ‘conditions’: [{‘type’: ‘Initialized’, ‘status’: ‘True’, ‘lastProbeTime’: None, ‘lastTransitionTime’: ‘2018-10-16T02:55:58Z’}, {‘type’: ‘Ready’, ‘status’: ‘True’, ‘lastProbeTime’: None, ‘lastTransitionTime’: ‘2018-10-16T02:56:00Z’}, {‘type’: ‘PodScheduled’, ‘status’: ‘True’, ‘lastProbeTime’: None, ‘lastTransitionTime’: ‘2018-10-16T02:55:58Z’}], ‘hostIP’: ‘10.168.0.5’, ‘podIP’: ‘10.36.14.29’, ‘startTime’: ‘2018-10-16T02:55:58Z’, ‘containerStatuses’: [{‘name’: ‘nats-trigger-controller’, ‘state’: {‘running’: {‘startedAt’: ‘2018-10-16T02:55:59Z’}}, ‘lastState’: {}, ‘ready’: True, ‘restartCount’: 0, ‘image’: ‘bitnami/nats-trigger-controller:v1.0.0-alpha.9’, ‘imageID’: ‘docker-pullable://bitnami/nats-trigger-controller@sha256:d04c8141d12838732bdb33b2890eb00e5639c243e33d4ebdad34d2e065c54357’, ‘containerID’: ‘docker://d9ff52fa7e5d821c12fd910e85776e2a422098cde37a7f2c8054e7457f41aa1e’}], ‘qosClass’: ‘BestEffort’}}}, ‘event-id’: ‘YMAok3se6ZQyMTM’, ‘event-type’: ‘application/json’, ‘event-time’: ‘2018-10-16 02:56:00.738120124 +0000 UTC’, ‘event-namespace’: ‘natstriggers.kubeless.io’, ‘extensions’: {‘request’: }}
This is the modification event for the pod you just cycled. Awesome!
Publish the event to slack
Okay, so now you’ve got some events being shipped, it’s time to get a little bit more creative. Let’s publish some of these events to slack.
You can create a slack.py with your function in, like so:
#!/usr/bin/env python
from slackclient import SlackClient
import osdef slack_message(event, context):
try:
# Grab the slack token and channel from the environment vars
slack_token = os.environ.get(‘SLACK_TOKEN’, None)
slack_channel = os.environ.get(‘SLACK_CHANNEL’, None)
if not slack_token:
msg = ‘No slack token set, can\’t do anything’
print(msg)
return msg
else:
# post a slack message!
sc = SlackClient(slack_token)
sc.api_call(
“chat.postMessage”,
channel=slack_channel,
attachments=[ { “title”: event[‘data’][‘type’]+” Pod event”, “text”: str(event) } ]
)print(event)except Exception as inst:
print(type(inst))
print(inst)
print(event.keys())
print(type(event))
print(str(event))
You’ll need to deploy your function using the kubeless binary:
export SLACK_TOKEN=
export SLACK_CHANNEL=kubeless function deploy slack –runtime python3.6 –handler slack.slack_message –from-file slack.py -n kubeless –env SLACK_TOKEN=$SLACK_TOKEN –env SLACK_CHANNEL=$SLACK_CHANNEL –dependencies requirements.txt
The only thing you might be confused about here is the --dependencies file. Kubeless uses this to determine which dependencies you need to install for the function runtime. In the python case, it’s a requirements.txt. You can find a working one in the related github repo linked to this post. This example better formats the slack responses into nice slack output, so it’s worth taking a look at.
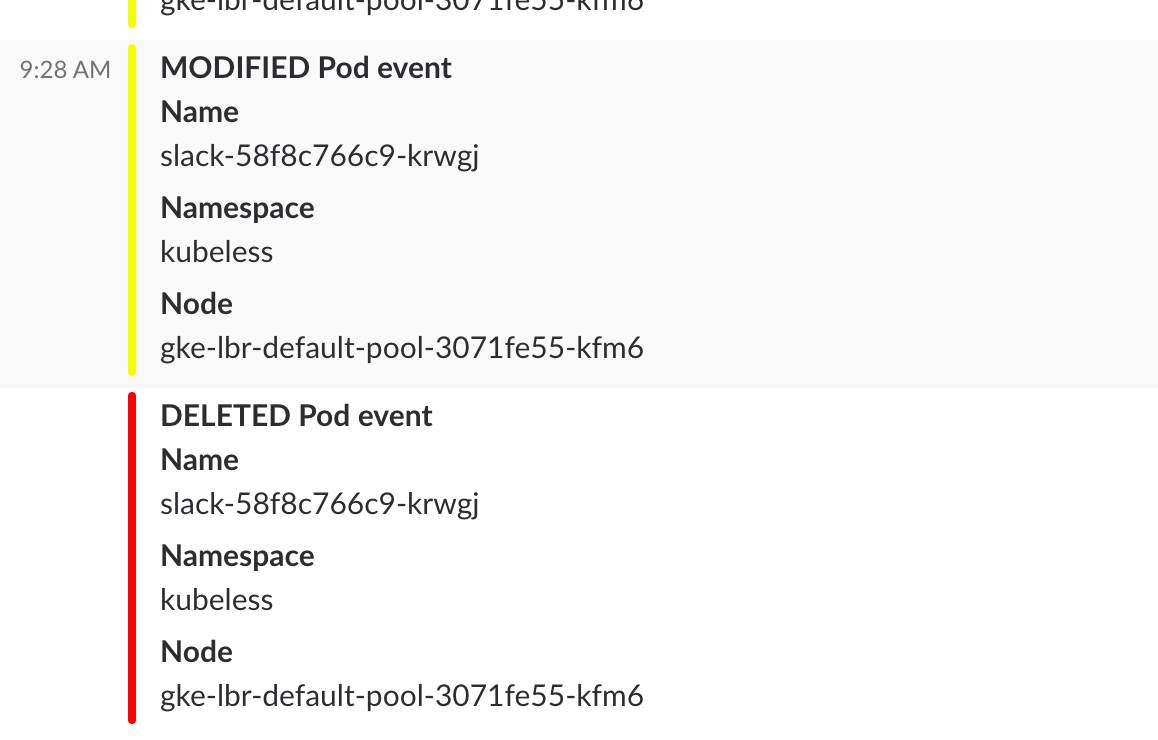
You’ll obviously need a slack org to try this out, and need to generate a slack token to get API access. However, now, once you cycle the events pod again (or, run another pod of course!) – you’ll now see these events pushed to slack!
Wrap up
Obviously this is a trivial example of using these functions, but the power of the event pipeline with kubeless is there to be seen. Anything you might need to happy when certain events happen in your Kubernetes cluster can be automated using this Kubeless event pipeline. You can check out all the code, deployment and manifests for this post in the github repo that accompanies this post. Pull requests and feedback on my awful Python code are also welcome!
This article originated from http://leebriggs.co.uk///blog/2018/10/16/using-kubeless-for-kubernetes-events.html
Lee Briggs is a Tigera guest blogger. He is an experienced DevOps Engineer Specialties: Redhat, Unix, Linux, , Monitoring, Kubernetes, AWS,Containers, Hashicorp, DevOps, SRE
————————————————-
Free Online Training
Access Live and On-Demand Kubernetes Tutorials
Calico Enterprise – Free Trial
Solve Common Kubernetes Roadblocks and Advance Your Enterprise Adoption
Join our mailing list
Get updates on blog posts, workshops, certification programs, new releases, and more!